
Navigating Heat-Resistance with Fabric Glue: Options and Considerations
Working with fabric often requires a reliable adhesive to ensure that materials stay put. Fabric glue is a common choice for its ease of use and efficiency. However, different projects demand different features from fabric glue, especially when heat resistance is a critical factor. Whether you are crafting, repairing, or designing, understanding heat-resistant fabric glue options and considerations is essential.
Understanding Fabric Glue
What is Fabric Glue?
Fabric glue is a specialized adhesive designed to bond fabric to fabric or fabric to other materials. Unlike traditional glues, fabric glue remains flexible when dry, preventing it from cracking or breaking. It serves as a convenient alternative to sewing, making it highly popular among crafters, DIY enthusiasts, and professional designers alike.
Why Heat Resistance Matters
Not all fabric glue is created equal. Heat resistance is a key factor, particularly for projects exposed to high temperatures. Consider items like pot holders, ironing board covers, or outdoor fabrics under direct sunlight. These projects demand glue that won’t break down or lose its adhesive properties when exposed to heat.
Types of Fabric Glue
There are two main types of fabric glue: permanent and temporary. Permanent fabric glue creates a lasting bond and is difficult to remove once dry. Temporary fabric glue, on the other hand, allows for repositioning or easy removal before finalizing the design. Heat-resistant options are crucial for both, as high temperatures can affect adhesion.
Common Uses for Heat-Resistant Fabric Glue
Heat-resistant fabric glue is versatile. It’s ideal for items like quilts, costumes, and home decor projects. It can also be useful in fashion repair, like hemming pants or fixing torn seams. Its heat-resistant properties make it a go-to for projects exposed to heat, ensuring longevity and durability.
Options for Heat-Resistant Fabric Glue
Popular Brands and Products
Several brands offer heat-resistant fabric glue, each with its own unique features. Aleene’s Platinum Bond Adhesive, for example, is known for its strong, heat-resistant properties. It bonds fabric effectively, making it suitable for heavy materials and heat-prone projects. Another reliable option is Beacon Fabri-Tac, which is highly favored for its quick-drying and heat-resistant capabilities.
Heat-Activated Fabric Glue
Some fabric glues require heat to activate. These are ideal for projects where a strong, permanent bond is necessary. Heat-activated fabric glue often comes in sheets or tapes, applied to fabrics with an iron. The heat melts the adhesive into the fabric, creating a durable bond. This type of glue is excellent for projects like patches, appliqués, and adding embellishments to garments.
Heat Resistant Spray Adhesives
Spray adhesives are another option for those dealing with fabric projects exposed to heat. These sprays provide a thin, even layer of adhesive that works well for larger surfaces. 3M Super 77 is a commonly used spray adhesive known for its strong bond and heat resistance. However, it is essential to use such products in well-ventilated areas to avoid inhaling fumes.
DIY Heat-Resistant Fabric Glue
While commercial options are widely available, some DIY enthusiasts prefer creating their own heat-resistant fabric glue. Recipes often include ingredients like natural latex, vinegar, and cornstarch. The advantage of homemade glue is the control over the ingredients, ensuring a non-toxic and environmentally-friendly product. However, it might lack the durability of commercial alternatives.
Considerations When Choosing Fabric Glue
Fabric Type and Weight
Different fabrics require different adhesive strengths. Lightweight fabrics like silk or chiffon need a gentle adhesive that won’t damage the fibers. Heavyweight fabrics like denim or canvas, conversely, require stronger glue. It’s essential to choose a fabric glue that suits the weight and type of fabric you’re working with.
Heat Exposure Duration and Intensity
The duration and intensity of heat exposure play a significant role in selecting the right glue. Fabrics exposed to high temperatures for prolonged periods need glue with high heat resistance. Consider items like oven mitts or outdoor banners, which will experience intense and ongoing heat. Ensure the glue can withstand these conditions without losing its adhesion properties.
Drying Time and Application Process
The drying time of fabric glue varies significantly between products. Some glues dry almost instantly, while others may take several hours. Consider the project timeline and the working conditions. For fast-paced projects, quick-drying glue is preferable. Pay attention to the application process as well. Some glues require ironing or heat application, which may not be convenient for all projects.
Washing and Durability
Not all fabric glue is washable. Projects intended for frequent use and washing require glue that withstands water and detergents. Check the product specifications for “washable” or “launderable” features. Durability is crucial for items that will endure frequent handling, stretching, and folding. Ensure the glue maintains its adhesive properties under these conditions.
Application Techniques for Optimal Results
Preparing the Fabric Surface
Proper preparation of the fabric surface ensures optimal adhesion. Clean the fabric thoroughly before applying glue to remove any dirt or oils that might interfere with bonding. If possible, iron the fabric to remove wrinkles and create a smooth working surface. Test a small area first to ensure the glue does not damage or discolor the fabric.
Applying the Glue Evenly
Applying fabric glue in an even layer is crucial for a strong bond. Use a brush or applicator suitable for the glue type. For spray adhesives, hold the can at an appropriate distance to ensure an even coat. For liquid glue, squeeze out a small amount and spread evenly with a brush or spatula. Avoid using excessive glue, as it can seep through the fabric and create a mess.
Curing and Drying
Allow the glue sufficient drying time before handling the fabric. Follow the manufacturer’s instructions regarding curing times. For heat-activated glues, apply heat as recommended, typically using an iron. Ensure the glue is fully cured before subjecting the fabric to stress or washing. Rushing this process can weaken the bond, causing the glue to fail.
Testing the Bond Strength
Testing the bond strength before finalizing the project can save time and resources. Gently tug on the glued area to ensure it holds firmly. For items that will undergo heavy use, conduct a stress test by simulating the conditions the fabric will face. Adjust your technique or choose a different glue if the bond is weak.
Alternatives to Fabric Glue
Sewing
Sewing remains the most traditional and reliable method for joining fabrics. It offers a strong, durable bond that withstands heat and washing. For those skilled with a needle and thread, sewing is a preferred option. However, it requires more time and effort than using glue. Sewing machines can expedite the process, making it suitable for larger projects.
Fabric Tape
Fabric tape is a quick alternative to fabric glue. It’s easy to use and provides a strong bond. Fabric tapes come in various forms, including fusible tape that requires heat to bond and adhesive-backed tapes for simple press-and-stick applications. Fabric tape works well for hemming, mending, and small projects.
Velcro and Snap Fasteners
Velcro and snap fasteners offer an alternative to fabric glue for projects that require frequent opening and closing. They are easy to attach and provide a strong hold. Velcro is ideal for items like bags, cushions, or removable covers. Snap fasteners work well for clothing and accessories. Both options are heat-resistant and durable.
Hot Glue
Hot glue is another adhesive option, often used in crafting. While not all hot glue sticks are suitable for fabric, there are specific variants designed for textile use. Hot glue guns provide a strong bond and are relatively quick to apply. However, the bond might not be as flexible as fabric glue, and the heat from the glue gun itself can damage delicate fabrics.
Safety Considerations
Ventilation and Protective Gear
When working with fabric glue, proper ventilation is essential. Many adhesives emit fumes that can be harmful if inhaled. Work in a well-ventilated area and, if necessary, use protective gear like masks and gloves. Follow all safety instructions provided by the manufacturer to minimize health risks.
Heat Source Safety
If using heat-activated glue, take precautions with the heat source. Irons and heat tools can cause burns or fire hazards if not used properly. Always follow the recommended heat settings and never leave a heat source unattended. Keep heat tools away from flammable materials and ensure they are placed on heat-resistant surfaces.
Storage and Disposal
Store fabric glue in a cool, dry place, away from direct sunlight and heat sources. Proper storage ensures the glue maintains its adhesive properties over time. Dispose of empty glue containers and any leftover adhesive according to local regulations. Many adhesives contain chemicals that should not be poured down drains or discarded with regular trash.
First Aid Measures
Accidents can happen, so it’s vital to know the first aid measures for dealing with glue-related injuries. If glue contacts your skin, gently peel it off and wash the area with soap and water. If it gets into your eyes, rinse immediately with plenty of water and seek medical attention. For inhaled fumes causing dizziness or nausea, move to an area with fresh air and seek medical help if symptoms persist.
Conclusion: Making an Informed Choice
Navigating the world of heat-resistant fabric glue involves understanding your project requirements and the characteristics of various glue types. With numerous options available, making an informed choice ensures you achieve the desired results without compromising the integrity of your fabric. Considering factors like fabric type, heat exposure, drying time, and washing durability will guide you to the right adhesive.
In 2024, Whether opting for commercial products like Aleene’s Platinum Bond Adhesive or DIY solutions, proper application techniques are crucial for achieving a strong bond. Alternatives like sewing, fabric tape, Velcro, and hot glue offer viable options when fabric glue is not suitable. Prioritizing safety, including proper ventilation, heat source management, and first aid knowledge, ensures a smooth and hazard-free crafting experience.
Ultimately, the right heat-resistant fabric glue enhances the functionality and durability of your fabric projects. By making an informed choice, you ensure that your creations withstand the test of time, heat, and use. Whether crafting a quilt, repairing clothing, or designing home decor, the right adhesive can make all the difference. So, take the time to evaluate your options and choose the fabric glue that best meets your needs.

How to Remove Grout Without Power Tools
Exploring Traditional Techniques for Removing Grout without Power Tools
Harnessing Manual Methods for Precise and Effective Grout Removal
When faced with the task of removing grout without power tools, traditional methods offer a reliable alternative that relies on manual labor and simple tools. While power tools may expedite the process, traditional techniques provide a more controlled approach. And allowing for precise removal without the risk of damaging surrounding tiles or surfaces.
How to soften grout?
Method1
One of the most common traditional methods for removing grout is the use of a grout saw or grout rake. These handheld tools feature small, sharp blades or carbide-tipped edges that allow users to carefully scrape away old grout from between tiles. By manually guiding the saw along grout lines, individuals can remove targeted sections of grout with precision. And ensuring minimal disruption to adjacent tiles.

Method2
Another traditional technique involves the use of a utility knife or a putty knife with a narrow blade. By carefully inserting the blade into the grout lines and applying controlled pressure, individuals can loosen and remove old grout without the need for power tools. This method requires patience and precision but can be highly effective, especially for small or intricate areas.
Method3-How to remove grout without power tools?
Additionally, manual scraping using a flathead screwdriver or a similar tool can be effective for removing stubborn grout residue. By gently working the edge of the tool along the grout lines, individuals can gradually loosen and dislodge old grout, allowing for thorough removal without the use of power tools. This method may require more time and effort compared to power tools but offers greater control over the removal process.
Will vinegar soften grout?
Furthermore, soaking the grout lines with a commercial grout remover solution or a homemade mixture of vinegar and water can help soften the grout and make it easier to remove manually. By applying the solution to the grout lines and allowing it to penetrate for a period of time, individuals can then use manual tools to scrape away the softened grout, facilitating the removal process without the need for power tools.
Chemical Solutions
Utilizing Chemical Solutions for Grout Removal without Power Tools
Leveraging Solvents and Solutions to Ease Grout Removal Efforts
In situations where manual methods may be impractical or time-consuming, chemical solutions offer an alternative approach for removing grout without power tools. These solvents and solutions are designed to break down grout and facilitate its removal, making the process more efficient and less labor-intensive.
Solution 1
One common chemical solution used for grout removal is a commercial grout remover or cleaner. These products typically contain acidic or alkaline ingredients that help dissolve and loosen grout, making it easier to scrape away using manual tools. By applying the remover to the grout lines and allowing it to penetrate for a specified period, individuals can then use handheld tools to remove the softened grout with minimal effort.
Solution2
Another chemical solution that can aid in grout removal is a mixture of vinegar and water. Vinegar is mildly acidic and can help break down grout residue when applied directly to the affected areas. By soaking the grout lines with a mixture of vinegar and water and allowing it to sit for a period of time, individuals can then use manual tools to scrape away the softened grout, facilitating its removal without the need for power tools.
solution3
Additionally, oxygen bleach or hydrogen peroxide solutions can be effective for removing grout stains and residue without the use of power tools. These solutions work by breaking down organic matter and lifting stains from the grout surface, making it easier to clean and remove manually. By applying the solution to the grout lines and allowing it to sit for a period of time, individuals can then use manual tools to scrub away the softened grout and achieve a clean, refreshed appearance.
Furthermore, enzyme-based cleaners can be used to break down grout residue and organic matter without the use of harsh chemicals. These cleaners contain enzymes that target and digest organic compounds, including mold, mildew, and grout residue, making them easier to remove manually. By applying the cleaner to the affected areas and allowing it to sit for a specified period, individuals can then use manual tools to scrub away the softened grout and achieve a thorough clean without the need for power tools.
Heat Application
Applying Heat for Efficient Grout Removal without Power Tools
Heat application is a lesser-known but highly effective method for removing grout without power tools. By applying heat to the grout lines, individuals can soften the grout and make it easier to remove manually, reducing the need for excessive force or specialized equipment.
One common method of applying heat for grout removal is the use of a heat gun or hairdryer. By directing the heat gun or hairdryer along the grout lines at a moderate temperature, individuals can gradually soften the grout without damaging surrounding tiles or surfaces. Once the grout has been heated sufficiently, it becomes easier to scrape away using manual tools, such as grout saws or utility knives.
Another heat application technique involves the use of a steam cleaner or steam mop. These devices utilize high-temperature steam to penetrate and soften grout, making it easier to remove manually. By directing the steam nozzle along the grout lines and allowing the steam to penetrate for a period of time, individuals can then use manual tools to scrape away the softened grout with minimal effort.
Natural Remedies
Exploring Natural Remedies for Grout Removal without Power Tools
Natural remedies offer a simple and eco-friendly approach to grout removal without the need for power tools or harsh chemicals. By utilizing common household items and simple techniques, individuals can effectively remove grout and achieve professional results with minimal environmental impact.
One of the most common natural remedies for grout removal is the use of baking soda and water paste. By mixing baking soda with water to form a thick paste and applying it to the grout lines, individuals can create a gentle abrasive that helps loosen and remove grout residue. After allowing the paste to sit for a period of time, individuals can then use manual tools, such as a scrub brush or toothbrush, to scrub away the softened grout and achieve a clean finish.
Another natural remedy for grout removal is the use of lemon juice or vinegar. These acidic substances can help break down grout residue and make it easier to remove manually. By applying lemon juice or vinegar directly to the grout lines and allowing it to sit for a period of time, individuals can then use manual tools to scrub away the softened grout and achieve professional results without the need for power tools or harsh chemicals.
Preventive Measures for Minimizing Grout Removal without Power Tools
Removing grout without power tools can be a painstaking process. It requires precision, patience, and the correct techniques to avoid damaging surrounding tiles. However, adopting preventive measures can minimize the need for frequent grout removal, extending the life of your grout and preserving the aesthetics of your tiled surfaces. This part discusses various strategies to maintain grout longevity, offers techniques for manual grout removal, and highlights safety precautions to take during the process.
Understanding Grout and Its Vulnerabilities
The Role of Grout
Grout is a cement-based substance used to fill gaps between tiles. It stabilizes tiles, prevents water infiltration, and enhances the overall appearance of tiled surfaces. However, grout is porous and can be susceptible to staining, cracking, and mold growth if not properly maintained.
Common Issues
- Staining: Grout is prone to accumulating dirt, grime, and stains, especially in high-traffic areas.
- Cracking: Temperature fluctuations and incorrect installation techniques can cause grout to crack over time.
- Mold and Mildew: Due to its porous nature, grout can absorb moisture. And leading to mold and mildew growth, particularly in damp areas like bathrooms and kitchens.
- Erosion: Cleaning agents and physical wear can erode grout, reducing its lifespan.
Preventive Measures for Grout Longevity
Proper Installation Techniques
From the outset, proper installation of grout sets the stage for its durability.
Choosing High-Quality Grout
- Epoxy Grout: Consider using epoxy grout for its superior durability, stain resistance, and water resistance compared to traditional cement-based grout.
- Sealed Grout: Use pre-mixed grout that comes with built-in sealants for added protection.
Correct Mixing and Application
- Consistent Mixing: Follow manufacturer instructions for mixing grout. Inconsistent mixing can weaken grout and lead to cracks.
- Proper Application: Apply grout evenly and ensure it fully fills the joints. Use a grout float at a 45-degree angle to press the grout into the gaps effectively.
Regular Cleaning and Maintenance
Routine cleaning and maintenance are crucial in extending grout lifespan.
Gentle Cleaning Agents
- Mild Detergents: Use pH-neutral or mild detergent solutions for regular cleaning to avoid damaging the grout.
- Avoid Harsh Chemicals: Steer clear of bleach and acidic cleaners that can erode grout over time.
Sealing the Grout
- Regular Sealing: Seal grout annually to create a protective barrier against stains and moisture. Ensure the surface is clean and dry before applying the sealant.
- Penetrating Sealers: Consider using penetrating sealers that get absorbed into the grout, providing more comprehensive protection compared to surface sealers.
Prompt Stain Treatment
- Immediate Cleaning: Clean spills and stains immediately to prevent them from seeping into the grout.
- Stain Removers: Utilize grout-safe stain removers for tougher stains without damaging the grout.
Environmental Control
Controlling the environment around your tiled surfaces can prevent grout deterioration.
Humidity and Ventilation
- Ventilation: Ensure good ventilation in areas prone to moisture, like bathrooms, to prevent mold and mildew growth.
- Dehumidifiers: Use dehumidifiers in damp areas to maintain lower humidity levels, reducing moisture buildup in the grout.
Temperature Regulation
- Avoid Rapid Temperature Changes: Sudden temperature fluctuations can cause grout to expand and contract, leading to cracks. Maintain stable indoor temperatures to avoid such issues.
Techniques for Manual Grout Removal
Sometimes, despite preventive measures, grout removal becomes necessary. Knowing manual techniques can save you from over-reliance on power tools.
Tools for Manual Grout Removal
Using the right tools ensures precision and efficiency.
Grout Removal Tools
- Grout Saw: A manual grout saw with a carbide blade can help you cut through grout lines with precision.
- Grout Rake: Ideal for thinner grout lines, a grout rake can effectively scrape away grout without damaging surrounding tiles.
- Utility Knife: For detailed work, a utility knife can be used to score and remove grout in tight spaces.
Safety Equipment
- Protective Glasses: Wear safety glasses to protect your eyes from flying debris.
- Dust Mask: Use a dust mask to avoid inhaling grout dust particles.
- Gloves: Wear gloves to prevent blisters and protect your hands during the process.
Manual Grout Removal Process
Preparation
- Clear the Area: Remove any furniture or obstacles around the work area to provide clear access.
- Clean the Surface: Clean the tiled surface to remove any dirt or debris that might interfere with the grout removal process.
Scoring the Grout Lines
- Mark the Area: If removing grout from a specific section, mark the grout lines to avoid removing more than necessary.
- Use a Utility Knife: Score along the grout lines with a utility knife to create a guide for further removal.
Removing the Grout
- Start with a Grout Saw: Use a grout saw to cut along the scored lines. And applying even pressure to avoid damaging the tiles.
- Switch to a Grout Rake: For finer control, switch to a grout rake and carefully remove the remaining grout. Use short, controlled strokes to avoid slipping and scratching the tiles.
- Repeat as Necessary: Continue removing grout, working systematically to ensure all the grout is removed evenly.
Finishing Touches
- Clean the Surface: After removing the grout, clean the area with a damp sponge to remove any remaining grout particles.
- Inspect for Residual Grout: Check for any missed spots and remove them with a utility knife or grout rake.
Safety Precautions
Safety should be a priority when working on grout removal projects.
Proper Ventilation
Ensure good ventilation in your work area to prevent dust and fumes from accumulating.
- Open Windows: Open windows or use a fan to circulate fresh air during the removal process.
- Use Air Purifiers: Consider using air purifiers with HEPA filters to trap fine dust particles.
Handling Tools Safely
Using tools correctly minimizes the risk of injury.
- Correct Grip: Hold tools with a firm grip to maintain control and avoid slipping.
- Controlled Force: Apply steady, controlled force to tools to prevent them from slipping and damaging tiles or injuring yourself.
Avoiding Prolonged Exposure
Manual grout removal can be physically demanding. Avoid prolonged exposure to minimize strain on your body.
- Take Breaks: Take regular breaks to rest your hands and avoid fatigue.
- Alternate Hands: If possible, alternate hands to distribute the workload evenly and reduce strain on one hand.

Conclusion
While removing grout manually without power tools can be challenging. And adopting preventive measures can minimize the frequency and necessity of grout removal. Ensuring proper installation, regular maintenance, and environmental control can extend the life of your grout and maintain the beauty of your tiled surfaces. When manual grout removal is unavoidable, using the right tools and techniques, paired with a strong focus on safety. And will make the process more manageable and less hazardous.
By taking a proactive approach to grout care and learning effective manual removal techniques, you can preserve the integrity of your tiled surfaces and enjoy a clean, well-maintained space in 2024. Whether you’re a DIY enthusiast or a seasoned homeowner, these tips and strategies will help you keep your grout in top condition and tackle any necessary removal projects with confidence.

Different Types of Box Cutters: Exploring Blade Styles and Designs
The box cutter is an essential tool for many people, from warehouse workers to DIY enthusiasts. Its utility extends beyond merely opening boxes. It can slice through various materials with ease and precision. Understanding the different types of box cutters, especially the various blade styles and designs, can help you choose the right tool for your needs. This exploration dives deep into the world of box cutters, providing insights into the most popular types and their specific applications.
A Brief History of Box Cutters
Origins and Evolution
Box cutters have been around for a long time. Initially, they were simple blades used for cutting twine and rope. As packaging materials evolved, so did the tools to open them. The modern box cutter emerged in the 20th century. Companies developed specialized blades that could easily slice through cardboard and other packing materials. In 2024, the box cutter is a versatile tool with many different designs and functionalities.
Importance in Various Industries
Box cutters are indispensable in various industries. In warehouses and fulfillment centers, workers use them daily to open packages and prepare goods for shipment. Retail employees rely on them for stocking shelves. In construction, box cutters cut various materials, including insulation, drywall, and carpet. The tool’s versatility makes it an essential item in many work environments, and even for home use.

Basic Components of a Box Cutter
The Blade
The blade is the most critical part of a box cutter. It needs to be sharp, durable, and designed for specific tasks. Different materials and coatings enhance the blade’s performance. High-carbon steel blades offer sharpness and durability, while stainless steel ones resist rust and corrosion.
The Handle
The handle provides grip and control. Ergonomics is essential, especially for those who use box cutters extensively. A well-designed handle reduces hand fatigue and enhances precision. Materials such as plastic, metal, and rubber improve grip and durability.
Safety Features
Safety is a significant consideration in the design of box cutters. Features such as retractable blades, safety locks, and guardrails help prevent accidents. Auto-retracting blades ensure the blade retracts after use, reducing the risk of accidental cuts.
Types of Box Cutters
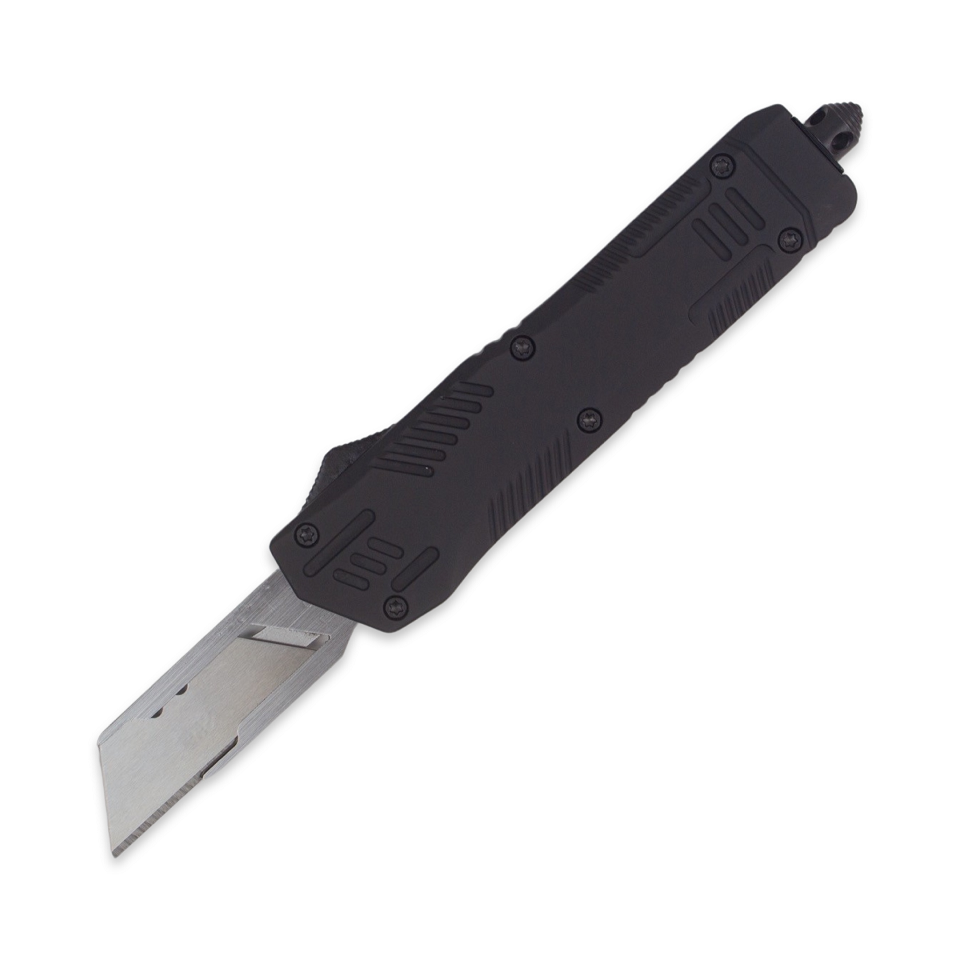
Retractable Box Cutters
Retractable box cutters are incredibly popular. They feature a blade that slides in and out of the handle. Users can adjust the blade length according to the task at hand. When not in use, the blade retracts into the handle, enhancing safety.
Fixed Blade Box Cutters
Fixed blade box cutters have a blade permanently exposed. Their design makes them robust and durable. However, they pose a higher risk of accidental cuts and need careful handling. These are ideal for heavy-duty tasks where a consistent blade length is required.
Snap-Off Blade Cutters
Snap-off blade cutters are unique. They contain a segmented blade. As the blade becomes dull, the user snaps off the used segment, revealing a sharp new edge. This design is convenient for those who need a consistently sharp blade without frequent replacements.
Blade Styles and Materials
Stainless Steel Blades
Stainless steel blades are popular due to their rust resistance. They are suitable for environments where the blade may be exposed to moisture. While they may not be as sharp as high-carbon steel blades, their resistance to rust and corrosion makes them durable.
High-Carbon Steel Blades
High-carbon steel blades are incredibly sharp and durable. They stay sharp longer but are prone to rust if exposed to moisture. These blades are ideal for dry environments where precision cutting is required.
Ceramic Blades
Ceramic blades are less common but have their advantages. They are incredibly sharp and maintain their edge longer than metal blades. They do not rust, making them suitable for sterile or humid environments. However, they are brittle and can break under heavy pressure.
Specialty Box Cutters
Safety Box Cutters
Safety box cutters prioritize user safety. They feature auto-retracting blades that retract when not in use. Some models have fully enclosed blades, reducing the risk of accidental cuts. These are ideal for environments where safety is a primary concern.
Utility Knives
Utility knives are versatile tools. They often feature replaceable blades that can tackle various tasks beyond cutting boxes. Their robust design makes them a favorite in construction and other heavy-duty environments.
Electric Box Cutters
Electric box cutters offer convenience for high-volume cutting tasks. They use a motor to drive the blade, reducing the effort required. These are often used in warehouses and manufacturing facilities where quick and consistent cutting is needed.
Ergonomics and Comfort
Handle Design
A well-designed handle is crucial for comfort and control. Ergonomic handles reduce hand fatigue and provide a secure grip. Rubberized handles improve safety by preventing slips, especially in environments where the tool may get wet or greasy.
Weight Balance
The weight and balance of a box cutter affect its usability. A well-balanced tool provides better control and reduces strain on the wrist. Lightweight models are easier to handle but might not provide the sturdiness required for heavy-duty tasks.
Grip Material
The material of the handle plays a role in comfort and safety. Rubber grips offer superior comfort and reduce slipping. Textured plastic handles also provide a good grip but may not be as comfortable for extended use. Metal handles are durable but can become slippery if wet.
Safety Considerations
Retractable Blades and Locks
Retractable blades are a crucial safety feature. They ensure the blade is only exposed when in use. Locks further enhance safety by preventing accidental blade exposure. These features are especially important in environments where multiple people may handle the tool.
Blade Guards
Blade guards provide an additional layer of safety. They cover the blade when not in use, reducing the risk of accidental cuts. Some models feature built-in guards that deploy automatically, enhancing user safety.
Proper Storage
Proper storage is essential to maintain the safety and longevity of box cutters. Many models come with a sheath or a cover to protect the blade. Storing box cutters in a tool box or a designated drawer reduces the risk of accidental injuries.

Maintenance and Care
Cleaning the Blade
Regular cleaning maintains the blade’s performance. Wipe the blade with a soft cloth to remove adhesive and debris. For tougher build-up, use a solvent that won’t damage the blade material. Cleaning prevents drag and maintains a sharp edge.
Sharpening Practices
While some box cutters feature disposable blades, others require sharpening. Use a sharpening stone or a specialized tool designed for the blade material. Regular sharpening ensures optimal performance and prolongs the blade’s lifespan.
Replacing the Blade
Replacing the blade is crucial for maintaining cutting efficiency. Most box cutters feature replaceable blades, making the process simple. Follow manufacturer instructions to ensure the new blade is installed correctly and safely.
Environmental Impact of Box Cutters
Box cutters are ubiquitous tools that many industries and households rely on for daily tasks. From opening packages to precision cutting in various crafts, their role is indispensable. However, like many frequently used tools, box cutters have an environmental footprint that we often overlook. Understanding the environmental impact of box cutters can empower us to make more informed choices and adopt sustainable practices. This part explores the various facets of the environmental impact of box cutters, including materials, manufacturing processes, and disposal methods.
The Materials of Box Cutters
Metal Blades
Box cutter blades are generally made from metals such as stainless steel or high-carbon steel. These materials are durable and capable of maintaining a sharp edge. However, the mining and processing of metals are energy-intensive activities that contribute significantly to environmental degradation.
- Energy Consumption: Extracting and processing metals require large amounts of energy, often sourced from fossil fuels. This contributes to greenhouse gas emissions and exacerbates climate change.
- Pollution: Metal extraction processes frequently lead to water and soil pollution. Toxic byproducts from mining can harm local ecosystems and biodiversity.
- Waste: The production of metal blades involves various chemical processes that generate waste, which needs careful management to avoid environmental contamination.
Plastic and Rubber Handles
Handles of box cutters are commonly made from plastic or rubber, materials that also have significant environmental impacts.
- Plastic Production: Manufacturing plastic involves petrochemicals, which are derived from fossil fuels. The process emits harmful greenhouse gases and other pollutants.
- Disposal Issues: Plastic waste is a growing environmental concern. Improper disposal of plastic handles can contribute to land and marine pollution, where they can take decades to break down.
- Rubber Sourcing: Natural rubber production often involves deforestation and habitat destruction, while synthetic rubber, derived from petroleum, shares similar environmental drawbacks to plastic.
Manufacturing Processes
Energy Use
The assembly and manufacturing of box cutters are energy-intensive processes. Factories run on various forms of energy, including electricity and natural gas. The carbon footprint of these energy sources contributes to climate change.
- Renewable Energy: Some manufacturers are beginning to use renewable energy sources to mitigate their environmental impact. Solar, wind, and hydroelectric power are cleaner alternatives that significantly reduce greenhouse gas emissions.
Waste Management
The manufacturing process generates waste, including metal scraps, plastic remnants, and chemical byproducts. Effective waste management practices are crucial to minimizing environmental impact.
- Recycling: Industries can mitigate waste by recycling metal scraps and plastic off-cuts. However, recycling processes themselves consume energy and may have their own environmental footprints.
- Chemical Disposal: Proper disposal and treatment of chemical byproducts are essential. Without appropriate waste treatment, harmful substances can leak into the environment, causing soil and water contamination.
Environmental Degradation from Use
Frequency of Replacement
One significant environmental concern is the frequency with which box cutter blades need replacement. Blades dull over time and must be swapped out regularly, leading to continuous production and disposal cycles.
- Disposable Blades: Single-use blades contribute to a growing waste problem. While convenient, they create a substantial amount of waste over time.
- Sharpenable Blades: Some box cutters feature blades that can be sharpened, which extends their lifespan and reduces waste. However, these still require eventual replacement and proper disposal.
Misuse and Overuse
Improper use and over-utilization of box cutters can accelerate wear and tear, leading to more frequent replacements and increased waste.
- Training: Proper training on the correct use of box cutters can prolong their lifespan and reduce unnecessary replacements.
- Quality: Investing in higher quality box cutters and blades can result in longer-lasting tools that need less frequent replacement.
Disposal and Recycling
End-of-Life Disposal
Disposing of box cutters and their components presents environmental challenges.
- Metal Blades: While theoretically recyclable, metal blades pose safety hazards in municipal recycling streams. Specialized recycling programs are needed to handle this type of waste safely.
- Plastic Handles: The recycling rate for plastics remains low. Many plastic handles end up in landfills or as litter in natural environments, contributing to long-term pollution.
Recycling Programs
Some manufacturers and organizations offer recycling programs for box cutters and blades.
- Take-Back Programs: Certain brands may offer take-back programs where users can return used blades for safe disposal or recycling. These programs can help manage waste more effectively.
- Community Initiatives: Local recycling centers may have specific guidelines for disposing of box cutter components. Community awareness and proper disposal practices can play a significant role in managing environmental impact.
Sustainable Alternatives
Eco-friendly Materials
Manufacturers are increasingly exploring eco-friendly materials to reduce the environmental footprint of box cutters.
- Biodegradable Plastics: Some manufacturers are experimenting with biodegradable plastics for handles, which break down more quickly and reduce long-term pollution.
- Recycled Metals: Using recycled metals for blades can minimize the environmental impact associated with mining and metal production.
Design Innovations
Design innovations can also contribute to sustainability.
- Modular Designs: Box cutters with modular components make replacing parts easier and more efficient, reducing overall waste.
- Energy-efficient Manufacturing: Leveraging newer, more energy-efficient manufacturing technologies can reduce the carbon footprint of producing box cutters.
The Role of Consumers
Sustainable Choices
Consumers have the power to drive demand for more sustainable products.
- Brand Research: Researching and choosing brands committed to sustainability can encourage manufacturers to adopt eco-friendly practices.
- Product Lifespan: Opting for high-quality, durable box cutters reduces the frequency of replacements and overall waste.
Proper Disposal
Responsible disposal of box cutters and blades is crucial.
- Recycling Programs: Taking advantage of recycling programs ensures that materials are processed correctly and safely.
- Awareness: Staying informed about proper disposal methods helps mitigate environmental harm.

Reducing the Environmental Footprint
While box cutters may seem like minor tools, their cumulative environmental impact is significant. From materials and manufacturing to disposal and recycling, every stage of a box cutter’s life cycle involves environmental considerations. By understanding these impacts, we can take steps toward more sustainable practices.
Manufacturers can lead by adopting eco-friendly materials and energy-efficient production methods. Design innovations can further enhance sustainability, making box cutters more environmentally friendly. Consumers play a crucial role by choosing sustainable products, using tools responsibly, and disposing of them correctly.
Through collective efforts, we can reduce the environmental footprint of box cutters. This ensures that we continue to benefit from these indispensable tools without compromising the health of our planet. So, the next time you reach for your box cutter, remember the broader implications and strive to make choices that support sustainability.
Conclusion: Choosing the Right Box Cutter
Navigating the world of box cutters involves considering various factors, from blade styles and materials to safety and ergonomics. Understanding the different types of box cutters and their specific features helps in making an informed choice tailored to individual needs. Whether you prioritize safety, durability, or convenience, there’s a box cutter designed to meet your requirements.
Investing in the right box cutter enhances efficiency and safety in everyday tasks. Regular maintenance and proper storage further ensure longevity and optimal performance of the tool. By considering the various options and adhering to safe practices, you can maximize the utility of this indispensable tool in various environments.
So, next time you reach for a box cutter, remember the different styles, materials, and designs that define its utility. Choose wisely for a tool that’s not just a cutter, but an extension of your efficiency and safety in handling various cutting tasks.
Power of Metal Lathes: Metal Lathe Projects
Introduction
In the realm of metalworking, metal lathes stand as indispensable tools, capable of transforming raw metal blocks into intricate and functional components. Whether you’re a seasoned machinist or an aspiring metalworker, metal lathe projects offer an avenue to unleash creativity, hone skills, and produce valuable items for various applications in 2024.
Understanding Creative Metal Lathe Projects and Their Capabilities
Metal lathes are machines that rotate a metal workpiece, allowing a cutting tool to shape it into desired forms. They primarily function to create cylindrical or conical shapes, with the ability to perform various operations, including:
-
Turning: Removing material from the workpiece to create a smooth, rounded surface.
-
Facing: Flattening the end of a workpiece perpendicular to its axis.
-
Boring: Enlarging an existing hole or creating a new one within the workpiece.
-
Threading: Cutting helical grooves onto the workpiece to create a screw-like pattern.
-
Parting: Separating a workpiece into two distinct pieces along a defined line.
Essential Metal Lathe Tools and Accessories
To embark on your metal lathe projects, you’ll need a basic set of tools and accessories:
-
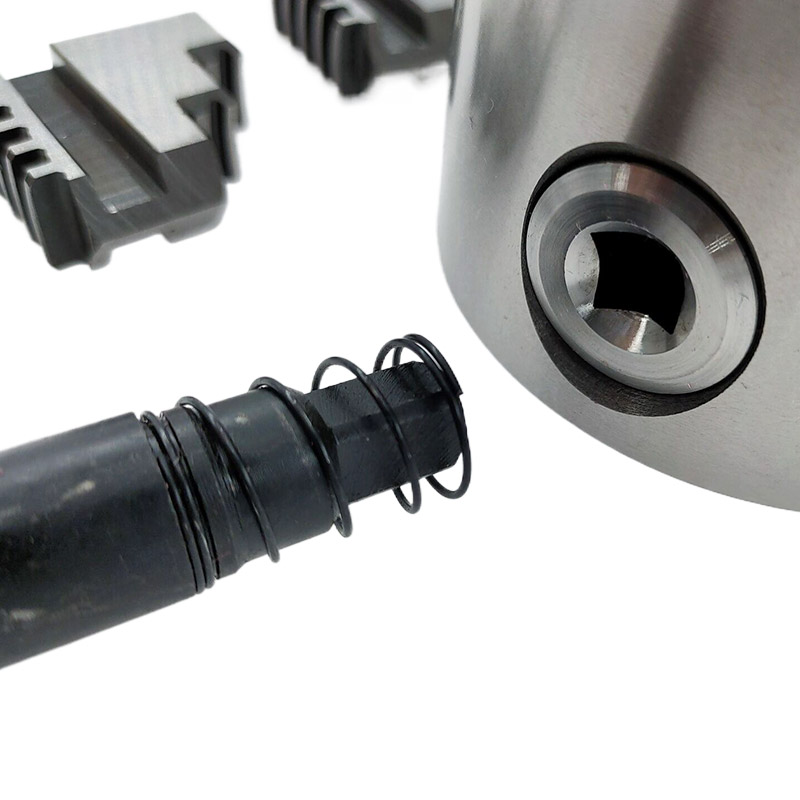
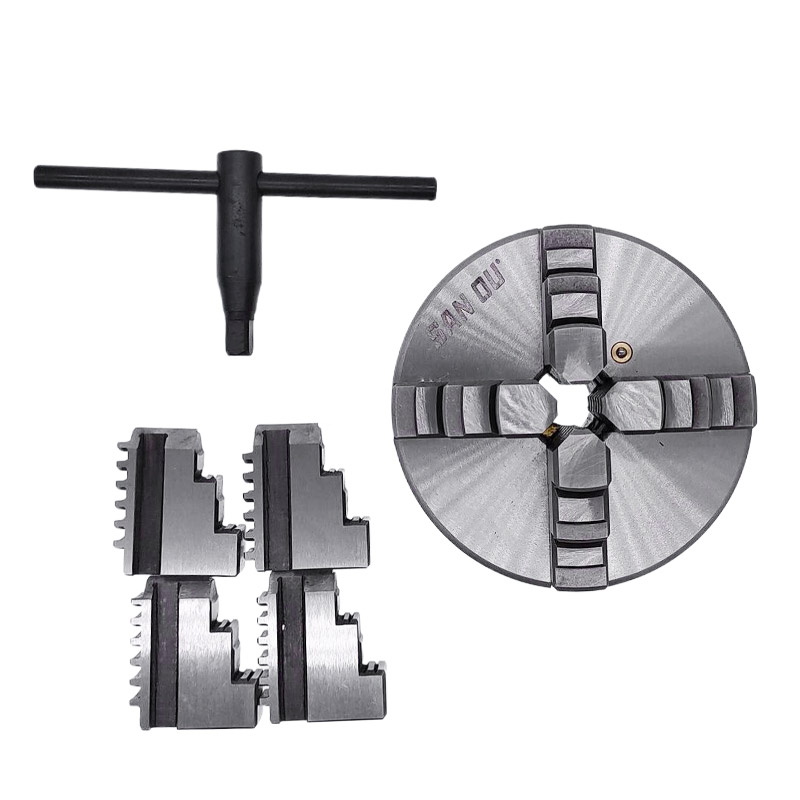
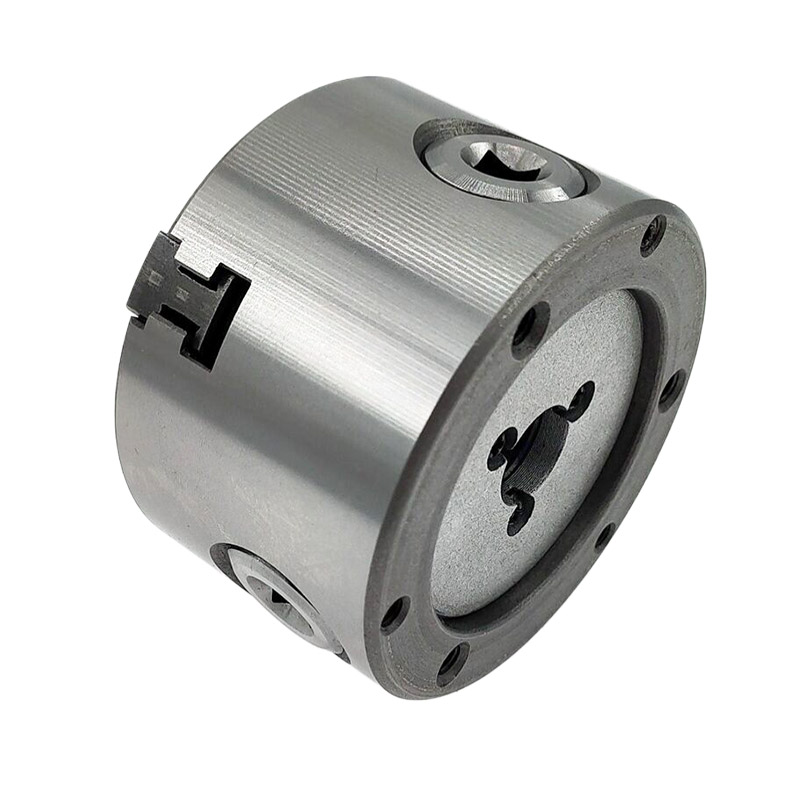
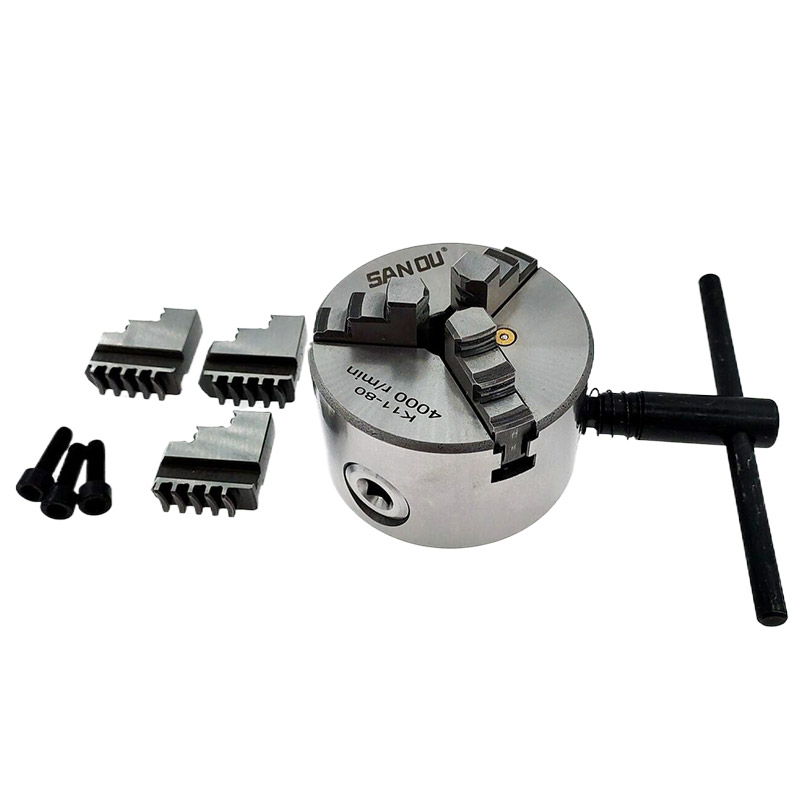
Three-Jaw Chuck: A versatile chuck for securing round workpieces of various sizes.
-
Four-Jaw Chuck: Ideal for holding irregularly shaped workpieces or those requiring more precise alignment.
-
Cutting Tools: A variety of high-speed steel (HSS) or carbide cutting tools for different turning, facing, boring, threading, and parting operations.
-
Tool Rest: A support for the cutting tool, ensuring precise control and stability during operation.
-
Measuring Tools: Calipers, micrometers, and gauges for accurate measurement and dimension control.
-
Safety Gear: Protective glasses, gloves, and a dust mask to safeguard yourself from hazards.
Types of Metal Lathes and Their Applications
Metal lathes come in various types, each suited for specific purposes:
-
Engine Lathes: The most common type, offering a versatile range of operations and suitable for both beginner and advanced projects.
-
Mini Lathes: Compact and portable, ideal for small-scale projects and hobbyists with limited workspace.
-
CNC Lathes: Computer Numerical Control (CNC) lathes provide high precision and automation for complex projects and mass production.
Choosing the Right Metal Lathe Project
When selecting a metal lathe project, consider your skill level, available tools, and desired outcome. Start with simple projects like bushings or spacers to gain confidence, then progress to more complex tasks like threading or gear cutting.
Safety Guidelines for Metal Lathe Operations
Safety is paramount when working on a metal lathe. Always follow these guidelines:
-
Secure the workpiece: Ensure the workpiece is firmly mounted in the chuck or between centers to prevent accidents.
-
Maintain proper posture: Stand with a balanced stance, knees slightly bent, and keep your hands away from rotating parts.
-
Wear appropriate PPE: Use protective glasses, gloves, and a dust mask to shield yourself from hazards.
-
Never operate the lathe while impaired: Avoid operating the lathe while under the influence of alcohol or drugs.
-
Stay alert and focused: Maintain full attention on the task at hand and avoid distractions while operating the lathe.
Basic Metal Lathe Operations for Beginners
Start with these fundamental metal lathe operations to master the basics:
-
Rough Turning: Initial shaping of the workpiece to remove excess material and establish the desired form.
-
Smoothing: Refining the surface of the workpiece to eliminate irregularities and achieve a smooth finish.
-
Detailing: Adding intricate details, such as grooves, ridges, or decorative elements, to enhance the appearance.
-
Polishing: Using abrasive compounds and polishing wheels to achieve a shiny, mirror-like finish.
Intermediate Metal Lathe Projects to Elevate Your Skills
Once you’ve mastered the basics, venture into these intermediate projects:
-
Creating a Bolt: Combine turning, facing, and threading operations to produce a functional bolt.
-
Turning a Sleeve: Shape a precise sleeve with a smooth bore and outer diameter.
-
Cutting a Taper: Learn the technique of creating a tapered form on the workpiece.
-
Making a Tool Holder: Turn a custom tool holder to organize and securely store your lathe tools.
Advanced Metal Lathe Projects for Experienced Machinists
For experienced machinists, these projects offer a challenge:
-
Turning a Gear: Produce a functional gear with precise teeth and accurate dimensions.
-
Machining a Knuckle Joint: Create a complex knuckle joint with multiple moving parts and intricate details.
-
Threading a Pipe Fitting: Master the process of threading a pipe fitting for plumbing applications.
- Making a Custom Lathe Chuck: Design and turn a custom lathe chuck for specific workpiece holding needs.
Maintaining Your Metal Lathe for Optimal Performance
Just like any tool, proper care is crucial to ensure your metal lathe’s longevity and optimal performance. Here are some maintenance practices:
- Cleaning and Lubrication: Regularly clean your lathe to remove metal chips, dust buildup, and coolant residue. Follow the manufacturer’s instructions for lubricating moving parts to prevent friction and wear.
- Sharpening Cutting Tools: Maintain sharp cutting tools for efficient and clean cuts. Learn how to sharpen your HSS or carbide tools using appropriate sharpening stones or invest in a sharpening jig.
- Tool Maintenance: Regularly inspect your cutting tools for damage, such as chipped edges or worn tips. Replace or recondition damaged tools to ensure proper operation and safety.
- Coolant System Maintenance: If your lathe utilizes a coolant system, maintain proper coolant levels and cleanliness to prevent overheating and extend tool life.
Advanced Safety Techniques for Experienced Metalworkers
As you progress in your metal lathe projects, consider incorporating these advanced safety techniques:

- Using Live Centers and Dead Centers: Learn the proper use of live centers and dead centers for longer workpieces and ensuring precise alignment during turning operations.
- Cutting Speeds and Feeds: Understand the concept of cutting speeds and feeds, selecting appropriate settings based on the material being machined and the desired outcome.
- Advanced Workholding Techniques: With experience, explore advanced workholding techniques like chucking techniques, using centers, and mandrels for specific workpiece shapes.
- Chip Control: Implement strategies for safe and efficient chip control to prevent chip accumulation in the work area and potential injuries.
The Basics of Metal Lathe Operations
Before delving into specific projects, it’s essential to understand the fundamentals of operating a metal lathe. A metal lathe is a machine tool used to shape metal, wood, or other materials by rotating the workpiece against cutting tools. The lathe’s spindle holds the workpiece, while various tools, such as cutting tools and drill bits, are used to shape and refine it. Mastery of lathe operations involves understanding spindle speed, feed rates, tool selection, and precise measurements—a blend of artistry and technical proficiency.
Crafting Precision Components: Turning and Facing
One of the most fundamental projects on a metal lathe is turning and facing. Turning involves rotating a cylindrical workpiece against a stationary cutting tool to create cylindrical shapes, such as shafts or pins. Facing, on the other hand, is the process of cutting a flat surface perpendicular to the axis of rotation. These techniques are foundational in machining and are essential for creating precise components used in various industries, from automotive to aerospace.
Creating Threads: Tapping into Functional Precision
Threads are integral to many mechanical assemblies, providing the means to secure parts together or adjust components. Metal lathes are indispensable for cutting threads, whether external or internal, using threading tools and dies. Projects involving thread cutting showcase the lathe’s ability to achieve high accuracy and repeatability, crucial for manufacturing threaded parts like bolts, nuts, and threaded rods.
Precision Boring: Enhancing Fit and Function
Boring operations on a metal lathe involve enlarging existing holes or creating precise internal diameters. This technique is vital for achieving accurate fits in mechanical assemblies, where tolerances are critical. Boring tools, such as single-point cutters or boring bars, allow machinists to achieve smooth, concentric bores that meet exact specifications. Projects involving boring highlight the lathe’s capability to refine and enhance the functionality of machined parts.
Turning Complex Shapes: From Cones to Eccentrics
Beyond simple cylindrical shapes, metal lathes excel at turning complex geometries, such as cones, spheres, and eccentric shafts. These projects require advanced techniques, including taper turning and eccentric turning, which involve adjusting the lathe’s setup to achieve non-linear profiles or varying diameters along the workpiece. Such projects not only demonstrate the lathe’s versatility but also challenge machinists to hone their skills in geometrical precision and creative problem-solving.
Restoring Vintage Machinery: Preserving Heritage with Precision
Restoration projects involving vintage machinery showcase the ultimate fusion of craftsmanship and historical preservation. Metal lathes play a crucial role in restoring worn or damaged parts of antique engines, tools, or industrial equipment. Machinists meticulously replicate original components, ensuring historical accuracy while rejuvenating functionality. These projects highlight the enduring value of metal lathes in maintaining and honoring industrial heritage.
Custom Tooling: Tailoring Solutions for Specific Needs
In many manufacturing settings, custom tooling is essential for optimizing production processes and overcoming unique challenges. Metal lathes empower machinists to fabricate custom tools, jigs, and fixtures tailored to specific manufacturing requirements. Whether it’s designing precision gauges, cutting tools, or production molds, the ability to create bespoke tooling enhances efficiency and quality in industrial applications. These projects underscore the adaptability and innovation facilitated by metal lathe technology.
Artistic Expressions: Sculpting Metal with Precision
Metalworking is not solely confined to functional components; it is also a form of artistic expression. Artists and craftsmen utilize metal lathes to sculpt intricate designs, decorative elements, and artistic forms from metal. These projects transcend traditional machining techniques, blending technical skill with creative vision to produce aesthetically pleasing and culturally significant artworks. Metal lathe artistry exemplifies the fusion of craftsmanship, innovation, and artistic ingenuity.
The Future of Metal Lathe Technology
The realm of metal lathe technology is constantly evolving, offering exciting advancements for machinists of all levels. Here’s a glimpse into what the future holds:
-
CNC Lathes with Advanced Functions: CNC lathes with even more sophisticated programming capabilities will enable complex machining with increased precision and automation.
-
Advanced Tooling Materials: New cutting tool materials with extended life and improved performance will enhance efficiency and reduce production costs.
-
Automated Safety Features: Lathes may incorporate advanced safety features like automatic shut-off mechanisms, chip ejection systems, and laser alignment tools.
-
Integration with 3D Printing: Potential integration with 3D printing technologies could offer new possibilities for rapid prototyping and hybrid manufacturing processes.
These advancements point towards a future where metal lathes become even more versatile, efficient, and safe, empowering machinists to bring their creations to life with unparalleled accuracy and sophistication.

How to clean carburetor on lawn mower
Introduction
As the heart of your lawn mower’s engine in 2024, the carburetor plays a crucial role in ensuring smooth operation and optimal performance. Responsible for mixing fuel and air to create the combustible mixture that powers the engine, a clean and functioning carburetor is essential for keeping your lawn mower running efficiently. However, over time, dirt, gum, and debris can accumulate in the carburetor’s delicate passages and jets, leading to a range of performance issues, from difficulty starting to rough idling and reduced power.
Regular carburetor cleaning is an essential part of preventive maintenance for your lawn mower, helping to extend its lifespan and maintain its peak performance. While the process may seem daunting, it can be easily accomplished with basic tools, readily available supplies, and a bit of mechanical know-how. In this comprehensive guide, we’ll walk you through the step-by-step process of cleaning your lawn mower carburetor, ensuring your engine runs smoothly and efficiently for years to come.
The Importance of Carburetor Maintenance in Lawn Mowers
Before diving into the cleaning process, it’s essential to understand the significance of maintaining your lawn mower’s carburetor. As a critical component of the engine, the carburetor is responsible for mixing fuel and air in the correct proportions, creating the combustible mixture that powers the engine. When the carburetor becomes clogged or dirty, the fuel-air mixture is disrupted, leading to a range of performance issues that can significantly impact your mowing experience.
Difficulty starting the lawn mower is a common symptom of a dirty carburetor. Even with a fully charged battery and good spark plugs, the engine may struggle to turn over due to the improper fuel-air mixture. Rough idling, characterized by an uneven or surging engine RPM, is another telltale sign of a clogged carburetor. This occurs because the carburetor is unable to regulate the fuel flow consistently, resulting in fluctuations in engine speed.
Perhaps the most noticeable consequence of a dirty carburetor is power loss. As the fuel-air mixture becomes compromised, the engine’s ability to generate power is diminished, making it difficult for the lawn mower to maintain its speed or tackle challenging mowing conditions. To prevent these performance issues and keep your lawn mower running smoothly, regular carburetor cleaning is essential.
Understanding the Signs of a Dirty Carburetor
As mentioned earlier, a dirty carburetor can manifest itself in several ways, affecting the lawn mower’s starting, idling, and overall power. Recognizing these signs early on can help you determine when it’s time to clean the carburetor and prevent further complications.
One of the most obvious signs of a dirty carburetor is difficulty starting the lawn mower. Even with a fully charged battery and good spark plugs, the engine may struggle to turn over or require repeated attempts to start. This is because the carburetor is unable to deliver the proper fuel-air mixture to the engine, making it difficult for the combustion process to initiate.
Rough idling, characterized by an uneven or surging engine RPM, is another common symptom of a clogged carburetor. This occurs because the carburetor is unable to regulate the fuel flow consistently, resulting in fluctuations in the engine’s air-fuel ratio. As the mixture varies, the engine RPM rises and falls, creating a rough and unstable idle.
Perhaps the most noticeable consequence of a dirty carburetor is power loss. As the fuel-air mixture becomes compromised, the engine’s ability to generate power is diminished. This can manifest in several ways, such as the lawn mower struggling to maintain its speed, bogging down when encountering thicker grass, or having difficulty tackling inclines. If you notice any of these signs, it’s a good indication that your lawn mower‘s carburetor needs cleaning.
How to Clean a Dirty Carburetor on a Lawn Mower
Gathering the Necessary Tools and Materials
Before embarking on the carburetor cleaning process, it’s crucial to gather the necessary tools and materials to ensure a smooth and efficient task. Safety should always be paramount, so make sure you have the appropriate protective gear, including safety glasses, gloves, and a well-ventilated workspace.
Essential tools for carburetor cleaning include a socket wrench set, screwdrivers (including a flathead screwdriver), a funnel, a container for old fuel, and a small brush for removing stubborn debris. Additionally, you’ll need carburetor cleaner, lint-free cloths or paper towels, and a clean workspace.
Locating the Carburetor
The carburetor’s location can vary depending on the specific lawn mower model and brand, so it’s important to consult your owner’s manual for precise instructions. However, in general, the carburetor is typically situated near the top of the engine, close to the air intake and fuel line.
Once you’ve identified the general area, look for a small metal box with multiple hoses and connections attached. This is usually the carburetor. If you’re still unsure, refer to your owner’s manual or seek assistance from a knowledgeable mechanic.
Disassembling the Carburetor with Safety Precautions
Now that you’ve located the carburetor and gathered the necessary tools, it’s time for disassembly. However, safety remains a top priority. Remember to work in a well-ventilated area where there are no open flames or sparks. Keep cleaning materials away from children and pets, and ensure the engine is completely cool and turned off before proceeding.
Removing Components Carefully:
Start by carefully disconnecting the air intake filter. Locate the hose or clamp securing it to the carburetor and detach it gently. Next, proceed to disconnect the fuel line by pinching the clamp with pliers and pulling the hose free from the carburetor nipple. Depending on your specific model, there may be additional hoses or electrical connections attached to the carburetor. Identify and disconnect them carefully, taking note of their location for reassembly later.
Unscrewing the Carburetor:
With all the hoses and connections removed, carefully locate the bolts or screws that secure the carburetor to the engine block. Use the appropriate socket wrench or screwdriver size to loosen and remove these fasteners. Be mindful of any washers or spacers located between the carburetor and the engine block, as these need to be reinstalled during reassembly.
Gently Handling the Carburetor:
Once the bolts or screws are removed, gently lift the carburetor from its position on the engine. Handle it with care to avoid damaging any delicate components or internal parts. Place the carburetor on a clean, flat surface to prevent any loose components from falling out.
Cleaning the Carburetor for Optimal Performance
Now that the carburetor is disassembled, it’s time for the cleaning process itself. This involves removing dirt, debris, and any accumulated gunk that may be hindering its proper functioning.
Draining Old Fuel:
Before proceeding, ensure you have a container ready to collect the old fuel. Carefully place the carburetor upside down over the container, allowing any remaining fuel to drain out. Dispose of this old fuel responsibly according to local regulations.
Cleaning with Carburetor Cleaner:
With the old fuel drained, it’s time to utilize the carburetor cleaner. Following the specific instructions on the cleaner’s label, carefully spray the cleaner into the carburetor’s jets, passages, and chambers. The cleaner will help to loosen and dissolve any dirt, gum, or debris that may be present.
Soaking for Effective Cleaning:
After spraying the carburetor cleaner, allow it to soak for the recommended time specified on the product label. This soaking period is crucial for the cleaner to effectively dissolve and loosen any built-up grime.
Scrubbing with a Gentle Touch:
Once the soaking period is complete, use the small brush provided in your cleaning kit to gently scrub the carburetor’s components. Focus on areas where debris is likely to accumulate, such as the jets, passages, and needle valve. However, avoid using harsh materials or wire brushes, as these can damage delicate parts within the carburetor.
Reassembling the Carburetor for Proper Functioning
With the carburetor thoroughly cleaned, it’s time to reassemble it for proper reinstallation onto the engine. Here’s a breakdown of this process:
Inspecting and Replacing Gaskets:
Before reassembly, take a moment to inspect the gaskets or seals that will be reused. These gaskets ensure a proper seal between the carburetor and the engine block, preventing leaks. If any of the gaskets appear damaged, worn, or cracked, it’s crucial to replace them with new ones to avoid leaks after reinstallation.
Reinstalling Components:
Now, carefully begin reassembling the carburetor. Meticulously reattach any internal components that may have been removed for cleaning, ensuring they are positioned and secured correctly. Once internal components are in place, proceed to reconnect the hoses and electrical connections that were previously disconnected during disassembly. Use pliers to tighten any hose clamps securely.

Reinstalling the Carburetor Back on the Engine
With the carburetor fully reassembled, it’s time to return it to its original position on the engine block.
Securing the Carburetor:
Carefully lift the carburetor and place it back in its designated location on the engine. Secure it with the bolts or screws that were removed during disassembly. Remember to tighten these fasteners to the specified torque using a torque wrench to ensure a proper and secure fit. A loose carburetor can lead to leaks and performance issues.
Reconnecting Electrical Connections (if applicable):
If your carburetor had any electrical connections attached, such as for a throttle solenoid, carefully reconnect them now. Ensure all connections are secure and properly seated.

White smoke from lawn mower
Introduction
The sight of white smoke billowing from your lawnmower can be a cause for concern, especially if you’re not familiar with the potential causes and their implications. While white smoke can indicate a range of issues, it’s important to understand that not all of them are necessarily serious. In this comprehensive guide, we’ll delve into the various causes of white smoke in lawnmowers, explore effective solutions, and provide preventive measures to keep your mower running smoothly and smoke-free in 2024.
Why is White Smoke Coming Out Of My Lawn Mower?
White smoke emanating from your lawn mower’s exhaust can stem from various underlying issues within the engine. Understanding these causes is crucial to diagnosing and addressing the problem effectively.
1. Overfilled Oil Reservoir
One of the common reasons for white smoke is an overfilled oil reservoir. When there is excessive oil in the engine, it can seep into areas where it shouldn’t be, such as the combustion chamber. During operation, this excess oil burns along with the fuel, producing white smoke. It’s important to check your oil levels regularly and ensure they are within the recommended range specified in your mower’s manual.
2. Incorrect Fuel Mixture
Another potential cause of white smoke is an incorrect fuel mixture, particularly if you are using a two-stroke engine. If the fuel mixture is too rich (too much oil in proportion to gasoline), it can lead to incomplete combustion and produce white smoke as a result. Ensuring you use the correct fuel mixture as specified by the manufacturer is essential for proper engine performance and to avoid issues like white smoke.
3. Water or Moisture in the Fuel
Water or moisture in the fuel can also be a culprit behind white smoke. When water enters the combustion chamber, it can vaporize and appear as white smoke in the exhaust. This problem can arise from contaminated fuel or from improper storage of the lawn mower in damp conditions. Using clean, dry fuel and storing your mower properly can help prevent this issue.
4. Coolant Leakage
White smoke can sometimes indicate a more serious issue such as coolant leakage into the combustion chamber. Modern lawn mowers with liquid-cooled engines can experience this problem if there is a leak in the coolant system. Coolant entering the combustion chamber will vaporize and appear as white smoke. It’s crucial to inspect your mower for any signs of coolant leaks and address them promptly to prevent engine damage.
How to Troubleshoot White Smoke Issues
When you notice white smoke coming from your lawn mower, prompt action is necessary to identify and resolve the underlying problem. Here are steps you can take to troubleshoot and potentially fix the issue:
1. Check Oil Levels and Quality
Begin by checking the oil levels in your lawn mower. If you suspect overfilling or contamination of the oil, drain and replace it with the appropriate type and amount recommended by the manufacturer. Ensure the oil is clean and not diluted with gasoline or water, which can also cause white smoke.
2. Inspect the Air Filter
A clogged or dirty air filter can affect the air-fuel mixture in the engine, leading to incomplete combustion and white smoke. Remove the air filter and inspect it for dirt, debris, or damage. Clean or replace the air filter if necessary to ensure proper airflow to the engine.
3. Examine the Fuel System
Inspect the fuel system for any issues that could contribute to white smoke, such as clogged fuel filters, old or contaminated fuel, or incorrect fuel mixture. Replace the fuel filter if it appears dirty or clogged, and use fresh, clean fuel with the correct oil-to-gas ratio for two-stroke engines.
4. Check for Coolant Leaks
If you suspect coolant leakage as the cause of white smoke, carefully inspect the coolant system for signs of leaks. Look for puddles or stains under the mower, and check the coolant reservoir for low levels or discoloration. Repair any leaks found and ensure the coolant system is sealed properly to prevent further issues.
5. Conduct a Compression Test
For more serious or persistent white smoke issues, performing a compression test can help diagnose internal engine problems such as worn piston rings or a blown head gasket. A lower than normal compression reading can indicate these issues, which may require professional repair or replacement of engine components.

Preventive Maintenance Tips
Preventing white smoke issues in your lawn mower involves regular maintenance and care. Here are some preventive tips to keep your mower in top condition:
1. Follow Manufacturer’s Maintenance Schedule
Adhere to the maintenance schedule outlined in your mower’s manual, including oil changes, air filter checks/replacements, and spark plug inspections. Regular maintenance helps prevent issues that can lead to white smoke.
2. Use Quality Fuel and Oil
Always use high-quality fuel and oil recommended by the manufacturer. Poor quality fuel or oil can lead to combustion problems and white smoke issues.
3. Store Your Mower Properly
Store your lawn mower in a clean, dry place to prevent moisture or water from contaminating the fuel or engine components. Proper storage also helps extend the life of your mower.

4. Keep Cooling System Intact
If your mower has a liquid-cooled engine, monitor the coolant levels and inspect the system for leaks regularly. Maintaining the cooling system prevents overheating and potential coolant leaks that can cause white smoke.
Decoding the Meaning of White Smoke
White smoke in a lawnmower typically arises from burning oil. This can occur due to various factors, ranging from simple overfilling to more complex mechanical issues. However, it’s crucial to note that white smoke isn’t always an immediate cause for alarm. In some cases, it might just be a temporary issue that can be easily resolved.
Effective Solutions for White Smoke Issues
-
Check Oil Level: Regularly check the oil level using the dipstick and ensure it’s within the recommended range. If the oil level is too high, drain the excess oil carefully.
-
Inspect for Oil Leaks: Look for signs of oil leaks around the engine, such as wet spots or drips. If you notice any leaks, then locate the source and then repair or replace the damaged seals or gaskets.
-
Operate Engine on Level Ground: Avoid mowing on extremely steep slopes, then as this can cause oil to pool and potentially lead to white smoke.
-
Clean or Replace Crankcase Breather: If the crankcase breather is clog, then clean it thoroughly. If it’s damaged, replace it with a new one.
-
Seal Crankcase Air Leak: Identify the source of the air leak and seal it using appropriate gaskets or sealants.
-
Repair or Replace Blown Head Gasket: Replacing a blown head gasket is a complex task and should be done by a qualified mechanic.
-
Address Worn Cylinder and/or Rings: Replacing worn cylinder and/or rings is a major engine repair and may require extensive labor and parts.
Preventive Measures to Avoid White Smoke
-
Regular Maintenance: Follow the recommended maintenance schedule for your lawnmower, including oil changes, then air filter replacements, and tune-ups.
-
Use High-Quality Oil: Always use high-quality oil recommended by the manufacturer for your lawnmower engine.
-
Check for Leaks Regularly: Inspect your lawnmower regularly for signs of oil or coolant leaks.
-
Avoid Overfilling Oil Reservoir: Carefully check the oil level using the dipstick and avoid overfilling.
-
Operate Engine on Level Ground: As much as possible, mow on level ground to prevent oil from pooling in one side of the engine.
-
Taking Action and Seeking Help
If you notice white smoke coming from your lawnmower, the first step is to turn off the engine immediately. Continued operation can worsen the underlying issue and potentially damage the engine. Identify the severity of the smoke. If it’s a small puff that disappears quickly, it might be a temporary issue like burning off excess oil. However, if the smoke is thick, persistent, or accompanied by other symptoms like overheating or unusual noises, it’s best to seek professional help.
A qualified mechanic can diagnose the root cause of the white smoke issue by examining the engine, checking oil levels, and then performing pressure tests. They possess the expertise and tools to repair oil leaks, replace faulty components like the crankcase breather or head gasket, and address issues like worn cylinder and/or rings.
Importance of Addressing White Smoke Promptly
Addressing white smoke promptly is crucial for several reasons. Firstly, it helps prevent further damage to the engine. Ignoring the issue can lead to overheating, increased wear and tear, and ultimately, a more costly repair down the line. Secondly, then white smoke can be a symptom of a more serious problem, such as a blown head gasket, which can significantly impact the mower’s performance and lifespan. Early detection and repair can save you time, money, and hassle in the long run.

Conclusion: Keeping Your Lawn Mower Smoke-Free
By understanding the causes and solutions for white smoke in lawnmowers, then you can effectively troubleshoot the problem and ensure your mower runs smoothly. Implementing preventive measures like regular maintenance, using high-quality oil, and operating on level ground can significantly reduce the chances of encountering white smoke issues. Remember, if the problem persists or seems beyond your expertise, then don’t hesitate to seek help from a qualified mechanic to keep your lawnmower running efficiently and smoke-free for years to come.
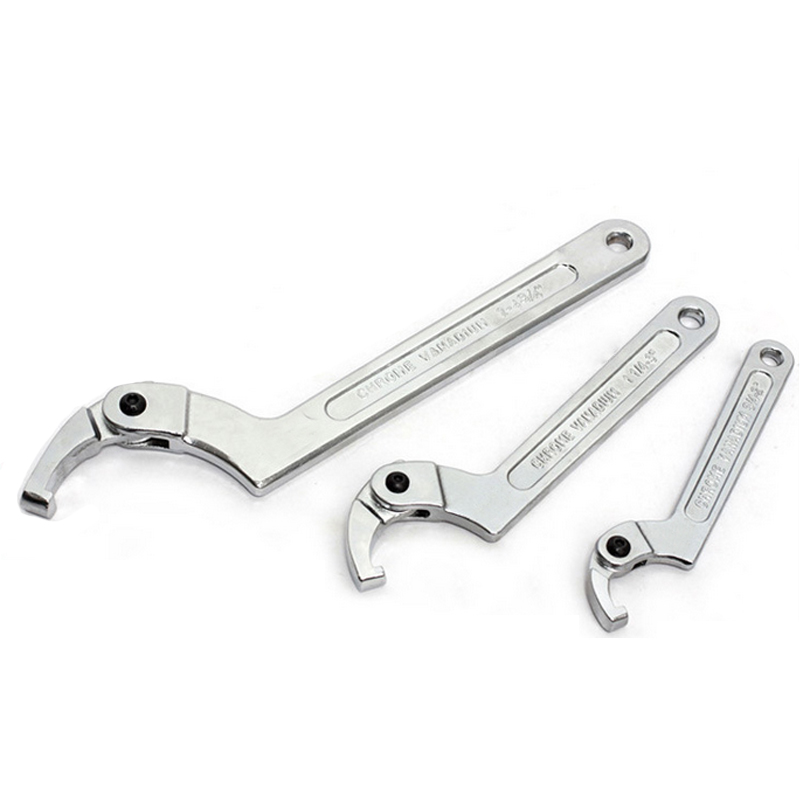
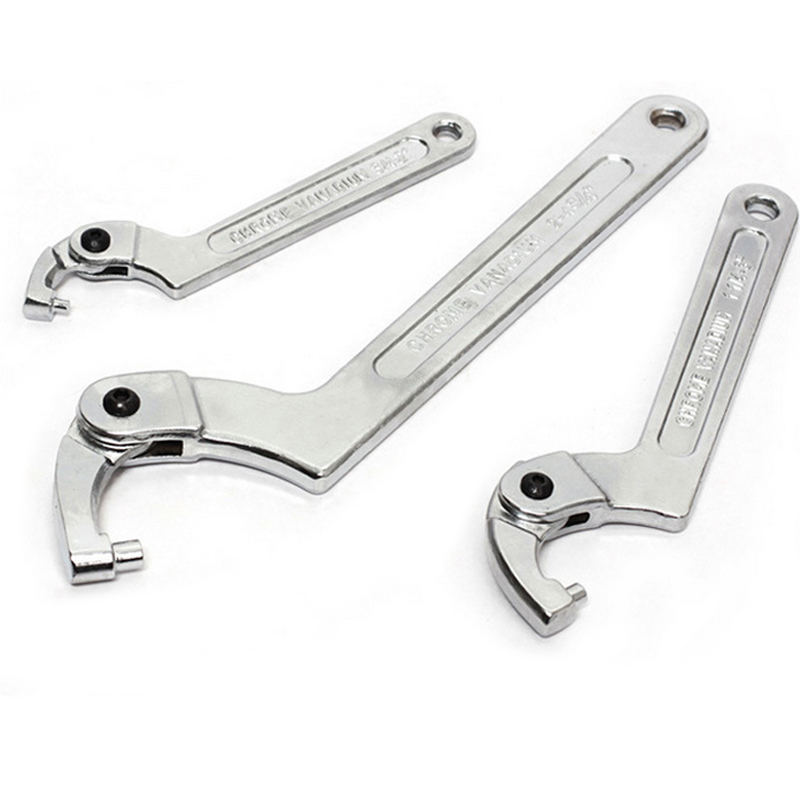
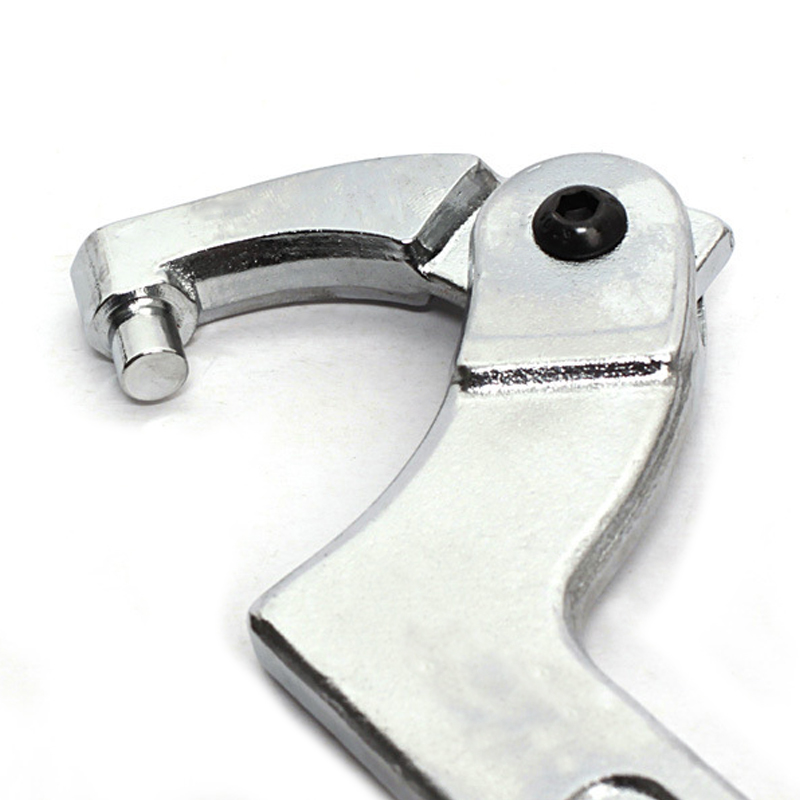
Definition of Spanner Wrench
Spanner Wrench Definition
Definition of Spanner Wrench, also known simply as a spanner or a hook spanner, is a specialized tool designed for turning or adjusting nuts, bolts, and other fasteners with a unique shape or configuration. Unlike conventional wrenches that grip flat surfaces, spanner wrenches feature one or more pins, hooks, or arms that fit into holes or slots on the fastener. This design allows them to securely grip round or irregularly shaped objects where other tools might struggle. Spanner wrenches come in various sizes and designs in 2024, each tailored to specific applications across industries ranging from automotive repair to machinery maintenance and beyond.
Historical Perspective: Evolution of Spanner Wrenches
The undefined of spanner wrenches is a fascinating travel through the phylogenesis of mechanical tools. Wrench wrenches have roots geological geological dating back to the early on 19th century, with the earliest designs resembling simple L-shaped tools for turn square-headed bolts. O’er time, they underwent considerable development. With the internalisation of versatile features to improve usableness and versatility.
One notable existent aspect is the transition from single-purpose tools to more multifunctional designs. Early on wring out wrenches were a great deal specific to specific applications or industries. As heavy-duty undefined advanced, the require for monetary standard tools became apparent. Leading to the vague of adjustable spanner wrenches with jaws that could accommodate unusual fastener sizes.
Functional Perspective: primary feather Functions of Spanner Wrenches
Spanner wrenches serve some essential functions in the sports sports stadium of maintenance, repair, and construction:
Fastener Adjustment: The first tone up function of a spanner wring come come out is to constrain or undo fasteners like haywire and bolts. The solicit or pin of the spanner engages with the fastener, allowing the user to utilize contortion and accomplish the craved strip of tightness.
Collar Adjustment: Spanner wrenches are good in adjusting collars on machinery, ensuring finespun alignment and secure positioning.
Valve Operation: In plumbing system and unstable systems, wrench wrenches are secondhand to control and operate valves, ensuring the regulation of liquidity state flow.
Hydraulic Fittings: These wrenches are necessary for securing mechanics fittings and connectors, material in various industries, including animated and manufacturing.
Design Perspective: key out cast undefined of wrench Wrenches
The contrive of wrenches is noticeable by some describe elements, each inducive to their functionality and usability:
Hook or Pin: The most normal feature of a wrench wring out is the hook or pin at the end of the tool, which engages with slots, holes, or other holdfast features. This design allows for procure fond view and work wring out of fasteners.
Handle: wrench wrenches typically have a straight or slightly curving handle, providing a wide grip for the user. The handle Crataegus oxycantha be solidness or tubular, and its duration varies depending on the intended application.
Adjustability: In the undefined of unsure wrench wrenches, a chattel jaw or jaw-like feature is included, allowing the tool around to conform to fasteners of unusual sizes. This adjustability is a substantial plan improvement that enhances versatility.
Industrial Perspective: park Usage in Industries
Spanner wrenches see applications crossways a multitude of industries, superior to their versatility and functionality:
Manufacturing: In manufacturing, wring come out of the closet wrenches are secondhand to procure and set machine components, ensuring preciseness and safety.
Automotive: In the automotive industry, these wrenches toy with a crucial function in appeal and maintaining vehicles, from securing undefined components to adjusting temp removal parts.
Construction: twist professionals utilize wrench wrenches for tasks care adjusting scaffolding, securing morphological components, and regulating hydraulic systems in heavy machinery.
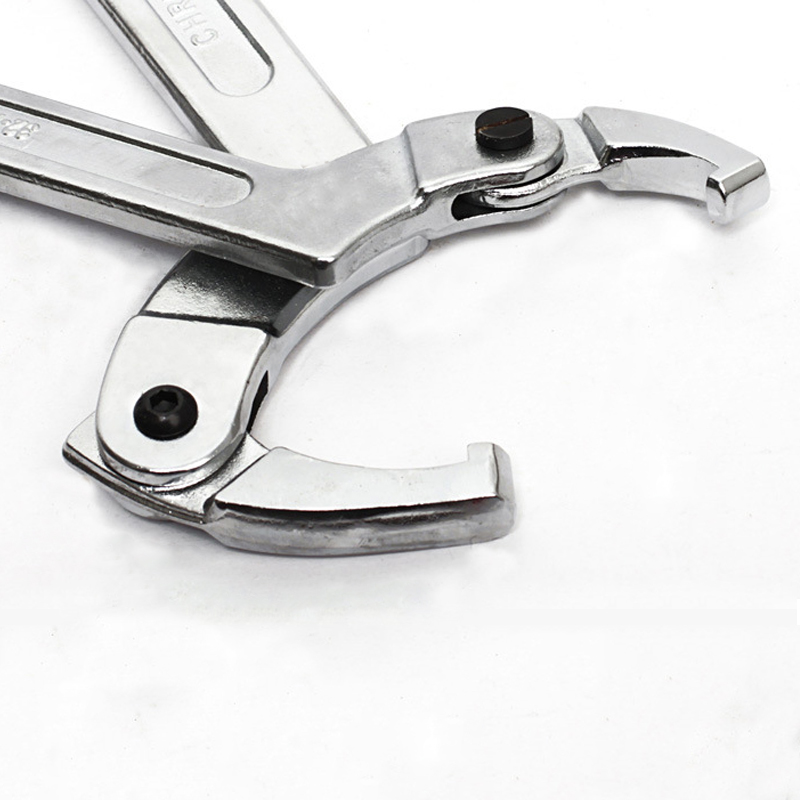
Plumbing: Plumbers utilize wrench wrenches to typeset up and adjust various plumbing system system fixtures, valves, and connectors, ensuring leak-free and efficient plumbing system systems.
Aerospace: The aerospace make up relies on spanner wrenches for upkee and meeting place tasks in aircraft and spacecraft, where precision and refuge are paramount.
Understanding the Types of Spanner Wrenches
Spanner wrenches are categorized based on their design and intended use, each serving a distinct purpose in various mechanical and industrial applications.
1. Adjustable Spanner Wrenches
Adjustable spanner wrenches are versatile tools that feature an adjustable jaw or pin distance, allowing them to accommodate a range of fastener sizes. They are commonly used in plumbing, automotive work, and general maintenance tasks where multiple fastener sizes may be encountered.
2. Hook Spanner Wrenches
Hook spanner wrenches, also known as pin spanner wrenches, feature two or more hooks or pins that engage with holes or notches on the circumference of a fastener. This design provides a secure grip and is ideal for tightening. Or loosening locknuts, bearings, collars, and other components with circular or slotted profiles.
3. C-Shaped Spanner Wrenches
C-shaped spanner wrenches are characterized by their C-shaped design/ Allow them to fit around the outside of a cylindrical or round object. They are commonly used in the automotive industry for adjusting shock absorbers, steering components, and other cylindrical parts. It require precise torque application.
4. Hinged Hook Spanner Wrenches
Hinged hook spanner wrenches feature a hinged design that allows the hooks or pins to adjust to different diameters while maintaining a secure grip on the fastener. This type of spanner wrench is frequently used in machinery maintenance, particularly for adjusting or removing threaded collars and similar components.
Applications and Industries
Spanner wrenches find widespread use in various industries and applications due to their versatility and specialized gripping mechanisms.
1. Automotive Maintenance and Repair
In the automotive industry, spanner wrenches are essential for tasks such as adjusting shock absorbers, tightening or loosening wheel bearings, and securing suspension components. The ability to securely grip round or slotted fasteners makes spanner wrenches indispensable in maintaining the integrity and safety of automotive systems.
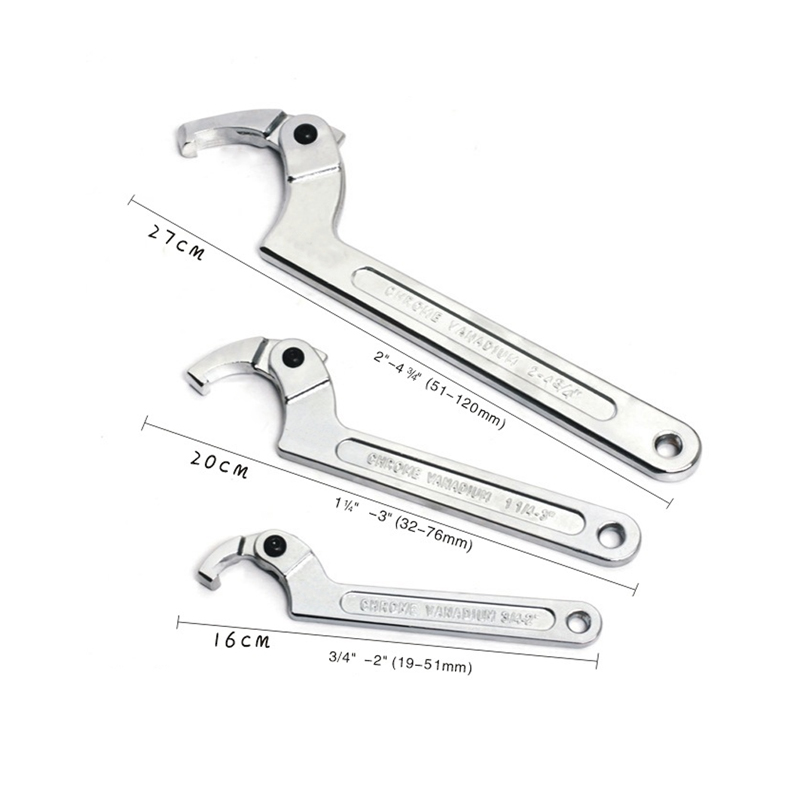
2. Machinery and Equipment Maintenance
In industrial settings, spanner wrenches play a critical role in maintaining machinery and equipment. They are used for adjusting bearings, tightening shaft collars, and securing machine components that require precise torque application. The durability and reliability of spanner wrenches make them ideal for heavy-duty applications in manufacturing and production facilities.
3. Plumbing and Pipe Fitting
The ability to grip irregularly shaped nuts and connectors ensures that plumbing installations remain secure and leak-free, contributing to efficient water and gas distribution systems.
4. Aerospace and Aviation
In the aerospace and aviation industries, where precision and reliability are paramount. Spanner wrenches are used for assembling and maintaining aircraft components. From adjusting hydraulic fittings to securing critical fasteners in avionic systems, spanner wrenches ensure that aircraft operate safely and efficiently.
Choosing the Right Spanner Wrench
Selecting the appropriate spanner wrench for a specific task. It requires consideration of several factors, including the type of fastener, size, and application requirements.
1. Size and Compatibility
Ensure that the spanner wrench selected is compatible with the size. And configuration of the fastener or component being adjusted. Adjustable spanner wrenches offer flexibility for varying sizes. While specialized designs such as hook or C-shaped spanner wrenches. They provide specific gripping mechanisms for precise applications.
2. Material and Durability
Opt for spanner wrenches constructed from durable materials. Such as hardened steel or alloys that withstand high torque and frequent use. The quality of construction directly impacts the longevity and performance of the tool in demanding environments.
3. Ergonomics and Handling
Consider the ergonomic features of the spanner wrench, including handle design, grip comfort, and ease of maneuverability. Ergonomically designed wrenches reduce operator fatigue and enhance control, especially during prolonged use or in tight spaces.
Maintenance and Care Tips
Proper maintenance and care prolong the lifespan and effectiveness of spanner wrenches, ensuring reliable performance over time.
1. Regular Cleaning
After each use, clean spanner wrenches thoroughly to remove dirt, debris, and oil residue. Use a solvent or degreaser to dissolve stubborn contaminants. Followed by drying and applying a light coating of lubricant to prevent corrosion.
2. Inspection for Wear and Damage
Periodically inspect spanner wrenches for signs of wear, including bent or damaged pins, worn jaws, or loose hinges. Replace worn or damaged components promptly to maintain optimal functionality and safety during use.
3. Storage and Organization
Store spanner wrenches in a clean, dry environment to prevent exposure to moisture, which can lead to rust and corrosion. Use toolboxes or racks to organize wrenches and protect them from physical damage or accidental misplacement.
Conclusion
Spanner wrenches are indispensable tools in various industries. Providing specialized capabilities for adjusting and securing fasteners with unique shapes or configurations. Understanding the different types of spanner wrenches. Their applications, and selection criteria ensures efficient and safe use in automotive, industrial, aerospace, and plumbing contexts. By following proper maintenance practices and choosing the right spanner wrench for each task. Professionals and enthusiasts alike can maintain equipment integrity. Improve efficiency, and achieve reliable results in their respective fields.