
Traditional Hand Tools Enthusiast
For the traditional hand tools enthusiast, the absence of a planer does not hinder the pursuit of beautifully planed wood surfaces. Embracing a more hands-on approach, this perspective relies on Art of Wood Planing Without a Planer such as hand planes, chisels, and scrapers. By skillfully wielding these tools, woodworkers can achieve smooth and even surfaces in 2024.
When using a hand plane, it is crucial to select the appropriate type and size for the task at hand. A bench plane, such as a jack plane or a smoothing plane, can be effective for planing larger surfaces. A block plane, on the other hand, is ideal for smaller, intricate areas. Before starting, ensure that the plane’s blade is sharp and properly honed. This will ensure clean and precise cuts.

To begin, firmly hold the plane with both hands and apply even pressure as you glide it along the wood grain. Start at one end of the wood piece and work your way towards the other end, taking shallow cuts to avoid tear-out. Adjust the plane’s depth settings as needed to remove just enough material to achieve a smooth surface. Regularly check your progress by running your hand over the wood to feel for evenness.
In addition to hand planes, chisels and scrapers can be employed to refine and smooth the wood surface. Use a chisel to remove any stubborn imperfections or to fine-tune edges and corners. A scraper, held at a slight angle, can be used to remove thin shavings and create a polished finish. These hand tools require patience and practice to master, but they offer a satisfying level of control and craftsmanship.

DIY Innovator of Art of Wood Planing Without a Planer
The DIY innovator understands the value of resourcefulness and creative problem-solving. In the absence of a planer, this perspective explores alternative tools and techniques that can be utilized for wood planing.
One such approach is to use a router equipped with a flush trim or straight-cutting bit. Begin by securing the wood piece to a workbench or a sturdy surface. Adjust the router settings to ensure a shallow cut, and then carefully guide the router along the wood surface, moving against the grain. This method requires precision and a steady hand, but it can produce smooth and uniform results.
Another option is to employ handheld power sanders. Start with a coarse-grit sandpaper to remove any prominent roughness or unevenness. Gradually switch to finer-grit sandpapers, working your way towards a smoother finish. Remember to sand in the direction of the wood grain to avoid scratches and swirl marks. Power sanders offer efficiency and speed, making them a convenient choice for larger projects.
Modern Technology Advocate of Art of Wood Planing Without a Planer
In the age of technological advancements, modern tools offer innovative solutions for wood planing without a traditional planer. The modern technology advocate may turn to power tools like thickness planers or drum sanders.
A thickness planer utilizes rotating blades to shave off thin layers of wood, ensuring a consistent thickness across the surface. Although thickness planers can be a significant investment, they offer precise control over material removal and can handle larger quantities of wood in a shorter time. By adjusting the planer’s settings, woodworkers can achieve desired thickness and uniformity.
Similarly, a drum sander can be employed to smooth out rough areas and achieve a finely planed result. This tool features a rotating drum covered in abrasive sandpaper. As the wood passes through the drum, the sandpaper removes imperfections, leaving behind a smooth surface. Drum sanders are available in various sizes, making them suitable for both small-scale and large-scale projects.
Budget-Conscious Woodworker of Planing Wood without A Planer
When working on a limited budget, acquiring specialized tools like a planer may not be feasible. However, the budget-conscious woodworker can still achieve satisfactory wood planing results through alternative methods.
Hand sanding is an affordable option that gradually smooths the wood surface. Start with a coarser grit sandpaper to remove any roughness, and then progress to finer grits for a smoother finish. Sand in the direction of the wood grain to avoid scratches. This method requires patience and attention to detail, but it can yield satisfying results.
Another technique involves constructing a simple sled or jig to be used with a hand router. Begin by securing the wood piece to the sled, ensuring it is flat and stable. Adjust the router’s depth to remove a small amount of material with each pass. By guiding the router along the sled, woodworkers can achieve controlled and uniform planing without the need for expensive equipment.
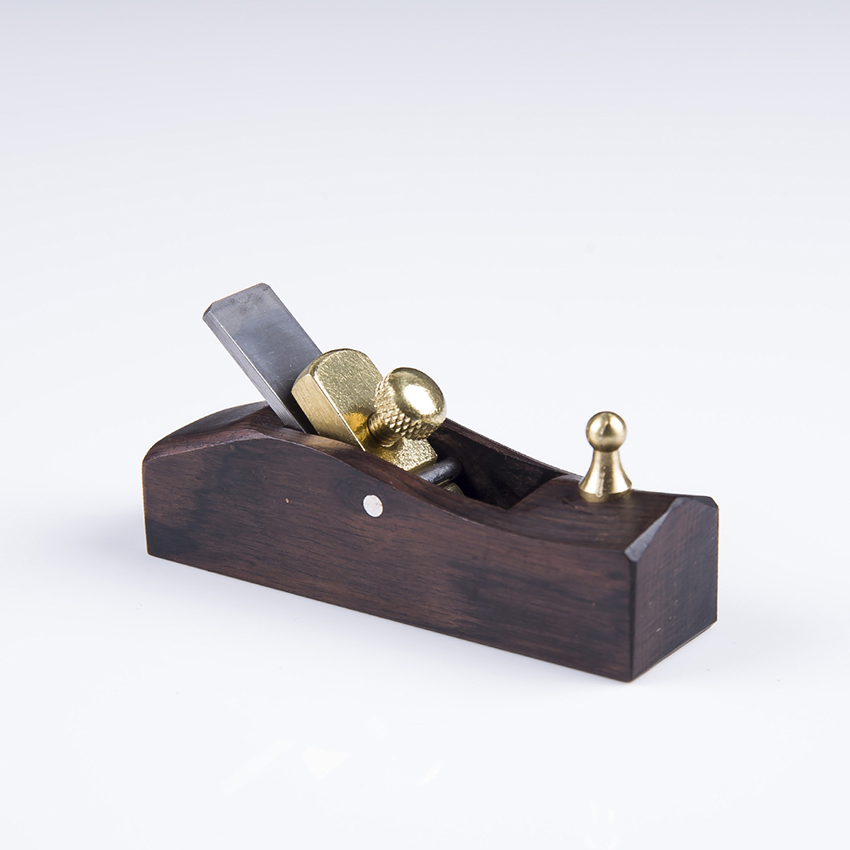
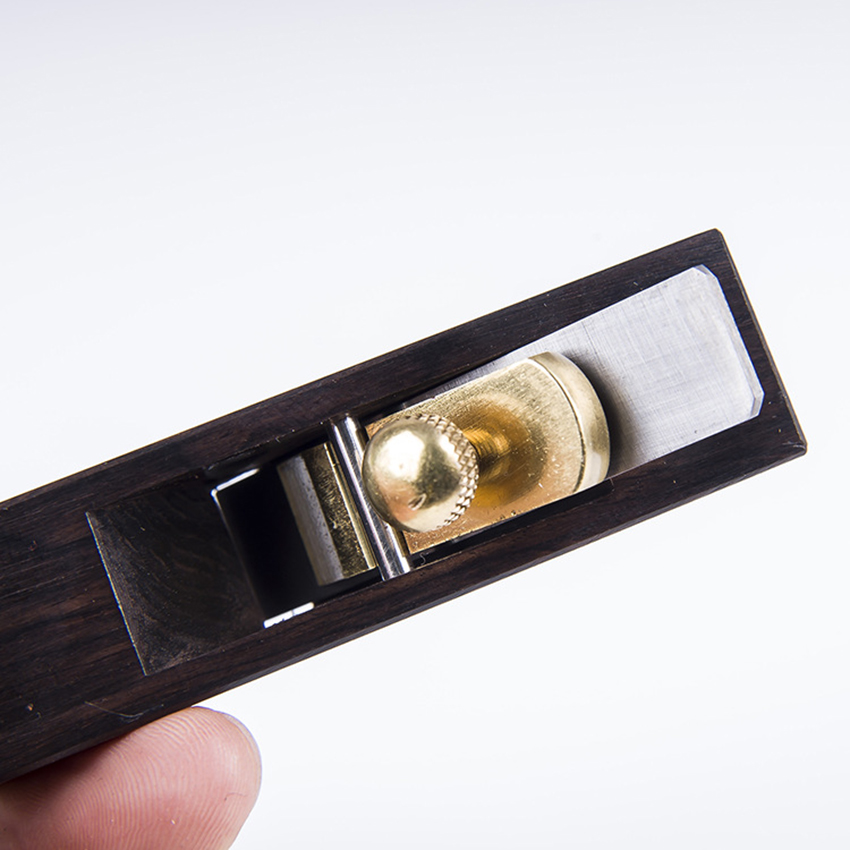
Understanding Hand Planes
Hand planes are essential tools in woodworking, designed to smooth, flatten, and shape wood by shaving off thin layers. They consist of a blade (iron) set at an angle in a metal or wooden body called the plane. Understanding the anatomy of a hand plane is crucial for effective use:
- Types of Hand Planes: There are several types of hand planes, each serving a specific purpose in woodworking:
- Jack Plane: This versatile plane is used for preliminary rough shaping and flattening of wood.
- Smoothing Plane: Designed for final finishing, it produces a fine, smooth surface ready for polishing.
- Jointer Plane: Ideal for flattening large surfaces and ensuring edges are straight and square.
- Block Plane: Smaller and handheld, perfect for trimming end grain and performing delicate work.
- Components of a Hand Plane:
- Blade (Iron): The cutting edge of the plane, typically made of hardened steel.
- Frog: The part of the plane that holds the blade and allows for adjustment.
- Cap Iron (Chipbreaker): A small plate that breaks wood chips, improving the cutting action.
- Adjustment Mechanism: Allows for setting the depth of the blade for different cuts.
Choosing the Right Wood and Preparation
Before you begin planing, selecting the right type of wood is crucial. Different woods have varying hardness and grain patterns, which affect how they respond to planing. Softer woods like pine or cedar are easier to plane compared to harder woods such as oak or maple, which require more effort and sharp blades. Here are steps to prepare the wood for hand planing:
- Inspecting the Wood:
- Check for any defects, knots, or irregularities that may affect planing.
- Ensure the wood is dry and acclimatized to prevent warping or movement during planing.
- Orientation and Grain Direction:
- Examine the grain pattern to determine the direction of the wood fibers.
- Planing against the grain can cause tear-out, so always plane in the direction of the grain for smoother results.
Techniques for Hand Planing
Mastering the techniques of hand planing is essential for achieving smooth, flat surfaces and precise dimensions in woodworking. While it requires practice and patience, the following techniques will help you hone your skills:
- Setting Up the Plane:
- Sharpen the blade to a keen edge using sharpening stones or a honing guide.
- Adjust the plane’s blade depth to take thin shavings initially, gradually increasing the depth for thicker cuts.
- Planing Technique:
- Hold the plane firmly with both hands, placing downward pressure to keep it flat against the wood.
- Start at one end of the wood and plane in long, continuous strokes towards the other end.
- Use your body weight to guide the plane rather than excessive force from your arms.
- Checking for Flatness:
- Regularly check the surface with a straightedge or winding sticks to ensure it remains flat and level.
- Focus on high spots and adjust your planing technique to achieve uniformity across the wood surface.
Advanced Tips and Troubleshooting of Art of Wood Planing Without a Planer
Even with practice, hand planing can present challenges that require patience and skill to overcome. Here are some advanced tips and troubleshooting techniques:
- Dealing with Tear-Out:
- Adjust the plane’s blade angle or use a finer blade setting to minimize tear-out, especially with figured or interlocked grain.
- Ensure the blade is sharp and take lighter passes to reduce tearing of wood fibers.
- Maintaining Sharpness:
- Regularly hone and sharpen the plane’s blade to maintain optimal cutting performance.
- Use a strop or honing guide to refine the blade edge and remove any burrs.
- Consistency in Pressure:
- Apply consistent downward pressure on the plane throughout each stroke to achieve even cutting and avoid uneven surfaces.
Conclusion
In conclusion, mastering the art of wood planing without a planer encompasses various perspectives – the traditional hand tools enthusiast, the DIY innovator, the modern technology advocate, and the budget-conscious woodworker. Each perspective offers unique insights and techniques to achieve smooth and refined wood surfaces. Whether relying on classic hand tools, exploring innovative alternatives, leveraging modern power tools, or adopting budget-friendly approaches, woodworkers can create beautifully planed finishes with dedication, practice, and a touch of creativity. The absence of a planer becomes an opportunity to develop new skills, expand woodworking knowledge, and find satisfaction in the artistry of wood planing.
