Transform Your Garden: The Creative Watering Can Planter Ideas
Choosing the Right Watering Can for Your Planter
Selecting the perfect watering can planter is crucial for both aesthetics and functionality. Start with size; a can that’s too large may overwhelm your plants, while one too small won’t provide ample space for root growth. Material matters as well. Metal cans offer durability and a classic look, while plastic ones are lightweight and come in various colors. Think about the design; a vintage-style can adds charm, whereas a modern design suits contemporary gardens. Check for a nozzle with a fine rose attachment for gentle watering. Ensure the can has a comfortable handle for easy lifting and pouring. Keep these tips in mind to pick an ideal watering can planter for your garden.
Creative Watering Can Planter Designs
After selecting the right watering can for your garden, let your creativity bloom with unique planter designs. Here are some inspirational ideas to get you started:
- Vintage Charm: Take an old metal can and distress it further for an antique look. It can complement a rustic garden theme.
- Fairy Garden Fantasy: Create a miniature fairy garden. Use small plants and figurines to bring the fantasy to life within the can.
- Painted Perfection: Brighten a plain can with weather-resistant paint. Choose colors that stand out or match your outdoor decor.
- Mosaic Magic: Adorn your watering can with glass or ceramic tiles for a shimmering mosaic effect. This can add a touch of art to your garden.
- Herb Haven: Transform your watering can into a portable herb garden. Fresh herbs are at hand whenever you cook outdoors.
Each of these designs allows the watering can planter to serve as both a functional item and a decorative piece. Keep the use of the keyword ‘watering can planter’ within the prescribed limit to maintain readability. By incorporating these designs, not only do you make efficient use of old watering cans, but you also add unique touches that enhance the beauty of your outdoor space.
Tips for Planting in a Watering Can
When planting in a watering can, consider these helpful tips to ensure success:
- Choose Suitable Soil: Select a high-quality potting mix that provides proper drainage and nutrient support for your plants.
- Mind the Drainage: Drill holes in the bottom of the can if they’re not already present to prevent waterlogging.
- Layer the Base: Place a layer of pebbles or gravel at the bottom to enhance drainage and prevent root rot.
- Go for Small Plants: Opt for smaller plants or seedlings, as they fit well in the confines of a watering can planter.
- Monitor Water Levels: Water sparingly to avoid overwatering, as the space inside a watering can is limited.
- Consider the Weight: Remember that the can will be heavier once filled with soil and plants; ensure it’s manageable.
- Fertilize with Care: Use a diluted liquid fertilizer to gently provide nutrients without overwhelming your plants.
With these tips in mind, your watering can planter can thrive and add a unique touch to your garden.
Best Plants for Watering Can Planters
Choosing the best plants for your watering can planter can be quite fun. Look for plants that thrive in small spaces and need moderate watering. Here are some excellent picks:
- Succulents and Cacti: These are ideal because they grow slowly and need little water.
- Annual Flowers: Think pansies or petunias for a splash of color.
- Herbs: Basil, chives, and parsley can grow well in watering can planters.
- Ferns: The compact Boston fern is a good choice.
- Alpine Plants: These are used to harsh conditions and grow well in confined spaces.
Remember, the key is to select plants that match the watering can’s environment. Make sure they get the right amount of sun and shade. This will help your plants flourish in their unique watering can planter.
How to Properly Drain Your Watering Can Planter
Ensuring your watering can planter has proper drainage is vital for plant health. Here’s how to achieve it:
- Drill Drainage Holes: If your can lacks holes, drill 3-4 at the bottom. Use a drill bit suitable for the material.
- Cover Holes with Mesh: This keeps soil from escaping. Cut a fine mesh to fit inside the can, over the holes.
- Use the Right Soil: Choose potting soil that drains well. This prevents water buildup that can harm roots.
- Elevate the Can: Place the can on bricks or feet. It lets water flow freely out of the drainage holes.
- Regularly Clean Holes: Check and clear the holes to stop them from clogging. Use a wire or toothpick to remove debris.
By following these steps, your watering can planter will drain effectively, preventing overwatering and promoting healthy plant growth.
Incorporating Watering Can Planters into Your Garden Layout
Incorporating watering can planters into your garden adds charm and character. Here’s how to blend them seamlessly into your outdoor space:
- Strategic Placement: Put your watering can planter in a spot where it’s visible and adds to the overall garden design. Choose locations near pathways or sitting areas for the best visual impact.
- Grouping: Cluster various watering can planters for an eye-catching display. Mix sizes and colors to create depth and interest.
- Height Variation: Place watering can planters at different heights using stands or garden features. This creates a dynamic and layered look.
- Combine with Other Planters: Integrate watering can planters with traditional pots and containers. This adds variety and texture to your garden layout.
- Seasonal Changes: Swap out plants according to the season. This keeps your garden looking fresh and ensures plants are season-appropriate.
- Theme Continuity: If your garden has a certain style, like a cottage or tropical theme, choose watering can planters that complement it.
- Mobile Advantage: Use the portability of watering can planters to change your garden layout easily. This also helps in repositioning plants for optimal sun exposure.
By carefully planning their placement, watering can planters can become integral parts of your garden’s design, offering both function and beauty.
DIY Watering Can Planter Projects
Getting hands-on with DIY projects can bring your garden to life and personalize your space. These DIY watering can planter projects will inspire you to turn simple watering cans into stunning garden features. Remember to sprinkle the keyword ‘watering can planter’ adequately throughout the text to optimize for SEO, without overdoing it.
- Hanging Charm: Convert your watering can into a hanging planter. Drill holes in the sides, attach strong wires, and hang it with your favorite blooms spilling out.
- Stencil Art: Use stencils to paint floral or abstract designs on your can. Fill it with soil and plants after the paint dries.
- Illuminate with Lights: String lights inside a watering can and let them cascade out of the spout. It creates a magical evening glow in your garden.
- Chalkboard Labels: Paint a section with chalkboard paint for easy labeling. Great for herbs, you can write and rewrite names as needed.
- Laced Look: Wrap lace or burlap around a can for a textured look. Plant something simple inside to let the design stand out.
Attempting these DIY watering can planter projects not only upcycles old items but also adds a creative touch to your outdoor space. They are a great weekend activity that can involve the whole family, from painting to planting. Plus, these planters can make thoughtful, homemade gifts for friends and garden enthusiasts. Have fun personalizing your garden with these unique planters.
Maintaining Your Watering Can Planter Through the Seasons
Maintaining a watering can planter requires seasonal care for its best performance. Here are tips to keep it in top shape throughout the year:
- Spring Prep: Clean out any leftover debris from winter. Check for rust or damage and repair as needed. This is a great time to refresh the soil and replant if necessary.
- Summer Checks: Inspect your watering can planter frequently as plants grow. Ensure it has enough water but isn’t waterlogged. Add mulch to help retain moisture during hot months.
- Autumn Adjustments: As temperatures drop, consider moving sensitive plants indoors. If your can stays outside, empty it to prevent damage from freezing.
- Winter Storage: If not in use, store your watering can planter inside to avoid cold damage. Place in a dry area to inhibit rust formation.
- Regular Cleaning: Throughout all seasons, keep your watering can planter clean. Gently scrub the exterior to prevent dirt buildup and potential plant diseases.
- Monitor Plant Health: No matter the season, watch for signs of stress in your plants. Adjust watering and exposure to sun as needed to keep them thriving.
By following these simple maintenance steps, your watering can planter will provide beauty and purpose all year round.

DIY Compost Tumbler: A Step-by-Step Guide for Gardening Tools
Benefits of Using a Compost Tumbler
Creating your own diy compost tumbler offers significant advantages over traditional composting methods. Below are key benefits that highlight why a compost tumbler may be a valuable addition to your gardening tools.
Time-Efficient Decomposition
One of the main benefits of a compost tumbler is its ability to speed up the decomposition process. With a tumbler, you can turn waste into compost in just a few weeks. This is much faster compared to stationary compost piles that can take months.
Pest and Odor Control
A fully enclosed diy compost tumbler reduces odors and keeps pests at bay. This containment ensures your composting efforts don’t attract unwanted animals or create unpleasant smells in your yard.
Easy to Use
Compost tumblers are user-friendly. You can easily load waste materials and rotate the barrel. This simple rotation mixes the compost, which is less labor-intensive than turning a compost pile with a shovel or fork.
Better Aeration
The design of a compost tumbler allows for better aeration. As you rotate the barrel, air flows through the compost. This increases the oxygen level, which is essential for the composting process.
Space Efficient
A diy compost tumbler is ideal for small spaces. Unlike a large compost heap, a tumbler fits neatly in a corner of your garden or on a balcony, making it perfect for urban gardeners.
Consistent Results
Using a compost tumbler helps you produce more consistent compost. The controlled environment allows for an even distribution of moisture and heat. As a result, you get high-quality compost every time.
Environmentally Friendly
Lastly, by using a diy compost tumbler, you’re contributing to waste reduction and recycling. This eco-friendly approach supports a sustainable lifestyle, turning kitchen scraps and yard waste into valuable garden input.

Essential Materials and Tools Needed
To start your diy compost tumbler project, gather the necessary materials and tools. Here’s what you’ll need:
- A durable barrel: Choose a barrel that can hold 55 gallons for ample composting space. Ensure it’s food-grade if reusing.
- Drill and drill bits: You’ll need these to create air holes for ventilation in the barrel.
- Saw: To cut parts for the frame and opening of your compost tumbler.
- Hardware: Bolts, nuts, and washers to secure the barrel to the frame.
- Hinges and latch: For the lid to ensure easy access and secure closure.
- Metal rods or pipe: To serve as the axle that the barrel will rotate on.
- Wood: For constructing the base and frame to support the barrel.
- Screws and a screwdriver: To assemble the frame and attach the barrel.
- Measuring tape and marker: To measure and mark where to cut or drill.
- Wrenches and pliers: To tighten the hardware and ensure everything is secure.
With all your materials and tools ready, you’re all set to build your diy compost tumbler. Remember, while building, ensure your safety first. Wear protective gloves and eyewear when necessary. If you repurpose a barrel, clean it thoroughly before use. A well-equipped toolkit makes the process smoother and more enjoyable.
Selecting a Suitable Barrel for Your Compost Tumbler
Choosing the right barrel is crucial for your diy compost tumbler. Look for these features:
- Size Matters: A 55-gallon barrel is ideal. It offers enough space for compost without being too bulky.
- Food-Grade Plastic: If reusing a barrel, make sure it’s food-grade to avoid contaminating your compost.
- Solid Construction: Your barrel should be sturdy. It must withstand the wear and tear of rotating.
- Tight Seal: The lid should fit snugly. This keeps out pests and preserves moisture levels.
- Dark Color: A black or dark-colored barrel is best. It absorbs heat, speeding up the composting process.
When selecting a barrel, you may also consider its history. Avoid barrels that held chemicals or toxic substances. These could harm your compost and garden. If using a second-hand barrel, clean it well before starting.
After picking your barrel, place it in a convenient spot. It should be easy to access and add materials to, and also be placed where it can get some sunlight. Sunlight helps the composting process by providing warmth, but be mindful not to expose it to excessive heat.
Remember, the right barrel leads to a successful composting experience. Take your time and choose wisely for the best results.
Constructing the Base and Frame
After selecting the right barrel for your diy compost tumbler, the next step is building the base and frame. Below are straightforward steps to guide you through the process:
- Measure and Cut the Wood: Start by measuring the wood according to the desired size of the frame. Use your saw to cut the wood with precision. Ensure each piece matches the measurements.
- Assemble the Frame: Lay out the cut pieces to form the base and sides of the frame. Use screws to join the pieces, ensuring the structure is sturdy and balanced.
- Install the Metal Rods or Pipe: Position the metal rods or pipe that will serve as the axis for the tumbler. Secure them onto the frame using bolts and nuts.
- Drill Guide Holes: Before screwing the frame together, drill guide holes to prevent the wood from splitting. This will make attaching the screws easier and more secure.
- Check the Stability: Once assembled, check the frame’s stability. It should not wobble or tilt. Make any necessary adjustments to ensure it can support the weight of the barrel filled with compost.
- Prepare for Barrel Installation: Finally, make sure the frame is ready to mount the barrel. Confirm the barrel will sit snugly and can rotate freely on the metal rods or pipe.
Building a strong base and frame is paramount to the functionality of your diy compost tumbler. With careful measuring, cutting, and assembling, you have laid the foundation for successful composting. Remember to work safely, using protective gear as required, and make sure all materials are secure and well-fitted to withstand regular tumbler rotation.

Assembling the Tumbler Mechanism
With the base and frame ready, assembling the tumbler mechanism is your next step. Here’s how to proceed:
- Position the Barrel: Carefully place the barrel on the metal rods or pipe that act as the axle. Confirm that it rotates smoothly.
- Drill Holes for the Axle: If not already present, drill holes on each side of the barrel. Align these with the axle positions on the frame.
- Attach the Barrel to the Axle: Slide the barrel onto the axle through the drilled holes. Ensure it’s a snug fit to avoid slipping.
- Secure the Barrel: Use bolts, nuts, and washers to secure the barrel in place. Check for tightness to make sure the barrel won’t wobble when spinning.
- Install the Lid: Attach the lid using hinges and a latch. Confirm that it closes firmly to keep out pests and rain.
- Test Rotation: Give the barrel several turns to test the ease of rotation. It should move without resistance.
- Adjust if Necessary: If the barrel sticks or is too loose, make adjustments. Proper alignment ensures efficient turning and mixing of compost materials.
Assembling the tumbler mechanism is a crucial step in building your diy compost tumbler. It should allow for easy rotation, which is key for even composting. Take your time to align and secure everything exactly right. Once done, your tumbler will be ready to receive compost materials and begin the decomposition process.
Adding and Managing Compost Material
The process of adding and managing compost material in your diy compost tumbler is straightforward. Follow these steps for the best composting results:
- Start with Browns and Greens: Begin by adding a balanced mix of ‘brown’ materials like dried leaves and ‘green’ materials such as kitchen scraps. This mixture ensures a good balance of carbon and nitrogen.
- Chop Larger Items: Cut larger pieces of organic waste into smaller chunks. Smaller pieces break down faster and more evenly.
- Maintain Moisture: Your compost should feel like a wrung-out sponge. If it’s too dry, add water; if too wet, mix in more browns to absorb excess moisture.
- Rotate Regularly: Turn the barrel every few days to mix the compost and distribute air and moisture evenly.
- Layer Your Additions: As you add new materials, layer them with old materials. This keeps the composting process active and efficient.
- Monitor Temperature: A warm compost pile means active decomposition. If it cools down, add more greens to heat it up.
- Check for Compost Readiness: In several weeks, look for dark, crumbly, and earthy-smelling compost. This indicates that your compost is ready to use.
By managing your compost properly, you create rich, nutritious soil amendment for your garden. Regular attention and the right mix of materials will yield excellent compost from your diy compost tumbler.
Troubleshooting Common Issues
Even with a well-constructed diy compost tumbler, you may encounter some common issues. Here are fixes for the typical problems:
- Difficulty in Spinning: If your tumbler is hard to turn, check for overloading. Reduce the content or distribute it evenly. Ensure the axle is lubricated and the barrel isn’t stuck on something.
- Compost Too Wet: An overly damp compost may need more browns. Add dry leaves or shredded paper to absorb moisture.
- Compost Too Dry: For dry compost, add greens like vegetable scraps or lightly sprinkle with water. Do not overwater.
- Odor Problems: Bad smells often come from too many greens. Mix in browns, turn more often, and check for aeration.
- Pests Attracted: Secure the lid properly. Inspect for gaps or holes and seal them if you find any.
- Slow Decomposition: If composting is slow, increase green material. Ensure you’re turning the barrel to mix contents well.
- Uneven Composting: For composting that’s uneven, turn the tumbler more frequently. This helps in evenly mixing the materials.
By addressing these issues promptly and adjusting your process, your diy compost tumbler will efficiently produce compost.
Maintaining Your DIY Compost Tumbler
Maintaining your diy compost tumbler is crucial for its longevity and efficiency. Here are some maintenance tips:
- Regular Inspection: Periodically check your tumbler for any signs of wear and tear. Look at the axle, hinges, and any moving parts to ensure they are in good condition.
- Cleaning:
After each batch of compost, clean the inside of the barrel. A quick rinse can prevent residue build-up.
- Lubrication:
Apply a non-toxic lubricant to the axle and hinges. This will keep the rotation smooth and prevent rust.
- Tighten Hardware:
Occasionally tighten bolts, nuts, and screws. This prevents them from coming loose due to the rotation.
- Check for Leaks:
Ensure there are no leaks in the barrel. Leaks can cause loss of moisture which is essential for composting.
- Adequate Cover:
Make sure the lid is always secure. It should protect the compost from too much rain or drying out.
- Monitor for Pests:
Even with a secure tumbler, inspect for signs of pests. No cracks or holes should be present.
By following these simple maintenance steps, your diy compost tumbler will serve you for many seasons.
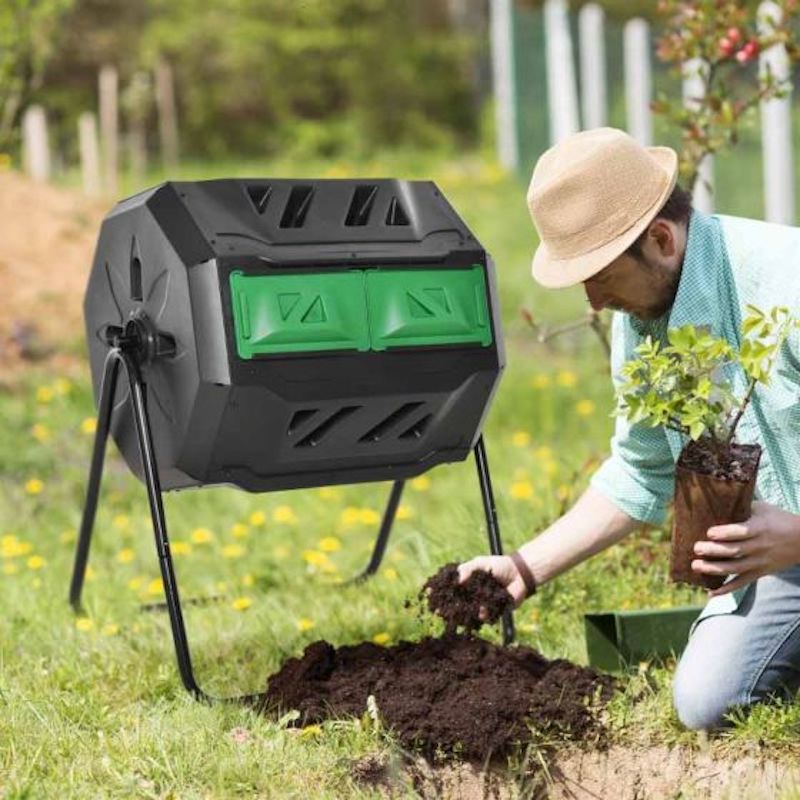
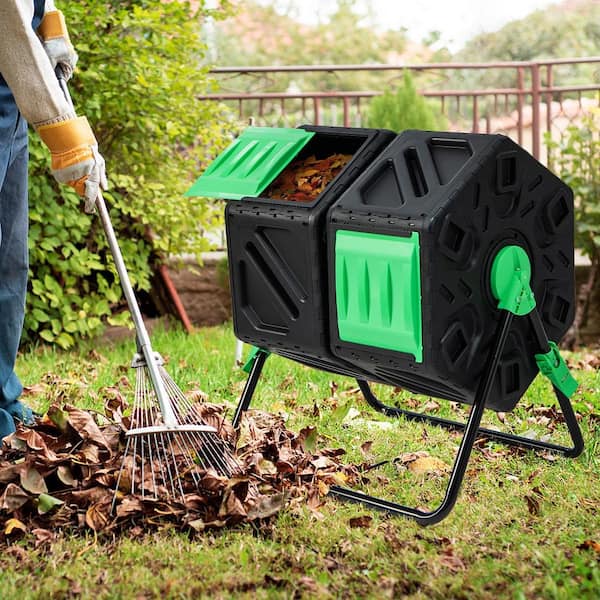
A Guide of Choosing the Best Compost Tumbler for Your Garden
What is a Compost Tumbler and How Does it Work?
A compost tumbler is a container designed for composting organic waste. Unlike traditional compost piles, tumblers elevate the composting material off the ground. This design offers protection from pests and rodents. A compost tumbler works by rotating the compost materials. This process mixes and aerates the contents efficiently. Regular turning with a handle makes the process effortless. Over time, the rotation and aeration speed up the breakdown of organic matter. This leads to quicker compost production. Effective tumblers create nutrient-rich compost within weeks. They are ideal for home gardeners seeking to recycle kitchen scraps and yard waste. With a compost tumbler, you transform waste into valuable fertilizer for plants. The best compost tumbler models balance durability and functionality. They provide an easy way to contribute to a sustainable environment.
Benefits of Using a Compost Tumbler
Using a compost tumbler has many benefits for both the environment and your garden. The compact design of a tumbler is one key advantage, as it requires less space than traditional compost methods. This makes tumblers suitable for urban settings or small backyards where space is at a premium.
A compost tumbler also speeds up the composting process. With its efficient rotating mechanism, it mixes and aerates the compost regularly. This results in faster decomposition of organic waste into rich, nourishing compost. In weeks, you can have finished compost, compared to months with a static pile.
Moreover, tumblers help keep pests and rodents at bay. The enclosed design and elevation off the ground protect your compost from being invaded. This ensures that your waste transforms into compost undisturbed.
The tumbler also contributes to a cleaner and more hygienic composting experience. They prevent the compost from coming into contact with the ground, reducing the risk of disease transmission.
Lastly, the best compost tumbler models offer the convenience of easy turning. This eliminates the laborious task of manual turning with a pitchfork or shovel. By simply rotating the handle, you mix and aerate the compost effortlessly. This ease of use encourages more people to compost, supporting a sustainable lifestyle.
Overall, a compost tumbler stands out as an efficient, clean, and convenient tool for converting waste into gold for your garden.
Key Features to Look for in a Compost Tumbler
Choosing the best compost tumbler involves considering several key features. These include size, durability, and how well it aerates and mixes the compost. Let’s explore these features in detail to help you make an informed decision.
Size and Capacity
When picking a compost tumbler, consider the size. Your choice should match the amount of waste you produce. Small households may need a compact tumbler. Large families or avid gardeners might go for a larger capacity. Think about how much space you have too. Remember, a tumbler should fit well in your garden or yard.
Durability and Construction
Look for tumblers made with sturdy materials. They should withstand weather and wear. Tough, UV-resistant plastics or coated metals are good options. Quality construction means your tumbler will last for years. Check for strong support legs and a robust spinning mechanism as well.
Aeration and Mixing Capabilities
Good aeration speeds up composting. Choose a tumbler with plenty of air vents or holes. It should also mix compost effectively. A tumbler that’s hard to turn won’t mix well. Check if it has internal mixing bars or protrusions. These help break up clumps and mix materials as you turn the tumbler.
Ease of Use and Maintenance
Your tumbler should be easy to use. Look for a model with a simple turning mechanism. It should not require much strength to spin. Also, consider how easy it is to add materials or remove compost. A removable door or hatch makes these tasks simpler. Lastly, low-maintenance models save time and effort in the long run.
Different Types of Compost Tumblers
Choosing the best compost tumbler for your needs involves understanding the different types available. Let’s delve into the three main types you’re likely to come across.
Stationary Tumblers
Stationary tumblers are fixed in one place. They often have a base that allows for manual rotation. These models are good for gardeners who have a permanent spot for composting. Their simple design typically makes them less expensive than other types. However, they may require more effort to turn, especially as the compost gets heavier.
Rotating Tumblers
Rotating tumblers are designed to make turning the compost easier. They are mounted on a frame and can be spun with a handle. This type is great for those who want to effortlessly mix their compost. The rotation ensures good aeration and quick decomposition. They can be more costly but offer convenience and efficiency.
Dual Chamber Tumblers
Dual chamber tumblers feature two compartments. This allows you to have two batches of compost at different stages. While one side is curing, you can add fresh materials to the other. Dual chambers are excellent for continuous compost production. They can be more expensive, but they provide a steady supply of compost.
When considering these types, think about your composting habits, volume of waste, and how quickly you want the compost ready. Your choice among these types will influence the ease and speed of your composting efforts.
Top Rated Compost Tumblers in the Market
When shopping for the best compost tumbler, you’ll want to know about top-rated models. These have proven to offer the key features gardeners look for: durability, ease of use, and efficient composting. Here are some favorites on the market:
###FCMP Outdoor IM4000 Tumbling Composter
The FCMP Outdoor IM4000 is a popular dual-chamber model. It’s known for its ease of use and quick compost turnaround. The sturdy construction assures long-term use.
###Envirocycle The Most Beautiful Composter in The World
The Envirocycle composter stands out with its aesthetic design. It’s dual-purpose, acting both as a compost tumbler and a tea maker. It’s also made of durable, BPA-free materials.
###Lifetime 60058 Compost Tumbler
Lifetime’s 60058 model boasts a large capacity, useful for bigger households. It features an internal bar for better mixing and aeration. The tumbler is made of high-density polyethylene, ensuring UV protection and durability.
###Good Ideas EZCJR-BLK 7-Cubic-Foot Compost Wizard Jr.
This compact tumbler is great for small spaces. It’s easy to turn and has a convenient wheeled base for mobility. Made from recycled materials, it’s also an environmentally conscious choice.
Look into these models and compare them with your needs. The best compost tumbler for you is one that fits your garden size, waste output, and user preference.
Factors to Consider Before Buying a Compost Tumbler
Before you buy the best compost tumbler, there are crucial factors to ponder. These will shape how well the tumbler serves your composting needs.
Location and Climate Considerations
Think about where you will place your compost tumbler. The location should be near your garden but also accessible. It’s vital to check the sunlight the area gets. Some tumblers may fade or degrade if exposed to too much sun. Also, consider your climate. If you live in a region with heavy snow or rain, ensure the tumbler is weather-resistant. It should handle the elements without rusting or cracking.
Budget and Cost Effectiveness
Your budget is a key factor in your choice. The best compost tumbler isn’t always the most expensive. Weigh the cost against the features it offers. Does it have a good capacity and is it durable? Check if the tumbler has a warranty. This can save on costs in case of defects. Remember, investing more at the start can mean lower costs down the road. A sturdy, efficient tumbler may cost less over its lifespan. It reduces the need for replacements or repairs.

Tips for Getting the Most Out of Your Compost Tumbler
To make the most of your compost tumbler, follow these practical tips. They will help you produce quality compost quickly and efficiently.
- Balance Your Greens and Browns: Keep a good balance of green materials (like kitchen scraps) and brown materials (like dry leaves). This mix helps your compost break down well.
- Cut Larger Pieces Smaller: Chop larger waste into smaller pieces before adding them to your tumbler. Smaller pieces decompose faster.
- Regular Turning: Turn your tumbler every few days to mix and aerate the compost. This speeds up the decomposition process.
- Monitor Moisture Levels: The compost should be damp but not wet. If it’s too dry, add water. If it’s too wet, add dry brown materials.
- Avoid Overfilling: Don’t stuff the tumbler. Leave room for the contents to move freely when turned.
- Check for Readiness: Your compost should look dark and crumbly when it’s ready. It should also have an earthy smell. If it’s still chunky or smells bad, keep composting.
- Clean Your Tumbler: After emptying your tumbler, give it a quick clean. This keeps it ready for your next batch.
- Use Compost Wisely: Mix your finished compost into garden soil or use it as a top dressing for plants.
By following these simple tips, your best compost tumbler will work at its peak. You’ll have a steady supply of great compost to enrich your garden.
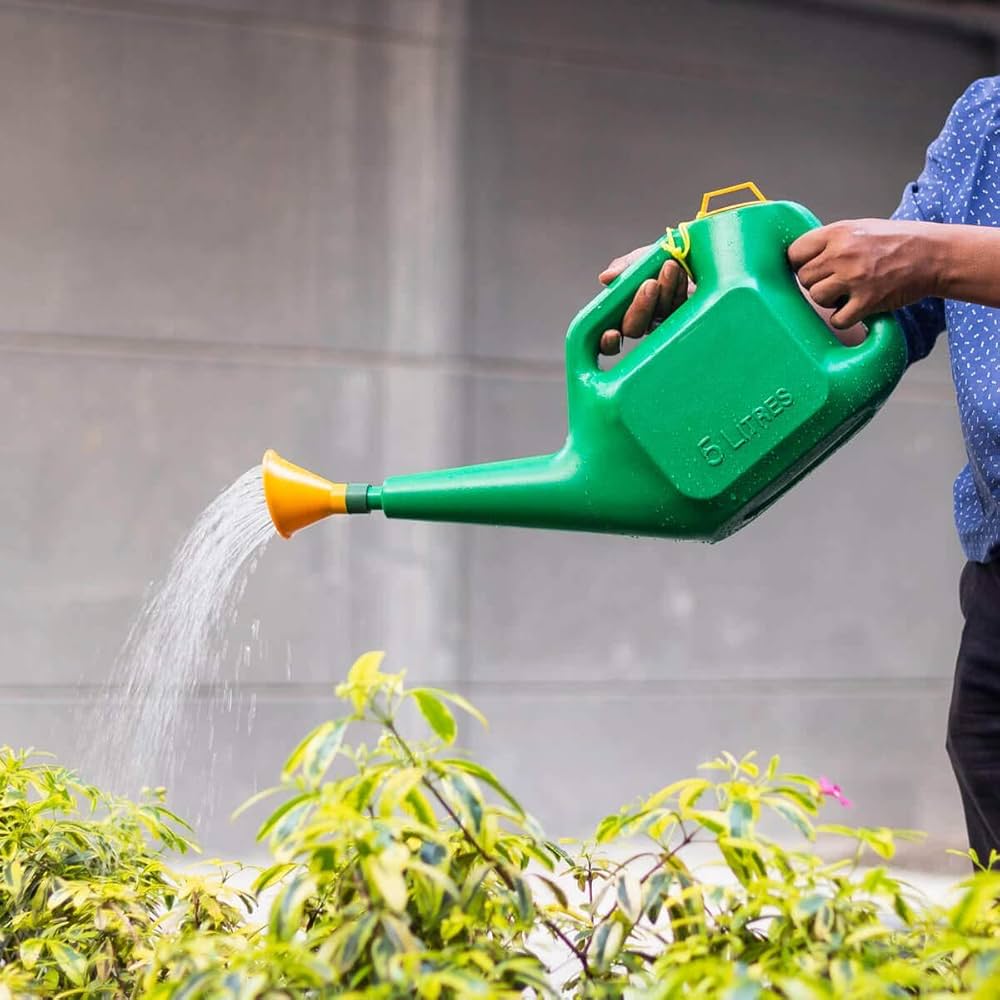
The Smart Watering: Choosing the Right Watering Can for Plants
The Importance of Proper Watering for Plant Health
Proper watering is crucial for plant health. It ensures that plants get the right amount of moisture they need to grow. Too much water can lead to root rot, a common issue that can harm or kill your plants. On the other hand, too little water can dry out the roots, causing stress and stunted growth. A good watering can for plants helps gardeners provide consistent water. Consistency is key to avoiding the swings of over or under-watering. It also helps in distributing water evenly to all parts of the soil. This even distribution allows roots to absorb moisture and nutrients well. Choose a watering can that suits the needs of your plants and your gardening style. This choice can make a big difference in the health and beauty of your garden. Remember, healthy plants resist pests and diseases better, and they flourish, providing you with a lush, vibrant garden. Every drop counts, so it’s important to water wisely and effectively.

Types of Watering Cans and How to Choose
Choosing the right watering can for plants is a fundamental gardening decision. Different cans offer various benefits and limitations. When picking a can, consider your garden size, plant types, and how often you need to water. Let’s explore the common types of watering cans to help you make an informed choice.
Metal vs. Plastic Watering Cans
Metal watering cans are durable and often have a classic look. They withstand wear and resist damage from falls or harsh weather. However, they can be heavier and may rust over time, which is a factor to consider. Plastic cans are lightweight and usually more affordable. They won’t rust, which makes them a good choice for outdoor use. But, they may not last as long as metal cans if left out in the sun, as UV rays can weaken the plastic.
Specialty Watering Cans for Different Plants
Some plants require special care and hence, special watering cans. For delicate or small plants, consider cans with a narrow spout for precise watering. For hanging or tall plants, a can with a long spout can reach without much effort. There are also cans designed for seedlings with a gentle shower head to avoid disturbing the soil. Always match the can’s features with the needs of your plants for the best results.
Features to Look For in a Watering Can
When shopping for the perfect watering can for plants, certain features stand out as especially important. Let’s dive into the specific aspects you should consider to find a can that does not only meet your plants’ needs but also enhances your gardening experience.
Spout Length and Shape
The spout of a watering can plays a crucial role in how water is delivered to your plants. A longer spout ensures you can reach plants in the back of the bed or hanging baskets without straining. Look for spouts with a gentle curve for precision watering without splashing. Shape matters too; narrower spouts suit seedlings and delicate plants, directing water right to the roots without displacing soil.
Capacity and Weight Considerations
How much a watering can holds impacts how often you’ll need to refill it. Larger capacities are perfect for extensive gardens, reducing the number of trips to the tap. Yet, keep in mind the weight when full. A watering can should be easy to carry and manage. Opt for a balance between capacity and weight that you can comfortably handle when full.
Durability and Material Quality
The material of a watering can affects its longevity. Metal cans are strong and may last longer, but they can be heavier and prone to rust. High-quality plastic is lighter and rust-proof but might degrade in constant sun. Assess your use, whether indoors or outdoors, and choose a material that will endure your gardening conditions while maintaining its form and function.
Ergonomic Designs for Comfortable Use
Ergonomic designs in watering cans can greatly increase comfort during use. These designs focus on reducing the strain on your hands, wrists, and back while watering. Look for watering cans with curved handles that fit well in your hand. This provides a natural grip, reducing the risk of cramping or fatigue. A well-balanced can makes it easier to carry when filled with water. It should not feel too heavy on one side. Some cans also have a second handle at the rear. This allows you to use both hands for better control and less strain when pouring. A can with an ergonomic design may also feature a tilt in the body. This helps to direct water flow without the need to bend too much. Remember that a watering can for plants should always feel comfortable to use. If you find one that suits your body and your garden’s layout, watering becomes a less tiresome task. A gardener who is at ease is more likely to care for their plants regularly and with joy. When shopping, it’s worth trying out different cans to find the best ergonomic fit for you.
Innovative Watering Can Features
When choosing the optimal watering can for plants, innovative features can enhance the watering process. Modern watering cans come with added functionalities that cater to different gardening needs. From built-in measuring tools to adjustable spray nozzles, these features can simplify plant care and ensure your plants thrive.
Built-in Measuring Tools
One smart feature of some modern watering cans is the inclusion of built-in measuring tools. These allow gardeners to provide the precise amount of water their plants need. Measuring marks on the side or inside of the can show how much water you’re using. This is very helpful for following the specific watering requirements of various plant species. It prevents over-watering and under-watering, promoting healthy plant growth.
Adjustable Spray Nozzles
Adjustable spray nozzles are another feature that can make a big difference. They allow you to customize the water flow to suit the needs of each plant. You can choose a gentle mist for delicate plants or a stronger stream for robust, deep-rooted plants. This adjustability helps target the watering, avoids displacing soil around the base of the plants, and offers versatility to the gardener. It’s crucial to have a watering can that adapts to your diverse garden.
Eco-Friendly Watering Can Options
In the age of sustainability, opting for eco-friendly watering can options becomes a priority for gardeners. Not only do these options reduce environmental impact, they also ensure that you can care for your plants responsibly. Here are some eco-friendly choices to consider:
- Recycled Materials: Choose watering cans made from recycled materials. These cans give a second life to plastic and reduce waste in landfills. Look for labels that confirm the recycled content.
- Biodegradable Cans: Some watering cans are now available in biodegradable materials. These will decompose over time and won’t clutter the planet for centuries.
- Solar-powered Watering Systems: Modern systems use solar power to water plants. This means less manual work for you and no electricity use, which is great for the environment.
- Rainwater Harvesting: Collect rainwater in barrels and use it with a simple watering can. You’ll save tap water and provide your plants with natural water. Make sure your barrel has a secure lid to keep out mosquitoes.
- Long-lasting Designs: Durable, long-lasting watering cans may not seem eco-friendly at first. However, investing in one reduces the need to replace it often, which is good for the planet.
- Local Sourcing: Buy watering cans made locally. This cuts down on transportation emissions and supports local economies.
When choosing an eco-friendly watering can for plants, remember that every small action counts. Whether it’s using recycled products or harnessing the power of the sun, the right choices can help preserve our planet while keeping your garden green and healthy. Check for capacity, durability, and ergonomic features in these eco-friendly options as well. Balance function, sustainability, and your gardening needs for the best pick.
Tips for Efficient Watering Techniques
Efficient watering techniques conserve water and support plant health. Here are practical tips to use a watering can for plants efficiently:
- Water Early or Late: Water plants during the cooler parts of the day. This reduces evaporation and ensures that plants have time to absorb moisture.
- Target the Root Zone: Aim the water at the base of the plants. Wetting the foliage is less effective and can promote disease.
- Mulch Around Plants: Mulch conserves moisture and reduces water runoff. It also helps prevent weeds that compete with plants for water.
- Use a Watering Schedule: Set a routine based on your plants’ needs. Some plants require weekly watering, while others may need more frequent care.
- Observe Your Plants: Look for signs of over or under-watering. Adjust your technique and schedule as needed for the well-being of your plants.
- Implement Drip Irrigation: For larger areas, consider a drip irrigation system. This delivers water directly to the roots and can be time-saving.
By following these efficient watering practices with your watering can for plants, you’ll ensure your garden is lush and healthy while also conserving valuable resources.
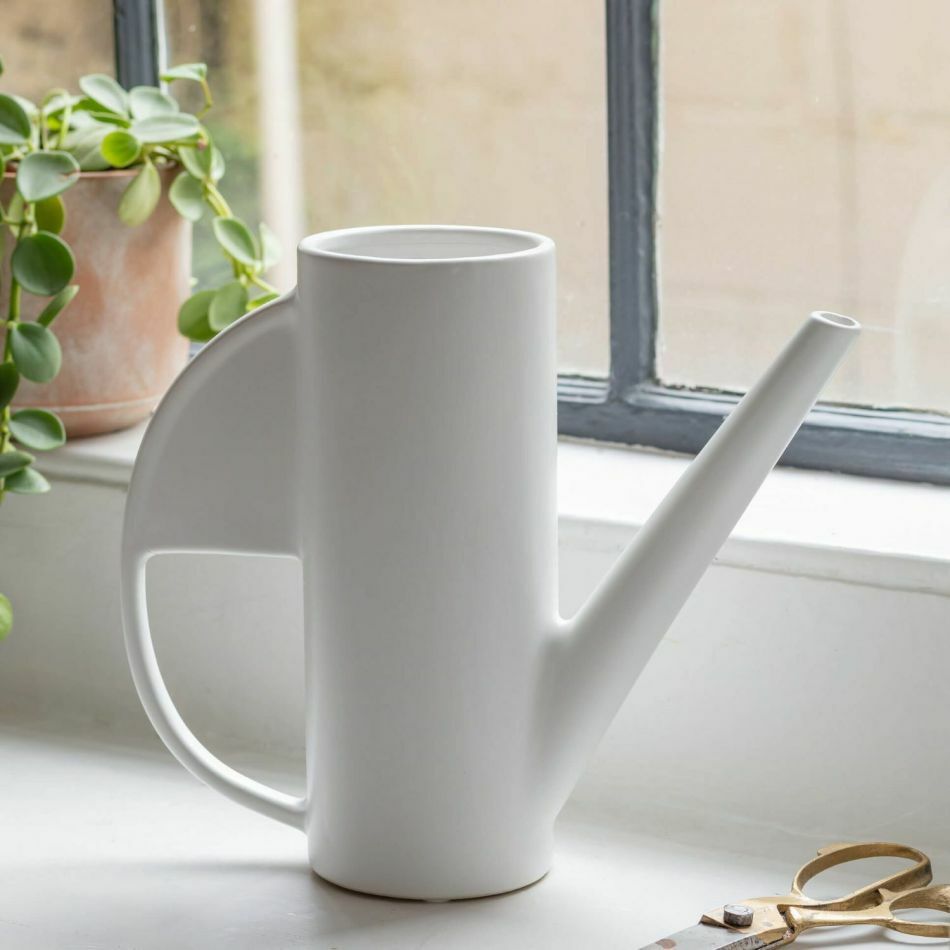
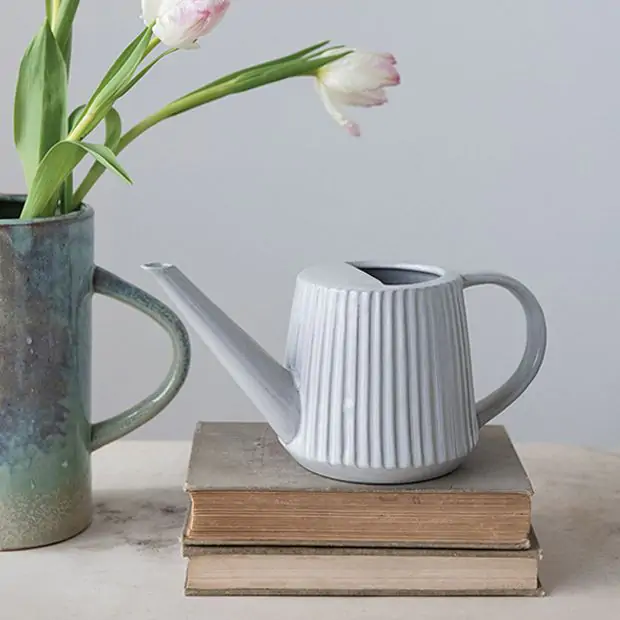
The Eco-Friendly Irrigation: Your Ceramic Watering Can for 2025
The Rise of Ceramic Watering Cans
Ceramic watering can is becoming more popular with gardeners who value sustainability. These cans offer an eco-friendly way to water plants. More gardeners are choosing ceramic over plastic. They understand that every small step helps the environment. Sales numbers show that more people buy ceramic watering cans each year. Experts say this trend will continue to grow.
Garden shops and online stores report higher demand for ceramic watering cans. They come in various shapes and sizes. Some even have artistic designs. This makes them not just a tool, but a garden feature. Many people like that they are made from natural materials. This resonates with the push for environmentally friendly products.
Sustainability blogs and magazines often feature ceramic watering cans. They show up as recommended products for responsible gardening. Social media influencers share their ceramic cans with followers. This helps spread awareness of their benefits. Workshops and gardening classes also promote them as part of sustainable living.
Ceramic watering cans are part of a larger trend. People want garden tools that last longer and harm the planet less. They are willing to pay more upfront for a product that will not need replacing often. This mindset is essential as the world moves toward greener living practices.
Advantages of Ceramic Watering Cans for Sustainable Gardening
Ceramic watering cans come with several benefits for those who care about the environment. These cans are durable and do not wear out quickly. This means less waste in landfills over time. They are often handmade, which supports local artisans and reduces the carbon footprint from mass production. Unlike plastic, ceramic materials do not release harmful chemicals into the soil. This is better for plant health and the ecosystem.
Ceramic watering cans also retain water temperature well. This protects vulnerable plants from shock due to cold water. They are heavier than plastic, which can help with exercise as you garden. Their unique designs can enhance garden aesthetics too.
Using a ceramic watering can reduces reliance on plastic. Plastic is a major environmental threat. Opting for ceramic helps cut down on plastic production and pollution. It is a choice that aligns with a sustainable gardening philosophy. Every ceramic watering can used is a step towards a greener earth.
Gardeners find that ceramic watering cans offer a better balance between functionality and beauty. They make a statement about the gardener’s commitment to the environment. As more people become aware of the impact of their choices, ceramic watering cans are set to become even more popular.
How Ceramic Watering Cans Contribute to Environmental Conservation
Ceramic watering cans play a significant role in environmental conservation. These cans, made from natural materials, provide an eco-friendly alternative to their plastic counterparts. Let’s explore their contributions to the environment.
First, they are long-lasting. The durability of ceramic reduces the need for frequent replacements. Fewer replacements mean less waste ending up in landfills. This is crucial for maintaining healthy ecosystems.
Second, the production process of ceramic watering cans is typically more sustainable. They often come from local artisans and not mass-produced factories. This supports local economies and decreases the carbon emissions associated with transportation.
Third, ceramic does not leach chemicals into the soil, unlike plastic. This feature ensures that plants and surrounding wildlife are safe from toxic substances. It also promotes healthier soil and plant life, which is vital for biodiversity.
Additionally, using ceramic watering cans reduces the demand for plastic. Lower plastic demand can lead to decreased plastic production. This is a major step towards less plastic pollution in the environment.
Finally, water temperature regulation is another hidden benefit. Ceramic watering cans help maintain water at a temperature that won’t shock the plants. This can lead to more robust plant growth and reduce the stress on plant systems. Healthier plants contribute to a better overall environment.
By choosing ceramic over plastic, gardeners are making a conscious decision to protect the planet. Each use of a ceramic watering can is a small yet significant action for a greener future.

Design Innovations in Ceramic Watering Cans for 2025
As we look towards 2025, design innovations in ceramic watering cans show a promising future. Here are some key features you can expect to find in the next generation of eco-friendly irrigation tools:
Customizable Designs
Expect more options to personalize your watering can to reflect your style. Artisans may offer custom glazes, patterns, and engravings.
Improved Ergonomics
Designers are focusing on better grips and balances to make watering easier. These ergonomic features are essential for comfort during long gardening sessions.
Integrated Water Filters
Some models might include built-in water filters. These filters will ensure that plants receive clean water, free from impurities.
Smart Watering Technology
We might see cans equipped with sensors that alert gardeners when plants need water. This technology saves water and promotes plant health.
Multi-Functional Attachments
Future cans could have attachments for different watering needs, like misting or targeted pouring. This adaptability will make them suitable for a variety of plants.
These design innovations aim to combine functionality, beauty, and sustainability. They reflect how the choice of a ceramic watering can is more than a practical decision. It’s a statement of care for both the garden and the environment. Staying informed on the latest trends helps gardeners make responsible choices for the future of gardening.
Ceramic vs. Plastic: A Comparative Analysis for Garden Enthusiasts
Gardeners often debate the merits of ceramic vs. plastic watering cans. This analysis aims to clarify the benefits and drawbacks of each type. We’ll consider their impact on sustainability, cost, and utility in the garden.
Ceramic watering cans shine in eco-friendliness. They come from natural clay and offer a sustainable choice. Over time, they don’t break down into microplastics that pollute the soil. Ceramic cans last longer, reducing the need to replace them often. This benefits our landfills and reduces waste. They often support local artisans, which aids local economies. And they do not leach harmful chemicals into the ground.
Plastic watering cans, on the other hand, are lightweight and often cheaper upfront. But they lack the longevity of ceramic. They can crack and fade, leading to frequent replacements. Their production process adds to carbon emissions and environmental harm. Plus, over time, they can release chemicals into the soil and harm plant life.
In terms of design, ceramic watering cans offer unique, artistic styles. They can be a statement piece in your garden. They also keep water temperatures more consistent, helping plant health. Plastic varieties often come in standard shapes and colors, with little room for personal flair or artistic expression.
On the utility front, plastic cans are easier to carry due to being lighter. But they may not offer the same ergonomic designs as some newer ceramic models. With innovations in the ceramic industry, ergonomics are improving.
Choosing the Right Ceramic Watering Can for Your Garden
Choosing a ceramic watering can involve several considerations. Here are tips to help you find the perfect fit:
Consider Capacity and Size
Think about the size of your garden. A larger garden may need a can with more capacity. Small gardens or indoor plants do well with a smaller can. Balance is key. You want a can that is big enough to water all your plants but not too heavy to carry.
Evaluate the Spout Design
The design of the spout affects water flow. Choose a long spout for precise watering. This is good for reaching the base of plants. For seedlings or delicate plants, look for a gentle shower spout. This ensures a soft water flow that won’t damage young plants.
Look for Durability
Quality matters. High-quality ceramic can last many years. It may cost more, but it saves you money over time. A durable watering can also supports sustainable practices.
Check the Handle Comfort
A comfortable handle matters when watering for a longer time. Ergonomic handles reduce strain on your hands and wrists. Ensure it feels good in your hand and provides a secure grip.
Style and Appearance
Garden tools can also be decorative. Choose a ceramic watering can that fits your personal style. Some have colorful patterns or rustic designs. Others are sleek and modern. Pick one that matches your garden’s aesthetic.
Brand and Price
Read reviews and compare brands. Price is a factor, but consider it alongside durability and design. Invest in a brand known for quality. It’s worth the extra cost for a can that lasts longer and works better.
In summary, when choosing a ceramic watering can, consider your garden’s needs and your comfort. Look for a balance between functionality, durability, and style. By making the right choice, you’re committing to both the beauty of your garden and the health of the planet. Remember to check that the can aligns with your personal gardening values, ensuring that every aspect of your gardening reflects your dedication to sustainability.
The Future of Garden Irrigation: Trends and Predictions
As we look ahead to 2025 and beyond, garden irrigation trends appear to be evolving. There’s a shifting focus towards sustainability and efficiency in garden practices. Here are some of the latest trends and predictions in garden irrigation:
- Eco-Friendly Materials: The use of eco-friendly materials like ceramic in garden tools will continue to rise. Gardeners are making conscious choices to reduce their environmental impact.
- Smart Irrigation Systems: Advancements in technology may introduce smart ceramic watering cans. These could have sensors to monitor soil moisture and provide water as needed. This technology ensures precision watering, conserving water and promoting healthier plants.
- Water Conservation Ethics: A growing emphasis on water conservation will influence garden irrigation systems. The design of watering cans might evolve to prevent water waste and maximize efficiency.
- Localized Irrigation: The trend toward localized watering, targeting specific areas, is on the rise. Custom spouts and attachments on ceramic watering cans can make this easier.
- Drought-resistant Gardening: With climate change, drought-resistant gardening is becoming crucial. Ceramic watering cans can help in this aspect by keeping water at a more consistent temperature reducing plant stress.
These trends point to a more thoughtful and sustainable approach to gardening. The ceramic watering can, with its blend of form, function, and eco-friendliness, is set to be at the forefront of this movement. As gardens become eco-conscious, the tools we use are expected to follow suit. The humble watering can, reinvented in ceramic, may soon be a symbol of modern, sustainable gardening practices.
Best Practices for Using and Maintaining Ceramic Watering Cans
To ensure your ceramic watering can lasts, follow these best practices for use and care.
Proper Filling Techniques
Avoid overfilling to prevent spills and keep the weight manageable. Fill only to the level you need.
Balanced Handling
Use both hands if needed for better control. This helps avoid strain and potential drops.
Gentle Watering
Pour slowly and steadily. Aim for the soil near the plant base to avoid damaging leaves and stems.
Regular Cleaning
Rinse the can after each use to remove dirt and debris. Clean it thoroughly with mild soap periodically.
Avoiding Extremes
Keep your watering can away from extreme temperatures. Don’t let it freeze or sit in direct sunlight for too long.
Inspection and Repair
Check for cracks or chips regularly. If repairable, use food-safe sealant to mend minor damages.
Proper Storage
Store your can upside down or in a dry location to prevent water accumulation and potential mold growth.
By taking care of your ceramic watering can, you are not just prolonging its life. You are also promoting sustainable gardening practices. Regular maintenance ensures that the can remains a valuable tool for your eco-friendly watering needs.
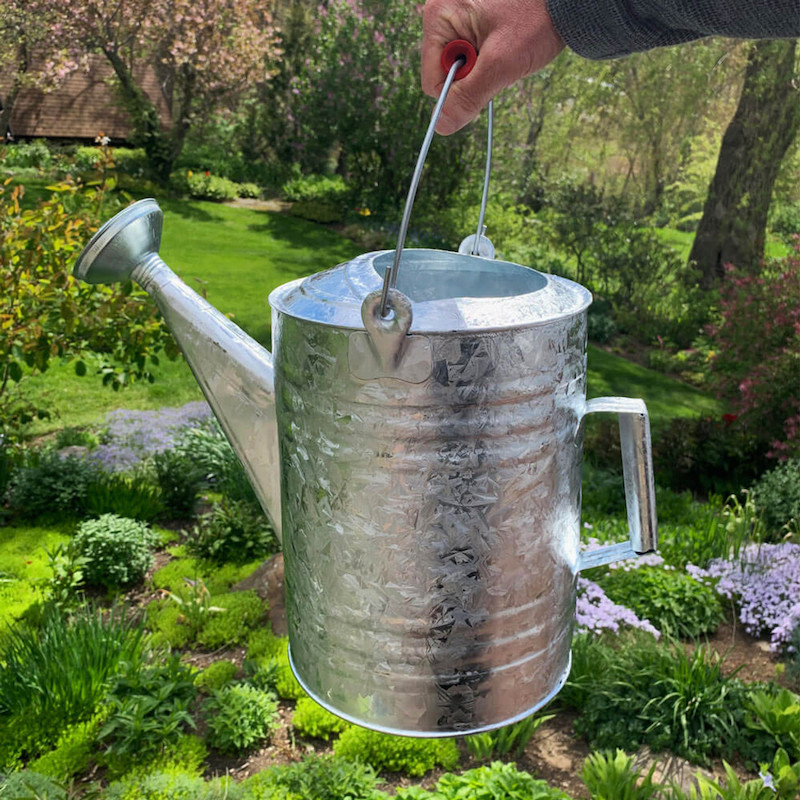
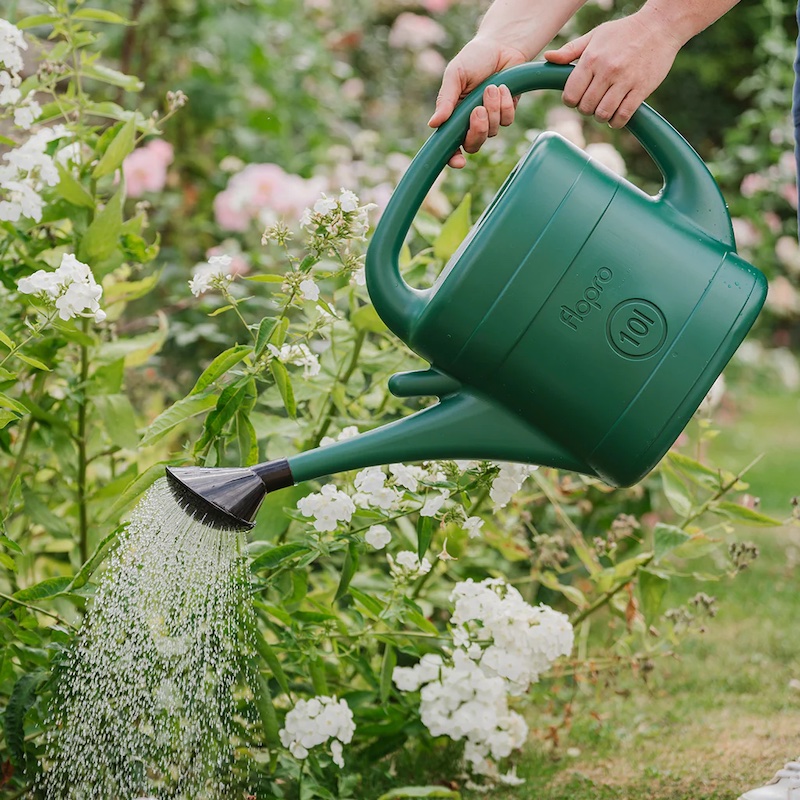
Efficient Watering: The Best 2 Gallon Galvanized Watering Can
Benefits of Using Galvanized Watering Cans
Galvanized watering cans offer several benefits that make them a preferred choice for gardeners. First, they are incredibly durable. Built to withstand the elements, a 2 gallon galvanized watering can resists rust and corrosion. This means you can use it for years without worrying about degradation.
Another key advantage is their aesthetic appeal. The classic look of galvanized metal adds a touch of rustic charm to your garden. It’s not just a tool; it’s a part of your garden’s decor.
Moreover, galvanized cans ensure precise watering. The design typically includes a spout that allows for targeted watering, which is essential for the health of your plants. You can direct the water to the root systems without splashing it on the leaves, which can prevent fungal diseases.
Lastly, these cans help conserve water. By controlling the flow of water, you can avoid overwatering and wastage. With a 2 gallon galvanized watering can, you can carry enough water for a small garden without making multiple trips to a tap.
Using galvanized cans is not just practical; it’s also a step towards sustainable gardening. Their long lifespan means you’ll be purchasing fewer cans over time, reducing waste and saving money in the long run.

Key Features of 2 Gallon Galvanized Watering Cans
When looking for a 2 gallon galvanized watering can, there are several key features to consider that set them apart from other options. Understanding these features will help you make the right choice for your gardening needs.
- Durability: These cans are made from steel that has been galvanized, or coated in a layer of protective zinc. This process makes them strong and resistant to both rust and the elements.
- Capacity: True to their name, these cans hold up to 2 gallons of water. This volume is ideal for small to medium gardens, allowing you to water several plants before needing a refill.
- Ergonomics: Look for a can with a comfortable handle and a balanced design. A good handle ensures ease of carrying when the can is full, while a balanced can make pouring more controlled.
- Spout Design: Most 2 gallon galvanized watering cans feature a long spout, which is beneficial for reaching plants without having to step on beds. Some spouts may have a removable rosette that distributes water evenly.
- Aesthetic Appeal: The metallic finish gives your gardening toolkit a classic, rustic look. A galvanized watering can be both a functional tool and an attractive accessory for your garden.
Incorporating these features into your decision-making will guide you towards a 2 gallon galvanized watering can that meets both your practical gardening requirements and your style preferences. Keep an eye out for additional attributes that may enhance the usability and lifetime of the can, such as a reinforced bottom or a sealant coating on the inside to further prevent rusting.
How to Choose the Right Galvanized Watering Can for Your Garden
Choosing the right 2 gallon galvanized watering can requires attention to several details. Look for quality construction, ensuring it has sturdy handles for a firm grip and durability. A long spout is key for precise watering, avoiding any damage to delicate plants. An ergonomic design is another critical factor, providing comfort when carrying and pouring.
To ensure efficient watering, check the can’s balance. A well-balanced can will make it easier to manage when full. Also, consider the type of spout. Some gardeners prefer a detachable rose, which evenly disperses water and is gentle on young seedlings.
Size matters in your selection process. A 2 gallon capacity is perfect for small to medium gardens but think about the weight when full. It should be manageable and not cause strain.
Aesthetic appeal might weigh in on your choice. A functional tool that looks good can enhance the enjoyment of your gardening activities. Finally, read reviews and compare products. Other gardeners’ experiences can inform your decision, highlighting ease of use and longevity.
In summary, prioritize construction quality, spout design, ergonomics, balance, and user reviews. These factors will guide you to the right choice for your garden needs. Always remember, a good galvanized watering can is a long-term investment for any gardener.
Tips for Efficient Watering with Galvanized Cans
Efficient watering practices can save time and resources while promoting plant health. Here are some valuable tips on how to water effectively with a 2 gallon galvanized watering can:
- Monitor Soil Moisture: Check the soil before watering. Watering when necessary avoids overwatering and water waste.
- Best Time to Water: Water early morning or late afternoon. Less water evaporates, and plants absorb it better.
- Consistent Watering Schedule: Keep a regular watering routine. Plants thrive on consistency.
- Use a Rose Attachment: A rose on your spout distributes water evenly, protecting delicate plants from strong water flow.
- Target the Root Zone: Aim the spout near the base of plants. This directs water to the roots, where it’s needed most.
- Fill Can Less than Capacity: Don’t fill your can to the brim. A slightly lighter can is easier to handle.
- Water Deeply and Less Frequently: Deep watering encourages deep root growth. This leads to stronger, more resilient plants.
- Avoid Wetting Foliage: Keeping leaves dry helps prevent the spread of plant diseases.
By incorporating these tips, you can use your 2 gallon galvanized watering can effectively, ensuring your garden remains lush and healthy while also being mindful of water use.
Maintenance and Care for Galvanized Watering Cans
To keep your 2 gallon galvanized watering can in top condition, follow these maintenance and care tips:
- Regular Cleaning: After use, rinse the can with water to remove any remaining dirt or plant debris. This prevents build-up and maintains cleanliness.
- Dry Thoroughly: Ensure the can is completely dry before storing it. This helps prevent rust, even though galvanized cans are rust-resistant.
- Store Properly: Keep your watering can in a dry place, away from direct sunlight and extreme temperatures to protect its material.
- Check for Leaks: Inspect your can periodically for any signs of leaks. Small punctures or seams coming apart can be repaired with waterproof sealant.
- Handle with Care: Even though your can is durable, handle it gently to avoid dents which can affect its balance and usability.
- Avoid Chemicals: Don’t use harsh chemicals for cleaning. They can damage the galvanized layer.
By caring for your can properly, you prolong its life and ensure it remains a reliable tool for your gardening activities.

The Environmental Impact of Using Metal Watering Cans
Metal watering cans, like the 2 gallon galvanized options, serve as a positive step toward eco-friendly gardening. They provide an alternative to plastic cans, which can break down and add to landfill waste. Metal cans are more durable, meaning they don’t need replacing as often. This reduces the amount of waste we produce over time.
Using a metal can also helps in conserving water. With precise pouring, you give plants only what they need. This cuts down on water use and waste. Such conservation supports a healthier environment.
Galvanized cans are also recyclable. When they reach the end of their life, you can recycle them instead of tossing them out. This ensures materials are not wasted and can be repurposed into new products.
Lastly, these cans reduce dependence on plastic manufacturing. Making plastic often involves harmful chemicals and processes. By choosing metal over plastic, we limit these environmental impacts.
In summary, opting for a metal watering can contributes positively to environmental conservation. It reduces waste, conserves water, supports recycling, and lessens reliance on plastic production.
Where to Purchase 2 Gallon Galvanized Watering Cans
Finding the ideal 2 gallon galvanized watering can is simple when you know where to look. Here are some suggestions on where to make your purchase:
- Local Garden Centers: Start with your local shops. They often carry quality gardening tools. Ask the staff for recommendations on galvanized cans.
- Hardware Stores: These stores have a range of tools for home and garden. Check their gardening section for galvanized watering cans.
- Online Retailers: Websites like Amazon or eBay offer a wide selection. You can compare prices and read reviews from other gardeners.
- Specialty Online Garden Shops: Look for stores specializing in gardening supplies. They often stock high-quality items not found elsewhere.
- Farmer’s Markets: Sometimes, local artisans sell galvanized cans at these markets. It’s a good way to support local craftsmen.
- Antique Stores: For a unique can, try antique shops. They might carry vintage galvanized cans with a timeless appeal.
- Direct from Manufacturers: Some manufacturers sell directly to customers, which might save money. Check their websites for deals.
Wherever you decide to shop for your 2 gallon galvanized watering can, remember to check for the key features discussed earlier. Ensure it’s well-built, comfortable to carry, has a good spout design, and suits your garden’s style.
Creative Ways to Use Your Galvanized Watering Can Beyond the Garden
A 2 gallon galvanized watering can is a handy tool in the garden. But its use goes beyond watering plants. Here are some creative ways you can repurpose your galvanized can around the house:
- As a Flower Vase: Fill the can with fresh flowers for a rustic centerpiece. Its classic look fits any decor.
- For Holding Kitchen Utensils: Use it to store spoons, spatulas, and whisks. Keep it by the stove for convenience.
- As a Cleaning Tool Holder: Hold cleaning brushes and cloths in it. This keeps your cleaning tools in one spot.
- In Craft Projects: It can be a part of a bigger craft. Think lamp bases or bird feeders.
- As an Ice Bucket: During parties, fill it with ice. It becomes a unique way to keep drinks cool.
- For Pet Watering: Offer water to pets outdoors. Just make sure it’s clean and refreshed daily.
Each idea ensures your 2 gallon galvanized watering can stays useful. It can even become a charming part of your home decor.
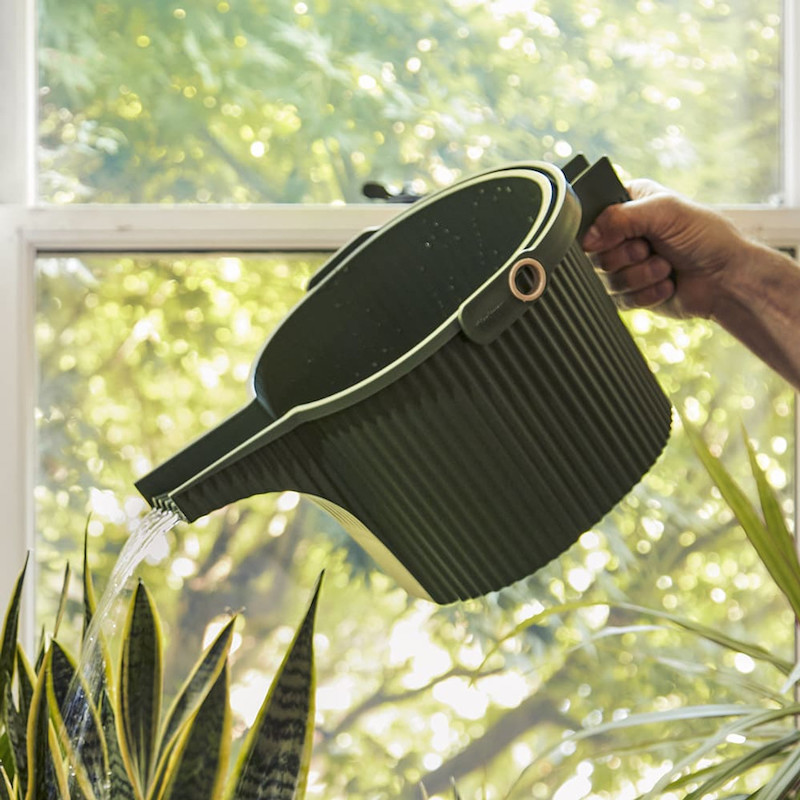
Sustainable Gardening: Choosing a Green Plastic Watering Can
The Importance of Sustainable Gardening Practices
Sustainable gardening is crucial for several reasons. First, it helps protect our environment. Using products and practices that reduce harm to the ecosystem is essential. The choices we make in our gardens have a big impact. A green plastic watering can is more than a tool. It’s a statement of our commitment to the environment.
Using eco-friendly tools like a green plastic watering can reduces pollution. It also conserves resources. Sustainable gardening practices prevent soil erosion and support biodiversity. They ensure that our gardening activities benefit the land rather than harm it.
Moreover, sustainable practices in gardening can improve our health. They minimize exposure to toxic chemicals found in some gardening products. By choosing green products, we guard our wellbeing and that of our families.
Sustainable gardening also involves using water wisely. A green plastic watering can help us do that. It allows us to water our plants efficiently. We avoid wasting water, one of our most precious resources.
In summary, sustainable gardening is key to preserving our planet for future generations. It creates healthier living spaces and promotes a balance with nature. A green plastic watering can is just one piece of a much larger puzzle. Together, these practices and tools build a foundation for a greener, more sustainable world.

What Makes a Watering Can ‘Green’?
When we talk about a ‘green’ plastic watering can, we mean eco-friendliness. But what exactly turns a simple watering can into a green icon? Here, we’ll explore the features that make a watering can environmentally friendly.
Firstly, the materials matter. A green watering can uses recycled or sustainable materials. Manufacturers often use recycled plastics to lessen waste. These materials reduce the need for new resources. They also cut down energy use during production.
Secondly, how it’s made counts. Green watering cans come from factories that follow eco-friendly practices. They use clean energy and reduce emissions. This means less pollution harming our air and water.
Thirdly, durability is crucial. A green plastic watering can should last for many years. Durable products mean less frequent replacements. This reduces the waste cycle.
Lastly, a green watering can is often recyclable. At the end of its life, you can recycle it. This keeps it out of landfills. Our planet stays cleaner.
To sum up, a green plastic watering can is sustainable, made with care for the environment, durable, and recyclable. Choose wisely and our earth will thank you.
Types of Eco-Friendly Materials for Plastic Watering Cans
Choosing the right type of material for a green plastic watering can is vital. Here are common options:
Recycled Plastics
A popular choice is recycled plastics. They keep waste out of landfills. Recycled materials also save energy and resources.
Bioplastics
Bioplastics are another eco-friendly material. They come from renewable resources, like corn or sugarcane. This reduces fossil fuel use.
Plant-Based Plastics
Plant-based plastics are similar to bioplastics. They often use less water and carbon to produce. They decompose faster than conventional plastics.
Sustainable Polymers
Some manufacturers use sustainable polymers. These are designed to last longer. They aim to reduce replacement frequency.
Using these materials, a green plastic watering can serves its purpose. It does so without harming the environment. Remember to look for signs like ‘recycled’ or ‘biodegradable’ when choosing. This ensures the can fits with sustainable gardening values.
Factors to Consider When Choosing a Green Plastic Watering Can
When choosing a green plastic watering can, several factors are key. Let’s explore these considerations:
Material
Choose cans made from eco-friendly materials. Look for recycled plastics, bioplastics, or sustainable polymers.
Size and Design
Pick a size that fits your garden’s needs. A well-designed can should be comfortable to hold and easy to pour.
Durability
Select a can that will last many years. Durable cans reduce the need for frequent replacement.
Recyclability
Ensure your watering can is recyclable. Check for recycling codes and guidelines.
Manufacturing Process
Research how the can is made. Prefer brands that use clean energy and eco-friendly production practices.
Brand Ethics
Support brands with a clear commitment to sustainability. Some brands donate to environmental causes.
Certifications
Look for certifications like ‘recycled content’ or ‘biodegradable.’ They validate the can’s green status.
By considering these factors, you ensure your choice aligns with sustainable gardening values. A green plastic watering can is more than an item. It’s part of an eco-conscious decision to protect our planet.

Top Sustainable Brands for Green Plastic Watering Cans
When searching for a green plastic watering can, brand reputation matters. Top eco-conscious brands combine sustainability with quality. Here’s what to consider when choosing a brand:
Sustainability Commitment
Choose brands that prioritize sustainability. These brands use eco-friendly materials and production processes.
Quality and Durability
Good brands provide watering cans that are sturdy and long-lasting. This minimizes frequent replacements.
Eco-Friendly Manufacturing
The best brands use renewable energy in their operations. They strive to have a low carbon footprint.
Recycled Materials Usage
Top sustainable brands often use recycled plastics. This helps reduce waste and conserves resources.
Design Innovation
Leading companies innovate with ergonomic designs. Such designs make watering efficient and easy.
Positive Customer Reviews
High-rated brands are often backed by satisfied customers. Look for positive feedback on durability and functionality.
Certifications
Certifications like ‘recycled content’ are important. They prove the brand’s commitment to sustainability.
Remember, by choosing a brand that values the environment, you make a responsible choice. You contribute to a healthier planet with every green plastic watering can you purchase.
Care and Maintenance for Your Eco-Friendly Watering Can
To ensure your green plastic watering can lasts, proper care and maintenance are essential. Here are tips to help:
Proper Cleaning
After each use, rinse your can to remove dirt and debris. This prevents buildup that can cause damage over time. Use mild soap and water for a deeper clean but avoid harsh chemicals.
Storing Correctly
Store your watering can in a cool, dry place away from direct sunlight. UV rays can weaken the plastic over time. Keeping it indoors or shaded will extend its life.
Regular Inspection
Check your can regularly for cracks or leaks. Catching issues early can save you from needing a replacement. Small cracks can sometimes be repaired, extending the lifespan of the can.
Mindful Usage
Be gentle when using your can. Avoid dropping it or throwing it down. A careful handling approach helps maintain its condition.
Recycling
When it’s time to retire your can, recycle it if possible. Follow local recycling guidelines to ensure proper disposal.
By following these simple care instructions, your green plastic watering can will serve your garden well for many seasons. Remember, little efforts in maintenance go a long way in supporting sustainable living.
The Role of Watering Cans in Water Conservation
Watering cans play a crucial role in conserving water. The green plastic watering can embody this principle perfectly. Here’s how they contribute to water conservation:
Precision Watering
Green plastic watering cans allow for precise watering. You can target the water exactly where plants need it. This avoids waste and reduces excess runoff.
Reduced Water Usage
A can’s design often includes a long spout. This helps control water flow. This way, you use less water compared to hoses or sprinklers.
Encouraging Mindful Watering
Using a watering can makes you more aware of the amount of water you use. It promotes mindful watering practices that align with sustainable gardening.
By using green plastic watering cans, we can make a significant impact. They help conserve water while keeping our gardens thriving. Every drop counts, and a green watering can ensures not a single one is wasted.
Where to Find Green Plastic Watering Cans
Finding a suitable green plastic watering can is straightforward. Many garden centers and online retailers offer a variety of eco-conscious options. Start your search at local nurseries or garden supply stores. They often stock products that align with sustainable practices. Ask staff for recommendations. They can point you towards green options.
For a broad selection, check online platforms. Sites like Amazon, Etsy, or eBay list numerous brands. Look for those with eco-friendly credentials. Always read customer reviews. They provide insight into quality and sustainability aspects.
You could also visit websites of brands committed to sustainability. They usually feature their green watering cans prominently. Plus, buying directly from the source may offer more detailed product information. It also supports the brands’ eco-friendly efforts directly.
Some home improvement stores carry eco-friendly gardening tools as well. Brands like Home Depot or Lowe’s are expanding their green selections due to consumer demand. Their websites often have filters to help you find sustainable products easily.
Remember to use the factors and materials previously discussed to make your choice. Check for keywords like ‘recycled,’ ‘biodegradable,’ or ‘sustainable.’ They indicate a product’s green status. By selecting a green plastic watering can, you are making a conscious decision. You are supporting environmental sustainability with your purchase.
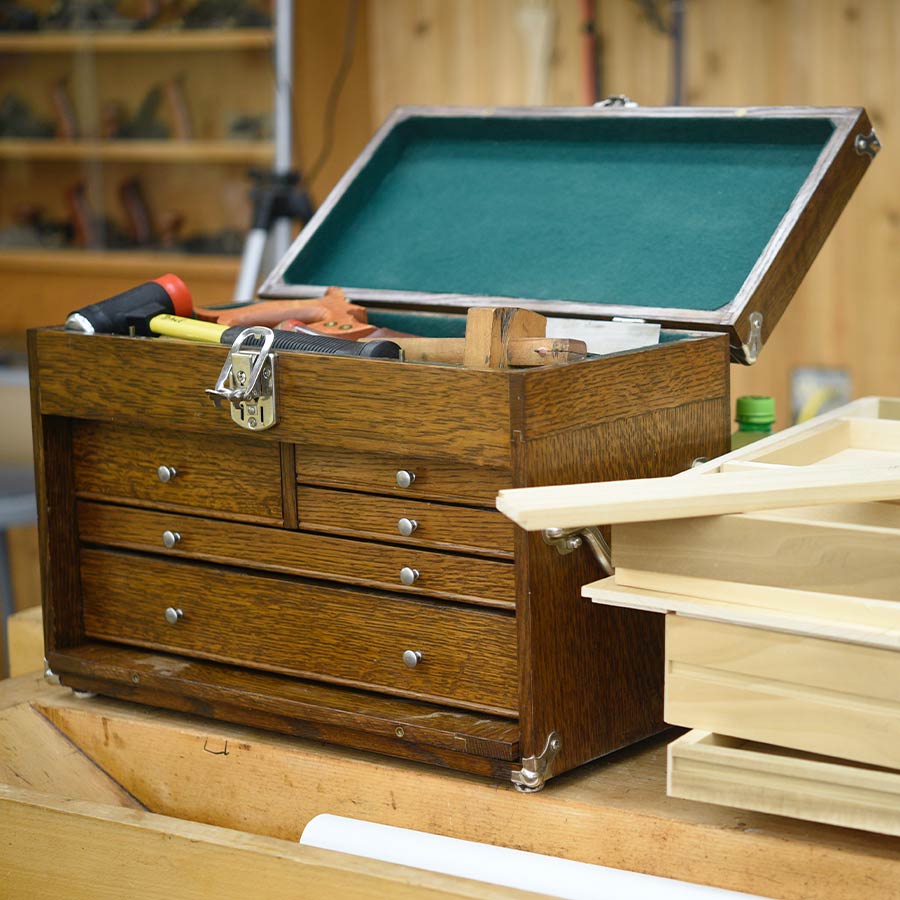
The Machinist Tool Box: Organization, Efficiency, Craftsmanship
Part 1: Introduction to Machinist Tool Boxes – The Backbone of Precision Work
Level 1: What Is a Machinist Tool Box?
A machinist tool box is a specialized storage solution designed to house the tools, instruments, and accessories essential for machining operations. These boxes are crafted with precision in mind, offering durable construction, organized compartments, and portability to meet the needs of professional machinists, hobbyists, and tradespeople alike. From wrenches and calipers to drill bits and files, a machinist tool box ensures that every tool has its place, promoting efficiency and minimizing clutter.
- The Role of Machinist Tool Boxes in Precision Work:
Machining requires meticulous attention to detail, and having the right tools readily accessible is crucial for maintaining accuracy and productivity. A well-organized machinist tool box not only protects valuable equipment but also streamlines workflows by reducing the time spent searching for specific tools. This makes it an indispensable asset in workshops, factories, and even on-the-go repair jobs. - Why Invest in a Quality Machinist Tool Box?
For machinists, investing in a high-quality tool box is as important as acquiring the tools themselves. A sturdy, thoughtfully designed tool box safeguards expensive instruments from damage, extends their lifespan, and enhances overall job performance. Whether you’re working on intricate metalwork or heavy-duty fabrication, a reliable tool box ensures your workspace remains efficient and professional.
Level 2: Key Features of Machinist Tool Boxes
Understanding what sets machinist tool boxes apart highlights their value in both personal and professional settings.
- Material Durability and Construction:
Most machinist tool boxes are made from robust materials like steel, aluminum, or impact-resistant polymers. Steel models offer superior strength and security, while aluminum provides lightweight portability without sacrificing durability. Polymer-based options are often corrosion-resistant, making them ideal for harsh environments. - Customizable Storage Solutions:
One of the standout features of machinist tool boxes is their ability to adapt to individual needs. Many models come with adjustable dividers, removable trays, and specialized compartments for organizing small parts, delicate instruments, and larger tools. Some even include locking mechanisms to prevent theft or unauthorized access.

Part 2: Types of Machinist Tool Boxes – Exploring Options for Every Need
Level 1: Common Categories of Machinist Tool Boxes
There are several types of machinist tool boxes available, each catering to different preferences, budgets, and applications. Below are some of the most popular categories:
- Rolling Tool Cabinets:
Rolling tool cabinets are large, mobile units equipped with drawers and shelves, designed for use in fixed workshop environments. They provide ample storage space and often feature heavy-duty casters for easy mobility around the shop floor. These cabinets are perfect for machinists who need quick access to a wide variety of tools and supplies. - Portable Tool Chests:
Portable tool chests strike a balance between capacity and convenience. Typically featuring multiple stacked drawers, these chests are compact enough to transport yet spacious enough to hold a comprehensive set of tools. Their portability makes them ideal for fieldwork or smaller workshops where space is limited.
Level 2: Specialty Tool Boxes for Unique Applications
Beyond mainstream options, specialty machinist tool boxes address niche requirements or specialized scenarios.
- Compact Tool Bags:
Tool bags are soft-sided carriers designed for light-duty tasks or travel. Made from durable canvas or ballistic nylon, they often include padded compartments and external pockets for organizing hand tools and accessories. These bags are favored by freelance machinists and technicians who require flexibility and ease of transport. - Modular Systems:
Modular tool box systems allow users to customize their setup according to changing needs. Individual components—such as drawer inserts, wall panels, and pegboards—can be rearranged or expanded over time. This adaptability makes modular systems particularly appealing for growing businesses or evolving projects.
Part 3: How Machinist Tool Boxes Enhance Productivity – Beyond Organization
Level 1: Encouraging Efficiency and Precision
Machinist tool boxes play a vital role in streamlining workflows and ensuring precision during machining operations.
- Minimizing Downtime During Tasks:
An organized tool box reduces the time spent locating specific tools, allowing machinists to focus on their work without interruptions. This increased efficiency translates into faster project completion times and higher output quality. - Protecting Tools and Equipment:
High-quality tool boxes shield delicate instruments from dust, moisture, and impacts, preserving their accuracy and functionality. For example, cushioned compartments protect fragile items like micrometers and dial indicators, while secure latches prevent accidental spills or falls.
Level 2: Supporting Professionalism and Confidence
Beyond practical benefits, machinist tool boxes contribute to fostering professionalism and self-assurance among users.
- Empowering DIY Enthusiasts and Professionals Alike:
Whether you’re a seasoned machinist or a beginner learning the craft, a well-equipped tool box instills confidence in your abilities. Knowing that all your tools are organized and within reach allows you to tackle complex projects with greater assurance. - Enhancing Workshop Aesthetics and Functionality:
A sleek, well-maintained tool box adds a touch of professionalism to any workspace. It creates a clean, organized environment that inspires creativity and discipline, encouraging users to take pride in their work.
Part 4: Practical Considerations – Choosing and Maintaining Your Machinist Tool Box
Level 1: Tips for Selecting the Right Tool Box
With so many variations available, choosing the perfect machinist tool box requires careful consideration of several factors.
- Capacity and Size Requirements:
Before purchasing a tool box, assess the number and size of tools you plan to store. Larger collections may necessitate rolling cabinets or multi-drawer chests, while smaller setups can suffice with portable cases or bags. - Mobility and Portability Needs:
Consider how frequently you’ll need to move your tool box. If portability is a priority, opt for lightweight designs with ergonomic handles or built-in wheels. Conversely, stationary setups benefit from heavier, more stable constructions.
Level 2: Maintenance and Longevity
Proper care ensures your machinist tool box remains functional and attractive over time.
- Regular Cleaning and Inspection:
Dust and debris can accumulate inside tool boxes, potentially damaging sensitive instruments. Regularly clean interior surfaces with a damp cloth and mild detergent, and inspect moving parts like drawers and hinges for signs of wear. - Preventing Rust and Corrosion:
For metal tool boxes, apply a thin layer of protective oil or wax to exposed surfaces to guard against rust. Store the box in a dry area whenever possible, and consider using silica gel packets to absorb excess moisture.
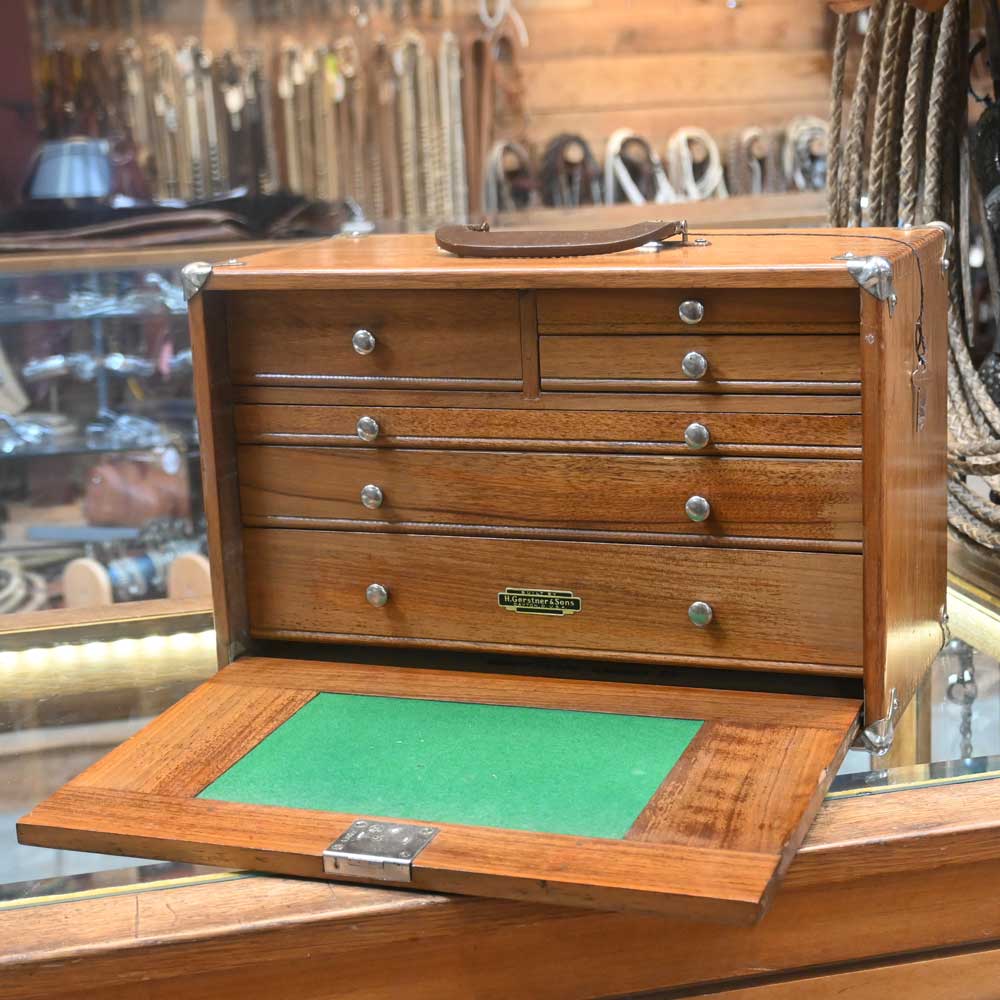
Part 5: Behind the Scenes – The Making of Machinist Tool Boxes
Level 1: The Development Process
Creating machinist tool boxes involves meticulous planning and execution to ensure safety, performance, and aesthetic appeal.
- Concept Development:
Designers collaborate with engineers, machinists, and end-users to develop concepts that balance visual design with functional performance. Inspiration comes from observing common challenges faced in workshops and identifying market gaps. - Testing and Refinement:
Once a prototype is developed, rigorous testing ensures consistency in strength, ergonomics, and ease of use. Feedback loops refine the product until it meets the brand’s exacting standards.
Level 2: Manufacturing Techniques
Advanced manufacturing techniques enable brands to produce high-quality machinist tool boxes at scale while maintaining precision and consistency.
- Material Selection and Treatment:
Premium materials like stainless steel, aluminum alloys, and reinforced polymers undergo stringent quality checks. Special treatments protect against corrosion, fatigue, or breakage, ensuring longevity. - Quality Assurance:
Final inspections include stress tests, finish evaluations, and dimensional checks to guarantee compliance with industry standards. Only products that pass all quality checks are approved for distribution, ensuring customer satisfaction.
Accessories That Enhance Your Machinist Tool Box Experience
Level 1: Essential Accessories for Everyday Use
Certain accessories can significantly improve the functionality and enjoyment of your machinist tool box.
- Drawer Liners and Foam Inserts:
Use non-slip drawer liners or custom-cut foam inserts to keep tools securely in place and prevent scratches or rattling. Always check compatibility before purchasing additional components. - Locking Mechanisms and Security Features:
Upgrade your tool box with advanced locking systems, such as combination locks or biometric scanners, to protect valuable tools from theft or tampering.
Level 2: Creative Enhancements
Take your machinist tool box experience to the next level with these creative additions.
- LED Lighting Kits:
Install LED strips or spotlights inside your tool box for better visibility, especially when working in low-light conditions. This customization fosters ownership and pride among users. - Interactive Storytelling Tools:
Augmented reality apps or QR codes linked to multimedia content can enrich the tool box’s narrative, providing insights into its creation, history, and cultural significance.
By understanding what makes machinist tool boxes exceptional, exploring diverse designs, leveraging expert tips, and embracing future innovations, you can fully unlock their potential. Whether you’re seeking affordability, craftsmanship, or symbolism, these tool boxes offer endless possibilities—one step closer to achieving precision and excellence!
Conclusion: Embracing the Versatility of Machinist Tool Boxes
Level 1: Celebrating Innovation and Reliability
Machinist tool boxes embody the perfect blend of functionality and craftsmanship, offering endless possibilities for enhancing productivity and organization. Their ability to adapt to changing needs underscores their universal appeal.
- A Universal Solution:
Whether you’re a professional machinist, a hobbyist, or a technician, machinist tool boxes cater to diverse skill levels and requirements. Their versatility ensures they remain relevant across industries and generations. - Inspiring Future Innovations:
As technology advances and consumer demands evolve, machinist tool boxes will continue to inspire creativity. Smart integrations, sustainable practices, and inclusive designs promise exciting developments in the years to come.
Level 2: Looking Ahead – Trends Shaping the Industry
With ongoing advancements in sustainability, inclusivity, and technology, the future of machinist tool boxes holds immense potential for growth and reinvention.
- Eco-Friendly Initiatives:
Manufacturers are increasingly prioritizing eco-conscious practices, such as using recyclable materials, reducing packaging waste, and designing products with extended lifespans. These efforts resonate with environmentally aware consumers seeking guilt-free purchases. - Tech-Enhanced Features:
Imagine smart tool boxes equipped with RFID tags to track inventory, digital locks for enhanced security, or integrated charging stations for power tools. Such innovations would redefine how users interact with their equipment, blending functionality with cutting-edge technology.
The Grabber Reacher Tool: Enhancing Accessibility & Convenience
Part 1: Introduction to Grabber Reacher Tools – What They Are and Why They Matter
Level 1: Understanding Grabber Reacher Tools
A grabber reacher tool, often referred to simply as a “reacher” or “grabber,” is a versatile assistive device designed to help individuals pick up, hold, or manipulate objects that are out of reach. These tools typically consist of a long handle with a gripping mechanism at one end, allowing users to extend their reach without straining themselves physically. Grabber reachers are commonly used in households, workplaces, healthcare settings, and outdoor environments.
- The Importance of Grabber Reachers in Daily Life:
Grabber reacher tools play a critical role in enhancing accessibility for people with mobility challenges, such as seniors, individuals recovering from surgery, or those living with disabilities. By enabling users to retrieve items from high shelves, deep corners, or hard-to-reach areas, these tools promote independence and reduce the risk of injury caused by bending, stretching, or climbing. - Why Choose a Grabber Reacher Tool?
For many, a grabber reacher is more than just a convenience—it’s a necessity. Whether you’re tidying up your home, gardening, or performing light maintenance tasks, this tool simplifies activities that might otherwise require assistance. Its ergonomic design minimizes strain on the back, arms, and shoulders, making it an invaluable asset for anyone seeking practical solutions to everyday challenges.
Level 2: Key Features of Grabber Reacher Tools
Understanding what sets grabber reacher tools apart highlights their unique appeal among users across different demographics.
- Design Variations and Customization Options:
Grabber reachers come in various lengths, ranging from compact models (16–24 inches) ideal for indoor use to extended versions (32–48 inches) suitable for outdoor or industrial applications. Some tools feature adjustable handles, rotating heads, or magnetic tips to accommodate specific needs and preferences. - Material Quality and Durability:
High-quality grabber reachers are typically constructed from lightweight yet durable materials like aluminum, stainless steel, or reinforced plastic. Ergonomic grips made from rubberized coatings or foam padding enhance comfort during prolonged use, while corrosion-resistant finishes ensure longevity even under harsh conditions.
Part 2: Types of Grabber Reacher Tools – Exploring Diversity and Innovation
Level 1: Common Categories of Grabber Reachers
There are several types of grabber reacher tools available on the market, each tailored to specific applications and user requirements. Below are some of the most popular categories:
- Manual Grabber Reachers:
Manual grabbers rely on mechanical leverage to operate the gripping mechanism. Users squeeze a trigger or lever located near the handle to close the jaws around an object. This type is widely favored for its simplicity, affordability, and reliability, making it a staple in homes and healthcare facilities. - Electric Grabber Reachers:
Electric grabbers incorporate battery-powered motors to automate the gripping process. A button or switch activates the mechanism, eliminating the need for manual effort. These tools are particularly beneficial for individuals with limited hand strength or dexterity, offering seamless operation with minimal exertion.
Level 2: Specialty Tools for Unique Needs
Beyond mainstream options, specialty grabber reachers address niche requirements or specialized scenarios.
- Magnetic Grabber Reachers:
Designed for retrieving metallic objects, magnetic grabbers feature powerful magnets embedded in the gripping head. These tools are indispensable for mechanics, hobbyists, or anyone working in environments where small metal parts frequently go missing. - Foldable and Portable Grabbers:
Compact and collapsible designs make foldable grabbers perfect for travel or storage-constrained spaces. Their lightweight build and ease of transport allow users to carry them anywhere, ensuring accessibility wherever needed.
Part 3: How Grabber Reacher Tools Enhance Your Lifestyle – Beyond Convenience
Level 1: Encouraging Independence and Safety
Grabber reacher tools play a vital role in empowering individuals to perform daily tasks independently while prioritizing safety and efficiency.
- Preventing Injuries During Routine Activities:
Using a grabber reacher eliminates the need to bend over, stretch excessively, or climb ladders to access hard-to-reach items. This significantly reduces the risk of falls, muscle strains, and other injuries commonly associated with such actions. - Simplifying Challenging Tasks:
From picking up dropped keys to retrieving groceries from the car trunk, grabber reachers simplify activities that would otherwise require awkward postures or additional help. This not only saves time but also enhances overall productivity.
Level 2: Supporting Emotional Well-Being and Confidence
Beyond physical benefits, grabber reacher tools contribute to fostering emotional well-being and self-assurance among users.
- Empowering Individuals with Disabilities:
For people with mobility impairments, using a grabber reacher restores a sense of autonomy and control over their environment. This empowerment fosters confidence and improves mental health by reducing feelings of dependency. - Enhancing Caregiver Efficiency:
Caregivers benefit greatly from grabber reachers when assisting loved ones or clients. These tools enable them to complete tasks quickly and safely, freeing up time for other responsibilities while ensuring the comfort and dignity of those they care for.
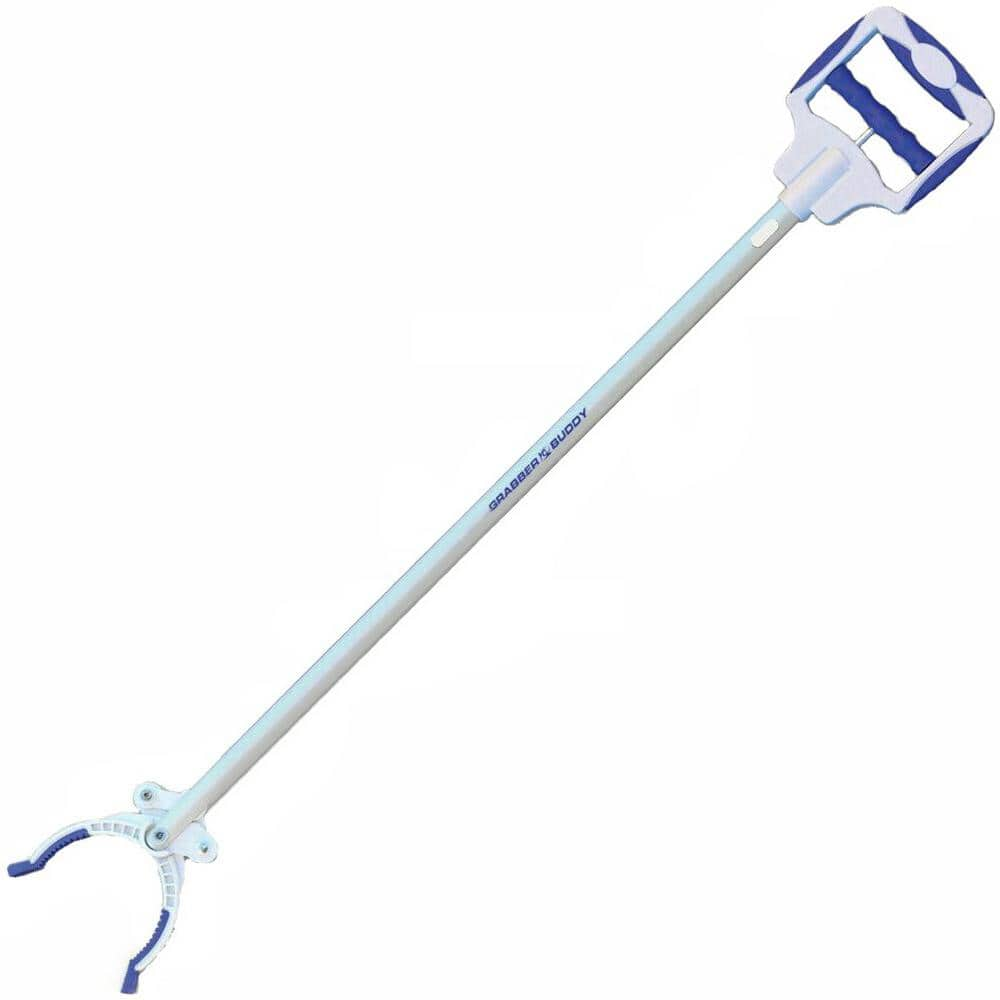
Part 4: Practical Considerations – Choosing and Using Grabber Reacher Tools
Level 1: Tips for Selecting the Right Tool
With so many variations available, choosing the perfect grabber reacher requires thoughtful consideration of several factors.
- Purpose and Environment:
Determine whether the tool will be used primarily indoors, outdoors, or in professional settings. For instance, heavy-duty models with robust construction may be preferable for industrial use, while lightweight, noiseless versions suit quiet environments like hospitals or libraries. - Ergonomics and Usability:
Look for tools with comfortable handles, smooth triggers, and intuitive controls. If you have arthritis or weakened grip strength, opt for electric or low-effort manual models that minimize strain during operation.
Level 2: Techniques for Safe and Effective Use
Mastering the correct usage of a grabber reacher ensures optimal results and prevents accidents.
- Proper Positioning and Alignment:
Always align the gripping jaws with the target object before attempting to pick it up. Misalignment can cause slippage or damage to fragile items. Practice patience and precision to avoid frustration. - Avoiding Common Mistakes:
Overloading the tool beyond its weight capacity or forcing it into tight spaces can lead to breakage or malfunction. Refer to the manufacturer’s guidelines for maximum load limits and recommended operating conditions.
Part 5: Behind the Scenes – The Making of Grabber Reacher Tools
Level 1: The Development Process
Creating grabber reacher tools involves meticulous planning and execution to ensure safety, performance, and aesthetic appeal.
- Concept Development:
Engineers collaborate with designers, ergonomists, and end-users to develop concepts that balance visual design with functional performance. Inspiration comes from observing common challenges faced during daily activities and identifying market gaps. - Testing and Refinement:
Once a prototype is developed, rigorous testing ensures consistency in strength, ergonomics, and ease of use. Feedback loops refine the product until it meets the brand’s exacting standards.
Level 2: Manufacturing Techniques
Advanced manufacturing techniques enable brands to produce high-quality grabber reacher tools at scale while maintaining precision and consistency.
- Material Selection and Treatment:
Premium materials like aluminum alloys, carbon fiber composites, and high-density plastics undergo stringent quality checks. Special treatments protect against wear, corrosion, or breakage, ensuring longevity. - Quality Assurance:
Final inspections include stress tests, finish evaluations, and dimensional checks to guarantee compliance with industry standards. Only products that pass all quality checks are approved for distribution, ensuring customer satisfaction.
Accessories That Enhance Your Grabber Reacher Experience
Level 1: Essential Accessories for Everyday Use
Certain accessories can significantly improve the functionality and enjoyment of your grabber reacher.
- Protective Covers and Guards:
Use protective covers or guards to shield delicate surfaces or prevent scratching during retrieval. Always check compatibility before purchasing additional components. - Replacement Parts and Kits:
Stock up on replacement tips, batteries (for electric models), or spare screws to prolong the life of your grabber reacher. Maintenance kits ensure your tool remains in top condition.
Level 2: Creative Enhancements
Take your grabber reacher experience to the next level with these creative additions.
- Customizable Handles and Grips:
Add custom handles, grips, or decals to personalize your tool further. This customization fosters ownership and pride among users. - Interactive Storytelling Tools:
Augmented reality apps or QR codes linked to multimedia content can enrich the tool’s narrative, providing insights into its creation, history, and cultural significance.
By understanding what makes grabber reacher tools exceptional, exploring diverse designs, leveraging expert tips, and embracing future innovations, you can fully unlock their potential. Whether you’re seeking affordability, craftsmanship, or symbolism, these tools offer endless possibilities—one step closer to hassle-free living!
Conclusion: Embracing the Versatility of Grabber Reacher Tools
Level 1: Celebrating Innovation and Reliability
Grabber reacher tools embody the perfect blend of functionality and ingenuity, offering endless possibilities for improving accessibility and convenience. Their ability to adapt to changing needs underscores their universal appeal.
- A Universal Solution:
Whether you’re a senior citizen, a caregiver, a DIY enthusiast, or a professional worker, grabber reachers cater to diverse skill levels and requirements. Their versatility ensures they remain relevant across generations and industries. - Inspiring Future Innovations:
As technology advances and consumer demands evolve, grabber reacher tools will continue to inspire creativity. Smart integrations, sustainable practices, and inclusive designs promise exciting developments in the years to come.
Level 2: Looking Ahead – Trends Shaping the Industry
With ongoing advancements in sustainability, inclusivity, and technology, the future of grabber reacher tools holds immense potential for growth and reinvention.
- Eco-Friendly Initiatives:
Manufacturers are increasingly prioritizing eco-conscious practices, such as using recyclable materials, reducing packaging waste, and promoting longevity through durable designs. These efforts resonate with environmentally aware consumers seeking guilt-free purchases. - Tech-Enhanced Features:
Imagine smart grabber reachers equipped with sensors that detect object proximity or provide real-time feedback during operation. Such innovations would redefine how users interact with their tools, blending functionality with cutting-edge technology.
Mastering the Brake Spring Tool – An Efficient Automotive Repairs
Part 1: Introduction to Brake Spring Tools – The Unsung Heroes of Brake Maintenance
Level 1: What Is a Brake Spring Tool?
A brake spring tool is a specialized automotive device designed to simplify the installation and removal of brake springs, which are critical components in drum brake systems. These tools help mechanics and DIY enthusiasts safely manipulate tensioned springs without causing damage to the braking system or risking injury. By providing leverage and precision, brake spring tools ensure that tasks like replacing brake shoes or adjusting mechanisms are performed efficiently and effectively.
- The Role of Brake Springs in Vehicle Safety:
Brake springs play a vital role in maintaining proper tension within drum brake assemblies. They keep brake shoes aligned with the drum, ensuring consistent friction and stopping power. Over time, these springs can weaken or break, necessitating replacement. Without the right tool, working on them can be challenging due to their high tension and small size. - Why Use a Dedicated Brake Spring Tool?
Attempting to remove or install brake springs manually or with improvised tools can lead to frustration, damaged parts, or even personal injury. A dedicated brake spring tool reduces these risks by offering a controlled method for handling tight, coiled springs. This makes it an essential addition to any toolkit for those who work on vehicles regularly.
Level 2: Key Features of Brake Spring Tools
Understanding what sets brake spring tools apart highlights their value in automotive maintenance.
- Design Variations and Functionality:
Brake spring tools come in various designs, including plier-style, hook-style, and scissor-action models. Each type caters to specific applications, such as removing heavy-duty return springs or delicate hold-down springs. Some tools feature interchangeable heads or adjustable settings to accommodate different vehicle models. - Durability and Ergonomics:
High-quality brake spring tools are typically constructed from hardened steel or durable alloys to withstand repeated use under demanding conditions. Ergonomic handles with non-slip grips enhance user comfort, while corrosion-resistant coatings extend the tool’s lifespan.

Part 2: Types of Brake Spring Tools – Exploring Options for Every Need
Level 1: Common Categories of Brake Spring Tools
There are several types of brake spring tools available on the market, each tailored to specific applications and preferences. Below are some of the most popular categories:
- Plier-Style Tools:
Plier-style brake spring tools resemble standard locking pliers but are specifically engineered to grip and release brake springs. Their self-locking mechanism allows users to apply steady pressure while minimizing hand strain. These tools are ideal for beginners and professionals alike due to their versatility and ease of use. - Hook-Style Tools:
Hook-style tools consist of a curved end designed to catch and pull brake springs into position. They are particularly useful for accessing hard-to-reach areas within drum brake assemblies. Lightweight and portable, hook-style tools are often included in basic automotive repair kits.
Level 2: Specialty Tools for Unique Challenges
Beyond mainstream options, specialty brake spring tools address niche requirements or complex scenarios.
- Scissor-Action Tools:
Scissor-action brake spring tools utilize a dual-lever design to amplify force, making it easier to stretch or compress highly tensioned springs. These tools are commonly used in commercial garages where efficiency and reliability are paramount. - Multi-Function Kits:
Some manufacturers offer multi-function kits that include multiple brake spring tools along with other accessories, such as screwdrivers, wrenches, and retaining clips. These comprehensive sets cater to individuals who perform a wide range of brake-related repairs.
Part 3: How Brake Spring Tools Enhance Your Maintenance Routine – Beyond Convenience
Level 1: Encouraging Safety and Efficiency
Brake spring tools play a vital role in streamlining automotive maintenance tasks while prioritizing safety and accuracy.
- Preventing Damage During Repairs:
Using a proper tool ensures that delicate components like brake shoes, drums, and hardware remain unharmed during spring adjustments. This not only saves money on potential repairs but also extends the lifespan of your vehicle’s braking system. - Simplifying Complex Procedures:
Replacing brake springs often involves navigating cramped spaces or dealing with rusted parts. A dedicated brake spring tool provides the leverage needed to overcome resistance without straining yourself or damaging surrounding areas.
Level 2: Supporting Professionalism and Confidence
Beyond practical benefits, brake spring tools contribute to fostering confidence and professionalism among users.
- Empowering DIY Enthusiasts:
With the right tool, even novice car owners can tackle brake spring replacements independently. This sense of accomplishment encourages further exploration into automotive maintenance and fosters self-reliance. - Enhancing Workshop Productivity:
For professional mechanics, having reliable brake spring tools improves workflow efficiency. Tasks that once required significant effort and time can now be completed swiftly, allowing technicians to focus on more complex repairs.

Part 4: Practical Considerations – Choosing and Using Brake Spring Tools
Level 1: Tips for Selecting the Right Tool
With so many variations available, choosing the perfect brake spring tool requires thoughtful consideration of several factors.
- Vehicle Compatibility:
Before purchasing a tool, verify its compatibility with your vehicle’s make and model. Consult your owner’s manual or online resources to determine the type of brake springs used in your car. - Material Quality and Build:
Opt for tools made from high-grade materials that resist wear and tear. Look for features like heat-treated steel, anti-corrosion coatings, and ergonomic designs that enhance usability and durability.
Level 2: Techniques for Safe and Effective Use
Mastering the correct usage of a brake spring tool ensures optimal results and prevents accidents.
- Proper Positioning and Alignment:
Always position the tool securely before applying force. Misalignment can cause uneven pressure, leading to damage or incomplete removal. Double-check that all components are firmly seated before proceeding. - Avoiding Common Mistakes:
Over-tightening screws or applying excessive force can result in stripped threads or bent springs. Work slowly and steadily, using only the amount of pressure necessary to disengage the part.
Part 5: Behind the Scenes – The Making of Brake Spring Tools
Level 1: The Development Process
Creating brake spring tools involves meticulous planning and execution to ensure safety, performance, and aesthetic appeal.
- Concept Development:
Engineers collaborate with designers, mechanics, and end-users to develop concepts that balance visual design with functional performance. Inspiration comes from observing common challenges faced during brake spring manipulation and identifying market gaps. - Testing and Refinement:
Once a prototype is developed, rigorous testing ensures consistency in strength, ergonomics, and ease of use. Feedback loops refine the product until it meets the brand’s exacting standards.
Level 2: Manufacturing Techniques
Advanced manufacturing techniques enable brands to produce high-quality brake spring tools at scale while maintaining precision and consistency.
- Material Selection and Treatment:
Premium materials like stainless steel, aluminum alloys, and reinforced polymers undergo stringent quality checks. Special treatments protect against corrosion, fatigue, or breakage, ensuring longevity. - Quality Assurance:
Final inspections include stress tests, finish evaluations, and dimensional checks to guarantee compliance with industry standards. Only products that pass all quality checks are approved for distribution, ensuring customer satisfaction.
Accessories That Enhance Your Brake Spring Tool Experience
Level 1: Essential Accessories for Everyday Use
Certain accessories can significantly improve the functionality and enjoyment of your brake spring tool.
- Protective Covers and Guards:
Use protective covers or guards to shield surrounding components during spring adjustments. Always check compatibility before purchasing additional components. - Lubricants and Cleaning Solutions:
Rust inhibitors or penetrating oils help loosen stuck bolts or corroded parts. These solutions ensure smooth operation and prevent future sticking.
Level 2: Creative Enhancements
Take your brake spring tool experience to the next level with these creative additions.
- Customizable Handles and Grips:
Add custom handles, grips, or tassels to personalize your tool further. This customization fosters ownership and pride among users. - Interactive Storytelling Tools:
Augmented reality apps or QR codes linked to multimedia content can enrich the tool’s narrative, providing insights into its creation, history, and cultural significance.
By understanding what makes brake spring tools exceptional, exploring diverse designs, leveraging expert tips, and embracing future innovations, you can fully unlock their potential. Whether you’re seeking affordability, craftsmanship, or symbolism, these tools offer endless possibilities—one step closer to hassle-free maintenance!