The Ultimate Guide to the Jack Tool: Everything You Need to Know
Introduction
Jack Tool is a renowned figure in the construction and home improvement industry, known for his expertise in power tools, hand tools, and DIY projects. With over 20 years of experience, Jack has gained a deep understanding of the tools and techniques required for various construction and repair tasks.
Having started his career as a construction worker, Jack quickly developed a passion for tools and equipment. He realized the importance of having high-quality tools that are durable, efficient, and safe to use. This passion led him to further his knowledge in the field and eventually establish himself as a trusted source of information and advice for both professionals and DIY enthusiasts.
Jack tools are a must-have in any toolkit, whether you are a professional mechanic or an everyday car owner. These versatile and powerful tools are designed to lift heavy objects, making them essential for vehicle maintenance, construction projects, and more. In this comprehensive guide, we will explore the different types of jack tools, their uses, maintenance tips, and safety precautions.
Part 1: Understanding the Different Types of Jack Tools
Jack is known for his hands-on approach and practical advice. His experience in using a wide range of tools allows him to provide valuable insights into their performance, durability, and value for money. He is also well-versed in the latest advancements in tool technology and always stays updated on new products entering the market.
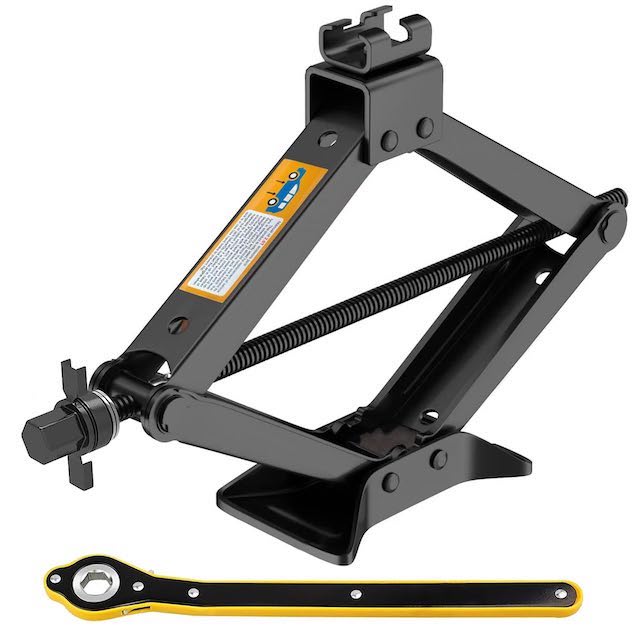
Level 1: Hydraulic Jacks
Hydraulic jacks are perhaps the most commonly used type of jack tool. They work by using a hydraulic liquid to create pressure and lift heavy objects. These jacks come in various designs, including bottle jacks, floor jacks, and toe jacks, each with its own unique features and weight capacities.
Level 2: Mechanical Jacks
Mechanical jacks rely on brute force to lift heavy objects, using a simple mechanism such as a screw thread or a lever. These jacks are often used in emergency situations, such as changing a tire on the side of the road.
Part 2: Common Uses of Jack Tools
Jack Tool is a renowned figure in the construction and home improvement industry, known for his expertise in power tools, hand tools, and DIY projects. With over 20 years of experience, Jack has gained a deep understanding of the tools and techniques required for various construction and repair tasks.
Having started his career as a construction worker, Jack quickly developed a passion for tools and equipment. He realized the importance of having high-quality tools that are durable, efficient, and safe to use. This passion led him to further his knowledge in the field and eventually establish himself as a trusted source of information and advice for both professionals and DIY enthusiasts.
Level 1: Vehicle Maintenance
One of the most common uses of jack tools is for vehicle maintenance, such as lifting cars or trucks to change tires, check brakes, or access the underside of the vehicle for repairs.
Level 2: Construction and Industrial Applications
In the construction and industrial sectors, jack tools can lift and support heavy loads, such as heavy machinery, structural components, and more. These tools play a crucial role in ensuring safety and efficiency on construction sites.

Part 3: Maintenance Tips for Jack Tools
Level 1: Regular Inspections
It is essential to regularly inspect your jack tools for any signs of wear and tear, such as leaks, cracks, or damaged parts. This will help ensure that your jack tools remain in good working condition and prevent accidents.
Level 2: Lubrication
Proper lubrication of the moving parts of your jack tools is essential for smooth operation and longevity. Be sure to use the recommended lubricants and follow the manufacturer’s guidelines for maintenance.
Part 4: Safety Precautions When Using Jack Tools
Level 1: Weight Capacity
Always make sure to use a jack tool that is rated for the weight of the object you are lifting. Exceeding the weight capacity of the jack can lead to failure and potential injury.
Level 2: Stability
Ensure that the surface on which you place the jack tool is stable and level. Use additional support, such as jack stands, when working under a lifted object to prevent it from falling.
Part 5: Choosing the Right Jack Tool for Your Needs
Level 1: Consider Your Requirements
When selecting a jack tool, consider the weight of the objects you will be lifting, the available space for storage, and the frequency of use. These factors will help you determine the most suitable type and size of jack tool for your needs.
Level 2: Quality and Reliability
Invest in high-quality jack tools from reputable manufacturers to ensure safety and durability. Consider factors such as the materials used, weight capacity, and customer reviews when making your purchase.

Part 6: Jack Tool’s reputation for quality and durability
Jack Tool in the industry for providing high-quality, durable tools that stand the test of time. For their reliability and performance, their products are making them a top choice for professionals and DIY enthusiasts alike.
Part 7: Jack Tool’s commitment to innovation and design
Jack Tool is staying ahead of the curve when it comes to innovation and design. They continually invest in research and development to ensure that their products incorporate the latest technology and advancements in tool design. This dedication to innovation sets them apart in the industry and keeps them at the forefront of tool manufacturing.
Part 8: Jack Tool’s customer service and support
Not only does Jack Tool offer a wide range of high-quality hand tools, but they also provide a guarantee of satisfaction with every purchase. This level of commitment to their customers’ satisfaction sets them apart from other tool manufacturers and has helped them build a strong and loyal customer base.
Overall, Jack Tool is a company that can provide professional-grade tools. It can meet the highest standards of quality and durability. With a commitment to innovation, customer satisfaction, and strict manufacturing standards, they have established themselves as a leading name in the industry.
Jack Tool prides itself on providing exceptional customer service and support. They have a team of knowledgeable and friendly staff who are always ready to assist customers with any questions or concerns they may have. Whether it’s helping customers find the right tool for their needs or providing technical support, Jack Tool goes above and beyond to ensure customer satisfaction.

Conclusion
In addition to his expertise in tools, Jack is also skilled at various DIY projects. Jack has a wealth of knowledge in carrying out a wide range of tasks. His ability to explain complex procedures in a simple and understandable manner has made him a popular figure among DIY enthusiasts looking for guidance.
Jack also has a strong online presence, with a popular blog and social media channels where he shares his knowledge, reviews, and tips with his audience. His practical approach and honest opinions have earned him a loyal following of readers and viewers who trust his recommendations and advice.
Overall, Jack Tool is a respected figure in the construction and home improvement industry. Known for his extensive knowledge of tools and equipment and his practical expertise in various DIY projects. He continues to inspire and educate others with his passion for quality tools and craftsmanship.
Jack tools are indispensable for a wide range of lifting and support applications, from vehicle maintenance to construction projects. By understanding the different types of jack tools, their uses, maintenance tips, and safety precautions. You can confidently choose the right jack tool for your needs and use it safely and effectively. Remember to prioritize safety at all times and perform regular maintenance to keep your jack tools in top condition.
The Ultimate Guide to Using a Planer for Woodworking
Introduction
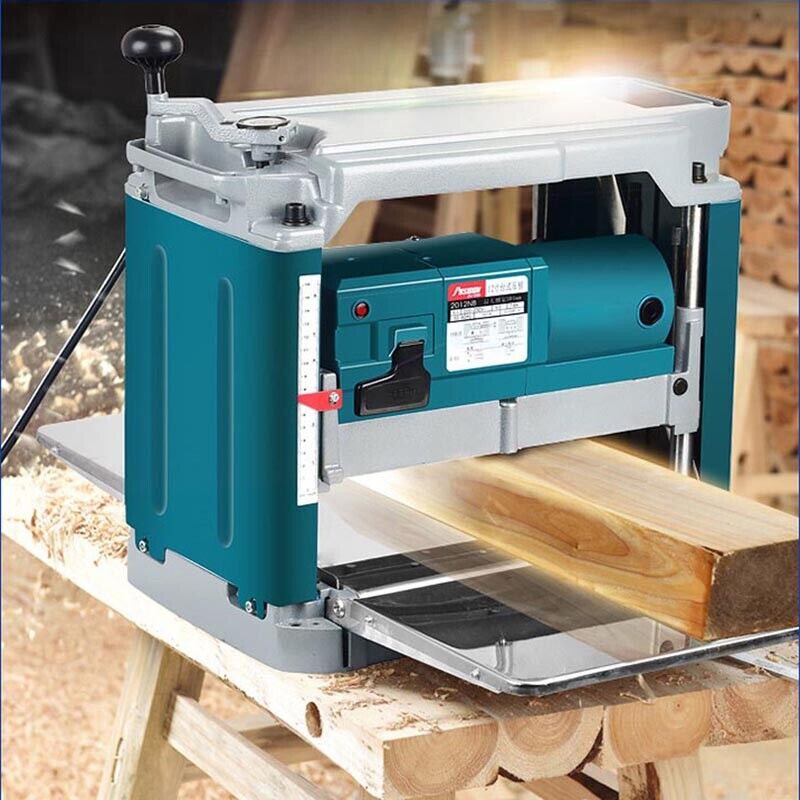
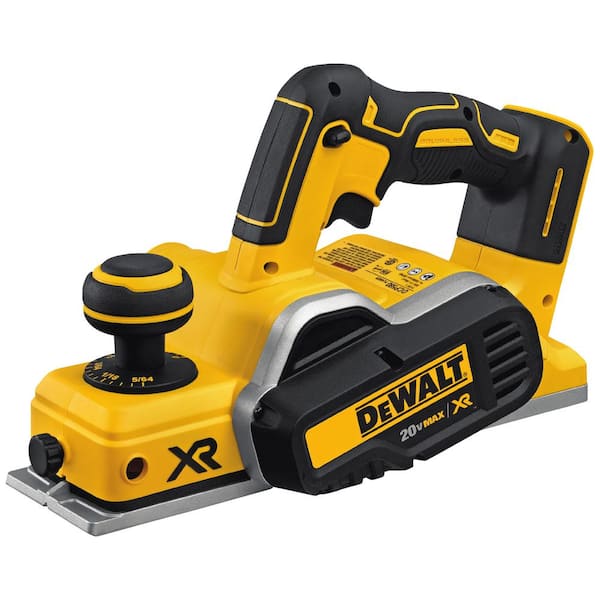
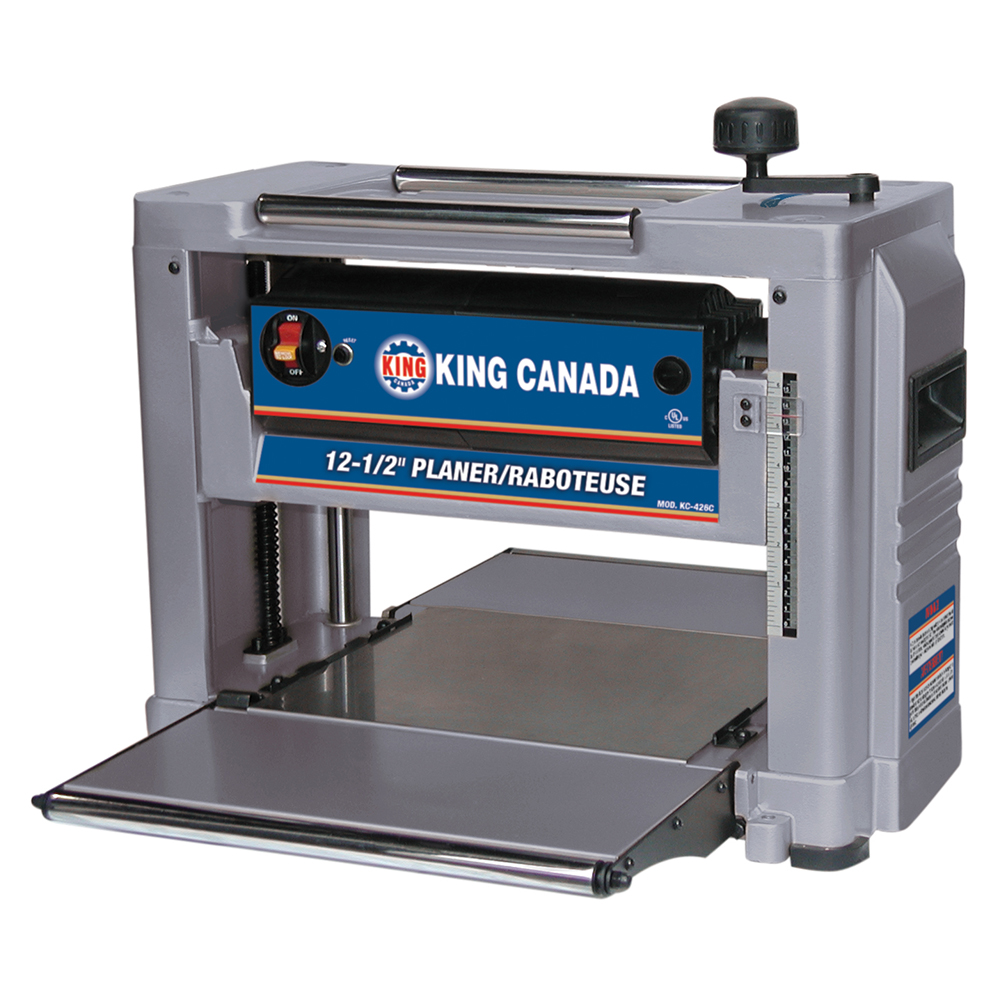
Hand-held planers are small, portable tools that are easy to maneuver and control. For small-scale projects or for trimming and shaping edges, stationary benchtop planer, on the other hand, are larger and sturdier machines that are designed for heavier-duty work. We can typically use the planer in woodworking shops. And we can handle larger and thicker pieces of wood. A planer is an essential tool in the woodworking industry, used to achieve a smooth and uniform thickness on a piece of wood. This versatile tool is perfect for both professional woodworkers and DIY enthusiasts, and it can help with a variety of woodworking projects. In this comprehensive guide, we will explore the different types of planers, how to operate them safely and effectively, and the many benefits of using a planer in your woodworking projects.
Part 1: Understanding the Different Types of Planers
A planer is a woodworking tool used to create a flat and smooth surface on a piece of wood. It is an essential tool in the woodworking industry and is commonly used by carpenters, furniture makers, and woodworkers.
There are two main types of planers: hand planers and electric planers. Hand planers are operated manually, with the user pushing the tool across the surface of the wood to remove material and create a smooth surface. They are often used for smaller woodworking projects and are popular among hobbyists and DIY enthusiasts. Electric planers, on the other hand, are powered by electricity and are typically used for larger woodworking projects. They are more efficient and can quickly remove material to create a smooth and flat surface.
Level 1: Electric Planers
Electric planers are the most common type of planer used in woodworking. They are suitable for both small-scale and large-scale woodworking projects. Electric planers come in a variety of sizes and can be handheld or mounted on a stand.
Level 2: Thickness Planers vs. Jointer Planers
There are two main types of electric planers: thickness planers and jointer planers. Thickness planers are used to achieve a consistent thickness across the entire surface of a piece of wood. Jointer planers, on the other hand, are designed to flatten one face of a board and square up one edge before using a thickness planer to achieve a consistent thickness.
Part 2: Safety Precautions When Using a Planer
Planers are available in different sizes, with larger planers being used for heavy-duty applications and smaller planers for more precise and detailed work. Some planers also come with adjustable depth settings, allowing users to control the amount of material being removed from the wood.
One of the key features of a planer is the cutter head, which is equipped with sharp blades that cut and remove material from the wood as it passes through the machine. The blades are adjustable and can be sharpened or replaced as needed to maintain their cutting efficiency.
Level 1: Proper Personal Protective Equipment (PPE)
When using a planer, it is essential to wear the proper personal protective equipment, including safety glasses, hearing protection, and a dust mask. This will help protect you from flying wood chips and loud noise, as well as any airborne dust particles.
Level 2: Maintaining a Clean and Organized Workspace
It is important to keep your workspace clean and organized when using a planer. This includes removing any obstacles from the area, ensuring the work area clear of any sawdust or debris that can pose a slipping hazard.
Part 3: Setting Up and Operating a Planer
Level 1: Choosing the Right Blade and Adjusting the Depth
Before operating a planer, it is crucial to choose the right blade for your project and adjust the depth of the planer to achieve the desired thickness.
Level 2: Feeding the Wood through the Planer
When feeding wood through a planer, it is important to do so slowly and evenly to achieve a smooth and uniform thickness. Avoid forcing the wood through the planer, as this can result in uneven cuts and potential damage to the wood or the planer.

Part 4: Benefits of Using a Planer in Woodworking Projects
Level 1: Achieving Consistent Thickness
One of the main benefits of using a planer is the ability to achieve a consistent thickness across a piece of wood. This is essential for projects such as furniture making or cabinetry, where uniformity is key to achieving a professional finish.
Level 2: Smoothing Rough Surfaces
In addition to achieving a consistent thickness, a planer can also be used to smooth rough surfaces on a piece of wood. This can save time and effort during the sanding phase of a project and result in a more polished and professional-looking final product.
Part 5: Maintenance and Care for Your Planer
Level 1: Regular Cleaning and Lubrication
To ensure your planer operates smoothly and efficiently, it is important to regularly clean and lubricate the moving parts. This will help prevent any buildup of sawdust and debris, as well as reduce wear and tear on the motor and other components.
Level 2: Sharpening and Replacing Blades
The blades on a planer will eventually wear down over time, so it is important to regularly inspect them and sharpen or replace them as needed. This will help maintain the performance and accuracy of your planer, as well as prevent any damage to the wood being planed.
Part 6: Safety Features
Level 1: Importance of Safety Features
Planers are powerful and potentially dangerous tools, so it is crucial that they have proper safety features to prevent accidents and injuries.
Level 2: Common Safety Features
Some common safety features found on planers include blade guards, emergency stop buttons, automatic shut-off mechanisms, and anti-kickback devices. These features help to protect the user from accidental contact with the blades and prevent kickback during operation.

Part 7: Maintenance and Care
Level 1: Importance of Maintenance
Proper maintenance and care are essential for keeping a planer in good working condition and ensuring its longevity. Neglecting maintenance can lead to decreased performance, increased wear and tear, and potential safety hazards.
Level 2: Routine Maintenance Tasks
Routine maintenance tasks for planers may include regular blade sharpening or replacement. And cleaning debris and dust buildup, lubricating moving parts, and checking for any signs of wear or damage. Following a maintenance schedule will help to keep the planer running smoothly and prevent premature breakdowns.
Part 8: Best Practices for Safe Operation
Level 1: Safe Operating Practices
To prevent accidents and injuries, it is important for planer users to follow safe operating practices. This includes reading the user manual, using the appropriate safety gear, and avoiding distractions while the planer is in use.
Level 2: Proper Material Handling
Proper material handling is crucial for safe planer operation. Users should ensure that the workpiece can feed it into the planer at a steady, even pace to prevent kickback or binding. Additionally, it is important to never force the material through the planer. This can cause damage to the machine and increase the risk of accidents.
Conclusion
A planer is a woodworking tool used to smooth and level the surface of a piece of wood. It consists of a cutter head that removes material from the wood and a flat surface called the bed. It supports the wood as it is fed through the machine. Planers come in various sizes and styles, with the most common types being hand-held planers and stationary benchtop planers.
In addition to their primary function of leveling and smoothing wood, planers can also create decorative and unique finishes on wooden surfaces. By adjusting the cutting depth and feed rate, woodworkers can create different textures and patterns. And adding visual interest to their projects. Planers can chamfer edges, create bevels, and shape wood for joinery. Making them a versatile tool in any woodworking shop. It is important to use caution when operating a planer, as the high-speed rotating blades can be dangerous if not handled properly. With the right precautions and proper technique, a planer can be a valuable tool for any woodworker.
In conclusion, a planer is an invaluable tool for any woodworker, whether professional or hobbyist. By understanding the different types of planers, following proper safety precautions, and mastering the setup and operation of a planer. You can achieve consistent thickness and smooth surfaces on your woodworking projects. With regular maintenance and care, your planer will continue to serve you well for years to come. Whether you are building furniture, constructing cabinets, or simply working on a DIY project. A planer is an essential tool for achieving professional results.
The Ultimate Guide to Socket Tool: Everything You Need to Know
Introduction
A socket tool, also known as a socket wrench, is a versatile hand tool used for tightening or loosening bolts and nuts. It consists of a handle and a socket, which is a hollow cylinder with a six-sided opening on one end that fits onto the head of a bolt or nut. The handle and socket are connected by a ratcheting mechanism that allows the socket to turn in one direction while the handle remains stationary, making it easier to apply torque to the fastener.
Socket tools are essential for any DIY enthusiast or professional mechanic. These versatile tools come in a variety of sizes and types, making them an indispensable part of any toolkit. Whether you’re working on your car, assembling furniture, or tackling home improvement projects, socket tools are a must-have. In this comprehensive guide, we’ll cover everything you need to know about socket tools, including their different types, uses, and maintenance tips.
Part 1: Types of Socket Tools
Level 1: Standard Sockets
Standard sockets are the most common type of socket tool and come in both metric and SAE (Society of Automotive Engineers) sizes. They are typically hexagonal in shape and are designed to fit on a ratcheting handle for turning bolts and nuts.
Level 2: Impact Sockets
Impact sockets are specifically designed to withstand the high torque and force generated by impact wrenches. They are made from toughened steel and have a thicker wall to handle the extra stress. Impact sockets are essential for automotive or industrial applications.
Part 2: Socket Drive Sizes
Level 1: 1/4-inch Drive
The 1/4-inch drive socket is the smallest and is ideal for working on small electronics, bicycles, and motorcycles. These sockets are perfect for delicate and precise work.
Level 2: 3/4-inch Drive
The 3/4-inch drive socket is the largest and is used for heavy-duty and industrial applications. These sockets are capable of handling large bolts and nuts, making them essential for construction and machinery maintenance.

Part 3: Uses of Socket Tools
Level 1: Automotive Repairs
Socket tools are a crucial part of any automotive toolkit, used for tasks such as changing oil, replacing spark plugs, and removing engine components. They are essential for both DIY car maintenance and professional automotive repairs.
Level 2: Home Improvement Projects
From assembling furniture to tightening loose bolts, socket tools are indispensable for various home improvement projects. They are ideal for tasks such as installing shelves, hanging light fixtures, and repairing appliances.
Part 4: Maintenance and Care
Level 1: Cleaning
Regular cleaning of socket tools is crucial for ensuring their longevity and performance. Use a solvent to remove grease and dirt from the sockets, and ensure they are thoroughly dried before use.
Level 2: Storage
Proper storage is essential for preventing rust and damage to socket tools. Organize them in a toolbox or chest, and consider using socket rail organizers to keep them neatly arranged and easily accessible.
Part 5: Tips for Choosing the Right Socket Tools
Level 1: Quality
Invest in high-quality socket tools made from durable materials such as chrome vanadium steel. Quality tools will last longer and provide better performance.
Level 2: Compatibility
Consider the types of projects you’ll be working on and choose socket tools that are compatible with your existing ratchets and wrenches. Ensure they are the correct size for the nuts and bolts you’ll be working with.

Part 6: Types of Socket Tools
Level 1: Types of Socket Tools
There are various types of socket tools available, designed for specific tasks and applications. Some of the most common types include:
- Impact sockets: These are designed to withstand high levels of torque and are commonly used with impact wrenches or air tools. They are usually made of chrome molybdenum steel for durability.
- Spark plug sockets: These are specifically designed for removing and installing spark plugs. They often feature a rubber insert to securely hold the spark plug in place during installation.
Level 2: Specialized Socket Tool Sets
Many socket tool sets are designed for specialized purposes, such as:
- Motorcycle tool sets: These sets typically include a range of socket sizes and other tools specifically designed for working on motorcycles, such as narrow profile sockets for tight spaces and specialized bits for motorcycle maintenance.
- Emergency roadside kits: These sets often include a compact selection of socket tools, along with other essential tools and items, to help with common vehicle repairs and emergencies while on the road.
Part 7: Specialty Socket Tools
Level 1: Specialty Socket Tools
In addition to standard socket sets, there are also specialty socket tools available for specific tasks. Some examples include:
- Torque limiting sockets: These sockets are designed to limit the amount of torque applied to a fastener, preventing over-tightening and potential damage. They are often used in critical applications where precise torque control is necessary.
- Swivel sockets: These sockets have a swiveling head that allows for greater flexibility and access to fasteners in tight or awkward spaces, making them ideal for automotive and machinery repairs.
Level 2: Socket Tool Accessories
There are also a variety of accessories available for socket tools, such as:
- Socket rails or trays: These are convenient storage solutions for organizing and transporting sockets in a workshop or garage. They typically feature clips or posts to securely hold individual sockets in place.
- Universal joints: These attachments allow for increased flexibility and angle adaptability when using socket tools, enabling access to fasteners that are not in a straight line with the tool’s handle.
Part 8: Advancements in Socket Tool Technology
Level 1: Advancements in Socket Tool Technology
In recent years, advancements in materials and design have led to improvements in socket tool performance and durability. Some of the latest advancements include:
- High-performance alloy steels: Manufacturers are developing new alloy steels with enhanced strength and wear resistance, resulting in sockets that can withstand higher torque levels and last longer under heavy use.
- Anti-corrosion coatings: Some socket tools now feature specialized coatings that provide protection against rust and corrosion, extending their lifespan in harsh working environments.
Level 2: Ergonomic Socket Tool Design
Modern socket tools with ergonomic features to improve user comfort and reduce fatigue. These design elements may include:
- Cushioned handles: Many socket wrenches now incorporate ergonomic handles with cushioned grips to provide more comfortable and secure handling during use, reducing hand fatigue and improving control.
- Quick-release mechanisms: Some socket wrench designs feature quick-release mechanisms that allow for easy and rapid socket changes, reducing the need for manual socket removal and speeding up workflow.

Conclusion
Extension bars can extend the reach of the ratchet wrench. And allowing it to access bolts or nuts located in tight or hard-to-reach spaces. Universal joints provide flexibility in the angle, making it easier to reach fasteners at odd angles. Spark plug sockets are specifically for removing and installing spark plugs, and impact sockets.
Overall, socket tools are essential for any mechanic, handyman, or DIY enthusiast. They provide a reliable and efficient way to tackle a wide range of fastening tasks. Making them an indispensable part of any tool collection. Socket tools are an essential part of any toolkit, offering versatility and functionality for a wide range of tasks. By understanding the different types, sizes, and uses of socket tools, as well as how to properly maintain and choose the right tools, you can ensure you have the right equipment for any job. Whether you’re a professional tradesperson or a DIY enthusiast, socket tools are a must-have for any workshop or garage.
The Guide to PEX Clamp Tool: Everything You Need to Know
Introduction
PEX (cross-linked polyethylene) tubing has become a popular choice for plumbing systems due to its flexibility, durability, and ease of installation. To secure PEX tubing to fittings, a PEX clamp tool is essential. In this comprehensive guide, we will delve into the world of PEX clamp tools, exploring their uses, benefits, and how to choose the right one for your needs.
Part 1: Understanding PEX Clamp Tools
This tool is commonly used in PEX plumbing systems for both hot and cold water distribution. It is also used in radiant heating systems, snowmelt systems, and other hydronic applications. The PEX clamp tool is designed to ensure a secure and reliable connection, preventing leaks and minimizing the risk of water damage. The PEX clamp tool is available in different sizes to accommodate various PEX tubing diameters, ranging from 3/8 inch to 1 inch. It is crucial to select the correct-sized tool for the specific PEX tubing being used to ensure a proper and secure connection.
Level 1: What are PEX clamp tools?
PEX clamp tools are used to secure PEX tubing to barbed fittings with stainless steel PEX clamps. They come in various designs, including manual and battery-powered options, and are essential for creating reliable and leak-free connections in PEX plumbing systems.
Level 2: Types of PEX clamp tools
There are two main types of PEX clamp tools: manual and battery-powered. Manual PEX clamp tools require physical force to crimp the clamps, while battery-powered tools use a motorized mechanism for effortless crimping. Each type has its advantages and is suited to different applications.
Part 2: Benefits of Using PEX Clamp Tools
Level 1: Reliability and durability
PEX clamp tools create strong, secure connections between PEX tubing and fittings, minimizing the risk of leaks and ensuring long-term durability. This is essential for maintaining the integrity of a plumbing system and preventing costly water damage.
Level 2: Ease of installation
PEX clamp tools are relatively easy to use, even for DIY enthusiasts. With the right tool and proper technique, anyone can create professional-quality crimps, saving time and money on installation costs.

Part 3: Choosing the Right PEX Clamp Tool
There are two main types of PEX clamp tools: manual and battery-powered. The manual PEX clamp tool requires the user to manually squeeze the handles to compress the clamp around the PEX tubing and fitting. This type of tool is lightweight, portable, and suitable for small-scale projects. On the other hand, battery-powered PEX clamp tools are designed to automate the clamping process, making it faster and less labor-intensive. These tools are ideal for large-scale installations and professional use.
Level 1: Factors to consider
When choosing a PEX clamp tool, it’s important to consider factors such as the size of the clamps it can accommodate, the type of PEX tubing you will be working with (PEX-A, PEX-B, or PEX-C), and the frequency of use. Additionally, consider the tool’s ergonomics, weight, and overall build quality.
Level 2: Popular brands and models
Some well-known manufacturers of PEX clamp tools include Milwaukee, Uponor, Apollo, and IWISS. Each brand offers a range of models with various features and capabilities to suit different needs and budgets.
Part 4: How to Use a PEX Clamp Tool
Level 1: Preparing the tubing and fittings
Before using a PEX clamp tool, ensure that the ends of the PEX tubing are cut squarely and cleanly. Verify that the fittings are compatible with the tubing and are free of any debris or damage.
Level 2: Crimping the clamps
Position the clamp over the barbed fitting and the PEX tubing, ensuring that it is properly aligned. Use the PEX clamp tool to apply the necessary force to crimp the clamp securely around the tubing and fitting. Check for any signs of deformation or incomplete crimps.
Part 5: Maintenance and Safety Tips
Level 1: Tool maintenance
Regularly inspect and clean your PEX clamp tool to ensure that it is in good working condition. Lubricate moving parts as recommended by the manufacturer and store the tool in a dry, secure location when not in use.
Level 2: Safety precautions
Always wear appropriate eye protection and gloves when using a PEX clamp tool. Avoid overexerting force on the tool, and never use it for purposes other than crimping PEX clamps. Follow the manufacturer’s guidelines and recommendations for safe operation.
Part 6: Benefits of Using a PEX Clamp Tool
Level 1: Increased Efficiency
Using a PEX clamp tool increases the efficiency of the installation process. The tool allows for quick and easy crimping of the clamps, reducing the time and effort required for the task. This is especially beneficial for larger projects where time is of the essence.
Level 2: Enhanced Reliability
PEX clamp tools ensure a reliable connection between the PEX tubing and the fittings. The properly crimped clamps provide a secure and leak-free joint, minimizing the risk of potential problems down the line. This enhanced reliability gives users peace of mind that their plumbing system is built to last.
Part 7: Types of PEX Clamp Tools
Level 1: Manual PEX Clamp Tool
Manual PEX clamp tools require physical force to compress the rings onto the PEX tubing and fittings. These tools are often lightweight, portable, and affordable, making them a popular choice for smaller residential projects or occasional use.
Level 2: Battery-Powered PEX Clamp Tool
Battery-powered PEX clamp tools are designed to provide a more effortless crimping process. These tools are suitable for frequent use and larger-scale projects, as they can quickly and consistently crimp the clamps with minimal physical effort from the user. While they may be more expensive than manual tools, the time and labor savings they offer can make them a worthwhile investment for professionals.
Part 8: Maintenance and Care of PEX Clamp Tools
Level 1: Regular Cleaning
It’s important to keep PEX clamp tools clean to ensure their proper function and longevity. After each use, wipe down the tool to remove any debris or dirt that may have accumulated. Regular cleaning can prevent corrosion and extend the lifespan of the tool.
Level 2: Storage
Proper storage is essential for PEX clamp tools. When not in use, store the tool in a dry, clean environment to prevent rust or damage. Some tools may come with a protective case or pouch for safekeeping. Additionally, it’s important to store the tool in a secure location to prevent unauthorized use or damage. Regular maintenance and care will help maximize the performance and lifespan of the PEX clamp tool.

Conclusion
When using a PEX clamp tool, it is essential to follow the manufacturer’s instructions and safety guidelines. This includes properly aligning the clamp with the PEX tubing and fitting, positioning the tool correctly, and applying the appropriate amount of pressure to ensure a tight seal. It is also important to regularly inspect the tool for signs of wear and tear and perform any necessary maintenance to keep it in good working condition.
In conclusion, the PEX clamp tool is an indispensable tool for anyone working with PEX tubing in plumbing and heating applications. It provides a quick, efficient, and reliable method for creating secure connections, ensuring the integrity and performance of the PEX system. PEX clamp tool is indispensable for anyone working with PEX plumbing systems. By understanding their uses, benefits, and how to choose and use them properly, you can ensure the reliability and longevity of your PEX installations. Whether you’re a professional plumber or a DIY enthusiast, investing in a quality PEX clamp tool is a wise decision for any plumbing project.

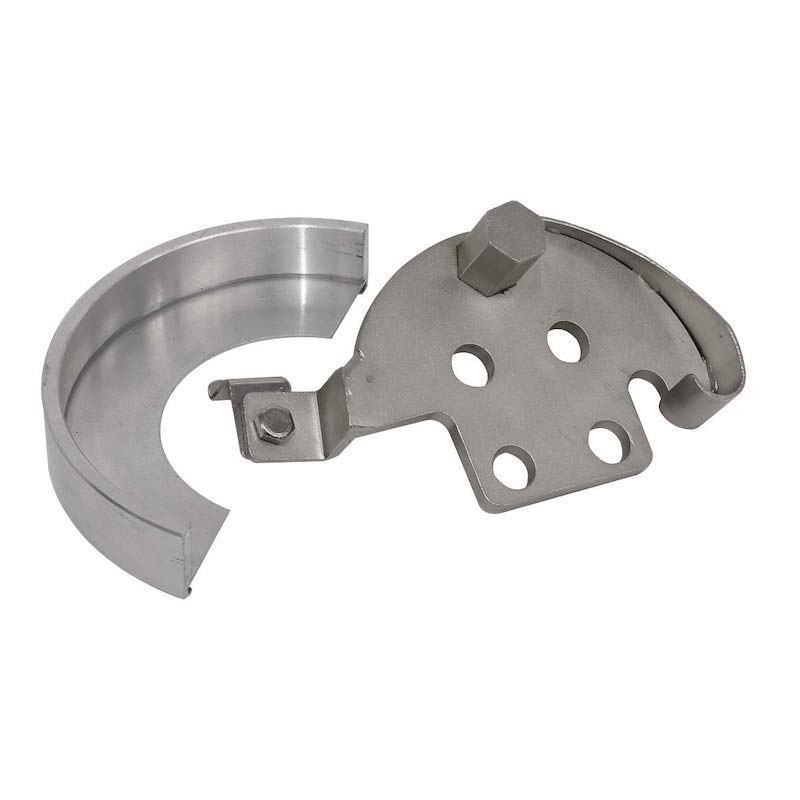
Everything You Need to Know About the Fuel Pump Removal Tool
Introduction
A fuel pump removal tool is a specialized tool used to efficiently and safely remove the fuel pump from a vehicle’s fuel tank. These tools come in a variety of designs and sizes, each intended for use on different vehicle makes and models. They are an essential tool for any mechanic or automotive technician who frequently works on fuel systems.
When it comes to working on a vehicle’s fuel system, having the right tools is essential. One such tool that can make the job much easier is a fuel pump removal tool. Whether you’re a DIY enthusiast or a professional mechanic. Understanding how to use fuel pump removal tools can save you time and effort when it comes to replacing or servicing a fuel pump. We’ll cover everything you need to know about fuel pump removal tools, including their function, types, and how to use them.
Part 1: Understanding the Function of a Fuel Pump Removal Tool
The tool is typically designed to fit onto the fuel pump locking ring. It secures the pump in place within the fuel tank. Once the tool is securely in place, it allows the user to apply leverage and torque to loosen and remove the locking ring. This makes it much easier to access and remove the fuel pump without damage to the surrounding components.
Level 1: What is a fuel pump removal tool?
A fuel pump removal tool is a specialized tool designed to safely and efficiently remove the fuel pump from a vehicle’s fuel tank. It is essential for accessing and replacing the fuel pump without causing any damage to the pump or the surrounding components.
Level 2: How does a fuel pump removal tool work?
Fuel pump removal tools typically feature a set of hooks or arms that are designed to securely grip the fuel pump, allowing it to be lifted out of the fuel tank. These tools are specifically designed to fit the shape and size of the fuel pump, providing a secure hold while it is being removed.

Part 2: Types of Fuel Pump Removal Tools
Level 1: Manual vs. electric fuel pump removal tools
There are two main types of fuel pump removal tools: manual and electric. Manual tools require physical force to remove the fuel pump, while electric tools are powered by an electric motor, making the removal process easier and quicker.
Level 2: Universal vs. vehicle-specific fuel pump removal tools
Fuel pump removal tools also come in universal and vehicle-specific designs. Universal tools are designed to fit a wide range of fuel pump sizes and shapes, while vehicle-specific tools are tailored to fit specific makes and models of vehicles, providing a more precise and secure fit.
Part 3: How to Use a Fuel Pump Removal Tool
Level 1: Preparing the vehicle and workspace
Before using a fuel pump removal tool, it is essential to prepare the vehicle and workspace. This includes disconnecting the vehicle’s battery, relieving fuel system pressure, and safely elevating and supporting the vehicle.
Level 2: Using fuel pump removal tools
To use fuel pump removal tools, carefully lower the tool into the fuel tank and position it securely around the fuel pump. Once in place, carefully lift the fuel pump out of the tank, taking care not to damage any surrounding components. Once removed, the fuel pump can be serviced or replaced as needed.
Part 4: Tips for Choosing the Right Fuel Pump Removal Tool
Level 1: Consider the fuel pump type and vehicle make/model
It’s essential to consider the type of fuel pump and the make and model of the vehicle when choosing a fuel pump removal tool. Different vehicles and fuel pump designs may require different tools to ensure a proper fit and secure removal.
Level 2: Read user reviews and recommendations
Before purchasing a fuel pump removal tool, it can be helpful to read user reviews and recommendations to determine which tool will best meet your needs. Look for tools with positive feedback regarding ease of use, durability, and compatibility with various vehicles.

Benefits of using a fuel pump removal tool
Level 1: Benefits of using a fuel pump removal tool
- Easy and safe removal: Using a dedicated tool designed for fuel pump removal makes the process much easier and safer. It allows for proper positioning and grip, reducing the risk of damage to the fuel pump or surrounding components.
- Time-saving: With fuel pump removal tools, the process of removing the fuel pump becomes faster and more efficient. This is especially useful for professionals who need to work on multiple vehicles in a day.
Level 2: Cost-effective solution
- While some may see dedicated fuel pump removal tools as an additional expense, it can actually save money in the long run. By preventing damage to the fuel pump or surrounding components during removal, it reduces the need for costly repairs or replacements.
- Additionally, the time saved by using fuel pump removal tools can lead to increased productivity and ultimately more income for professionals in the automotive industry.
Types of fuel pump removal tools
Level 1: Types of fuel pump removal tools
- Hand-held claw tools: These are commonly used for removing in-tank fuel pumps. They feature a claw-like design that grips the fuel pump securely, allowing for easy removal without causing damage.
- Slide hammer tools: These tools utilize a slide hammer mechanism to apply force to the fuel pump, allowing for its removal from the fuel tank. They are particularly useful for stubborn or rusted fuel pumps.
Level 2: Specialized fuel pump removal tools
- Some vehicles may have unique fuel pump designs that require specialized removal tools. These tools are often designed to fit specific makes and models, ensuring a precise and secure removal process.
- Furthermore, there are universal fuel pump removal tools that are adjustable and can accommodate a wide range of fuel pump sizes and shapes. These versatile tools are valuable for automotive professionals who work on various vehicles.
Maintenance of fuel pump removal tools
Level 1: Safety tips when using a fuel pump removal tool
- Ensure the vehicle is securely supported on jack stands and the fuel tank is properly depressurized before attempting to remove the fuel pump.
- Use appropriate eye protection and gloves to protect yourself from any fuel, debris, or sharp edges during the removal process.
Level 2: Maintenance of fuel pump removal tools
- After each use, clean the removal tool and inspect it for any signs of wear or damage. Proper maintenance will ensure the tool remains in good working condition for future use.
- Store fuel pump removal tools in a dry and secure location to prevent rust or deterioration. This will prolong the tool’s lifespan and ensure it is ready for use when needed.

Conclusion
In conclusion, a fuel pump removal tool is an essential tool for safely and efficiently removing a vehicle’s fuel pump. Understanding the function, types, and how to use these tools can help you tackle fuel system maintenance and repairs with confidence. By choosing the right tool for your specific vehicle and fuel pump type, you can ensure a smooth and successful removal process. Whether you’re a DIY mechanic or a professional, having quality fuel pump removal tools in your arsenal can save you time and effort when it comes to servicing a vehicle’s fuel system. Fuel pump removal tools are essential pieces of equipment for anyone working on fuel systems in vehicles.
Cam Bearing Tool: How to Choose the Right Tool for Your Needs
Introduction
Cam bearing tools are an essential piece of equipment for anyone working on an engine. Whether you’re a professional mechanic or a DIY enthusiast, having the right cam bearing tool can make the difference between a smooth and successful engine repair and a frustrating and time-consuming experience. In this guide, we’ll explore the different types of cam bearing tools available, how to choose the right tool for your specific needs, and tips for using cam bearing tools effectively.
Part 1: Understanding Cam Bearings
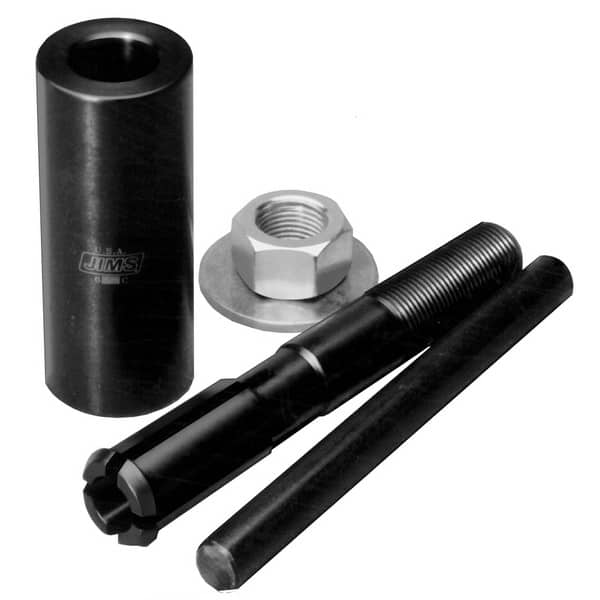
The cam bearing tool is made up of a few components, including an expansion sleeve, a driver, and an installation or removal tool. The expansion sleeve can fit inside the bearing, and when the driver is inserted into the expansion sleeve and tightened. It expands the sleeve to the proper diameter. And allowing it to install the bearing into the engine block. The installation tool is used to drive the bearing into the engine block, while the removal tool is used to extract the bearings from the block.
Level 1: What are cam bearings?
Cam bearings are a crucial component of any engine, as they provide support and reduce friction for the camshaft. They are typically made of durable materials like bronze or steel, and they are designed to withstand the high speeds and extreme temperatures of the engine.
Level 2: Importance of cam bearings
Cam bearings play a vital role in the overall performance and longevity of an engine. Without properly functioning cam bearings, the camshaft can become damaged, leading to costly repairs and potential engine failure.
Part 2: Types of Cam Bearing Tools
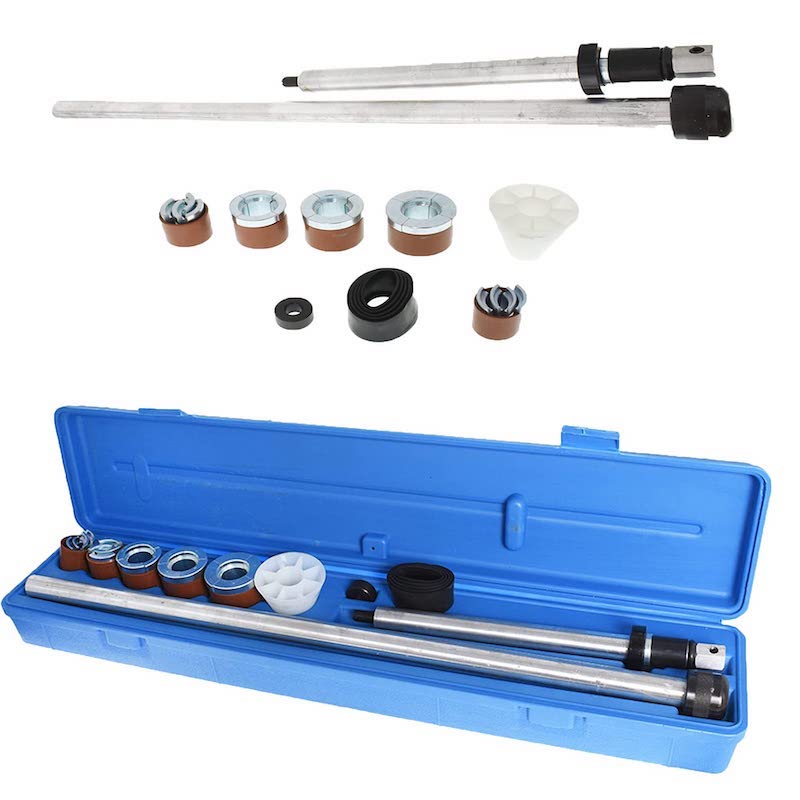
There are different types of cam bearing tools available, including manual and hydraulic versions. The manual version requires hand-operated force to expand the sleeve and drive the bearing into the block, while the hydraulic version uses hydraulic pressure to accomplish the same task. The hydraulic version is often preferred due to its ability to apply more even and controlled force, resulting in more precise bearing installation.
Level 1: Manual cam bearing tools
Manual cam bearing tools are hand-operated and are typically used for smaller engines or occasional use. These tools are simple to use and are a cost-effective option for DIY enthusiasts.
Level 2: Hydraulic cam bearing tools
Hydraulic cam bearing tools use hydraulic pressure to remove and install cam bearings. These tools are ideal for professional mechanics or anyone working on larger engines, as they provide efficient and consistent results.
Part 3: Choosing the Right Cam Bearing Tool
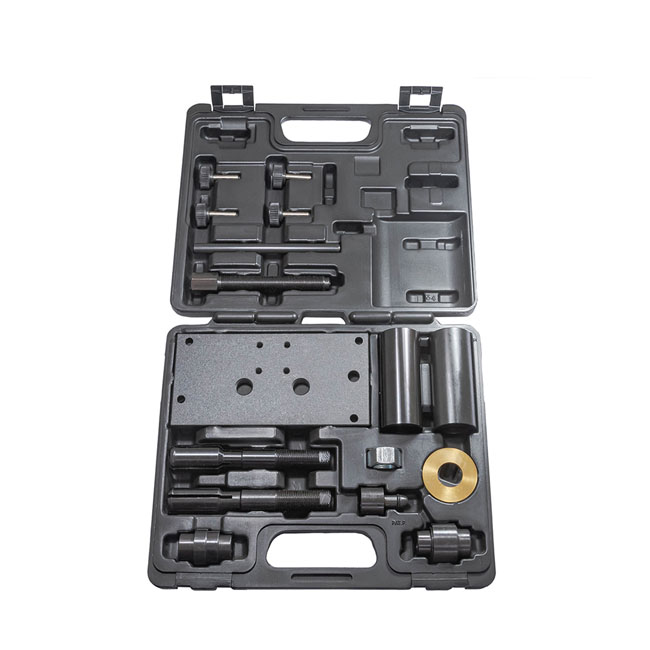
A cam bearing tool is a specialized tool in the automotive industry to install or remove cam bearings in an engine block. These bearings support the camshaft and allow it to rotate smoothly, so it is crucial to have the right tool for the job. The tool typically consists of a series of adapters and a handle to apply pressure and guide the bearing into place. It is designed to fit specific engine models and makes the installation process easier and more precise. Using a cam bearing tool ensures that the bearings are properly seated and aligned, which is essential for the proper functioning of the engine.
Level 1: Consider the size and type of engine
When choosing a cam bearing tool, it’s essential to consider the size and type of engine you’ll be working on. Smaller engines may only require a manual tool, while larger engines will benefit from a hydraulic option.
Level 2: Quality and durability
Investing in a high-quality cam bearing tool is crucial for achieving reliable and precise results. Look for tools made from durable materials and with a reputation for longevity and performance.
Part 4: Tips for Using Cam Bearing Tools Effectively
Level 1: Proper installation techniques
Properly installing cam bearings is essential for the overall performance of the engine. Always follow the manufacturer’s instructions and use the appropriate tools for the job.
Level 2: Regular maintenance and cleaning
Keeping your cam bearing tools clean and well-maintained will ensure they continue to perform at their best. Regularly inspect the tools for any signs of wear or damage and replace any worn components as needed.
Part 5: Slide Hammer Cam Bearing Tool
Level 1: Cam Bearing Tool Types
There are several types of cam bearing tools available on the market, each designed for specific applications and engine types.
Level 2: Roller Style Cam Bearing Tool
One popular type of cam bearing tool is the roller style, which features rolling elements that allow for easier insertion and removal of cam bearings. This type of tool in high-performance engine builds where precision and ease of use are essential.
Level 3: Slide Hammer Cam Bearing Tool
Another type of cam bearing tool is the slide hammer style, which utilizes a hammering action to remove stubborn cam bearings. This tool is ideal for situations.
Part 6: Identifying Cam Bearing Sizes
Level 1: Understanding Cam Bearing Tool Sizes
It’s important to select the correct size cam bearing tool for your specific engine application in order to ensure proper fit and function.
Level 2: Identifying Cam Bearing Sizes
Before purchasing a cam bearing tool, it’s crucial to identify the size of the cam bearings in your engine. This can usually be done by referencing the engine’s specifications or by measuring the dimensions of the existing cam bearings.
Level 3: Selecting the Right Tool Size
Once you have determined the size of the cam bearings in your engine, you can select the appropriate cam bearing tool size for insertion and removal. Using the correct size tool will ensure a proper fit, preventing damage to the bearings or the engine block.
Part 8: Maintenance and Care for Cam Bearing Tools
Level 1: Maintenance and Care for Cam Bearing Tools
Proper maintenance and care of cam bearing tools is essential for optimal performance and longevity.
Level 2: Cleaning and Lubrication
After each use, cam bearing tools should be thoroughly cleaned to remove any debris or contaminants. Additionally, applying a light coating of lubricant to the tool’s surface can prevent rust and corrosion, ensuring smooth operation for future use.
Level 3: Storage
When not in use, cam bearing tools can prevent damage and maintain their precision. Proper storage can also prevent wear and extend the lifespan of the tool.

Conclusion
Using a cam bearing tool is important for a few reasons. This is crucial for maintaining the integrity of the engine and ensuring that it performs optimally. Additionally, using the tool allows for more precise bearing installation, which is essential for reducing friction, prolonging the life of the bearings, and maximizing engine performance.
Overall, the cam bearing tool is an essential piece of equipment for anyone involved in engine rebuilding or maintenance. Especially for those working on high-performance engines. Engine builders and mechanics can ensure that camshaft bearings are installed or removed with precision and care. And leading to better engine performance and longevity.
Cam bearing tool is an essential piece of equipment for anyone working on an engine, and choosing the right tool for your needs is crucial for achieving the best results. By understanding the different types of cam bearing tools available. Considering the size and type of engine you’ll be working on. Following proper installation techniques and maintenance tips. You can ensure that your engine repairs are smooth and successful. With the right cam bearing tool in hand, you can tackle any engine repair with confidence and precision.
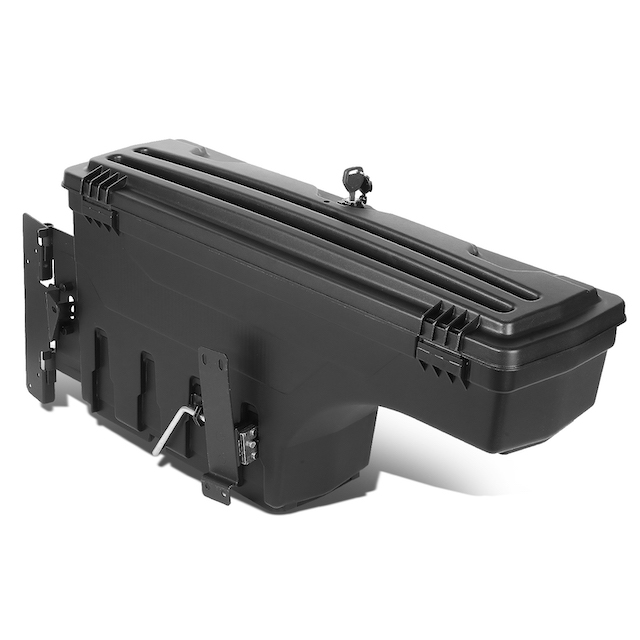
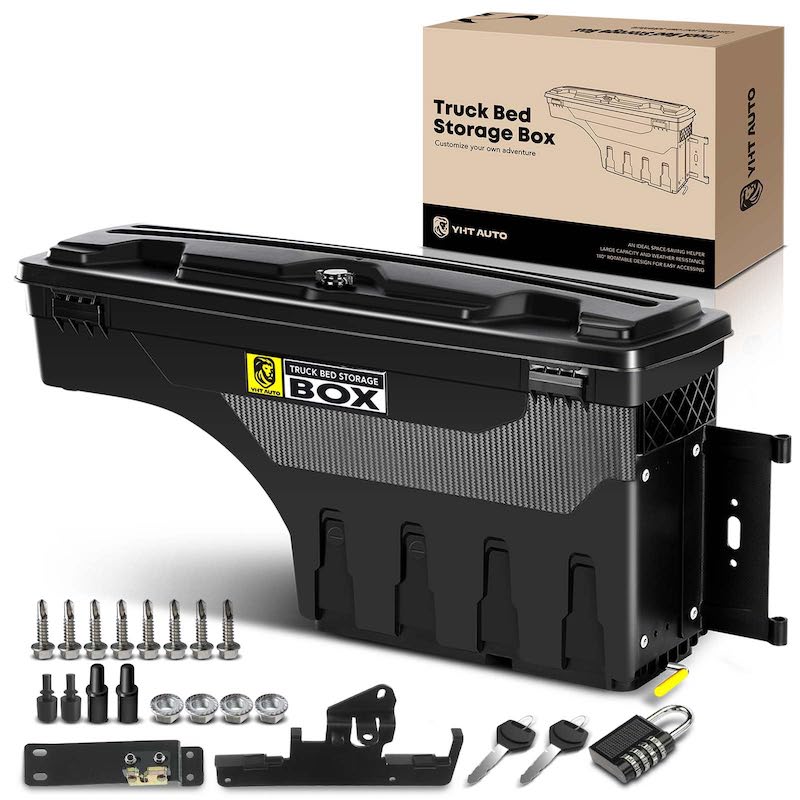
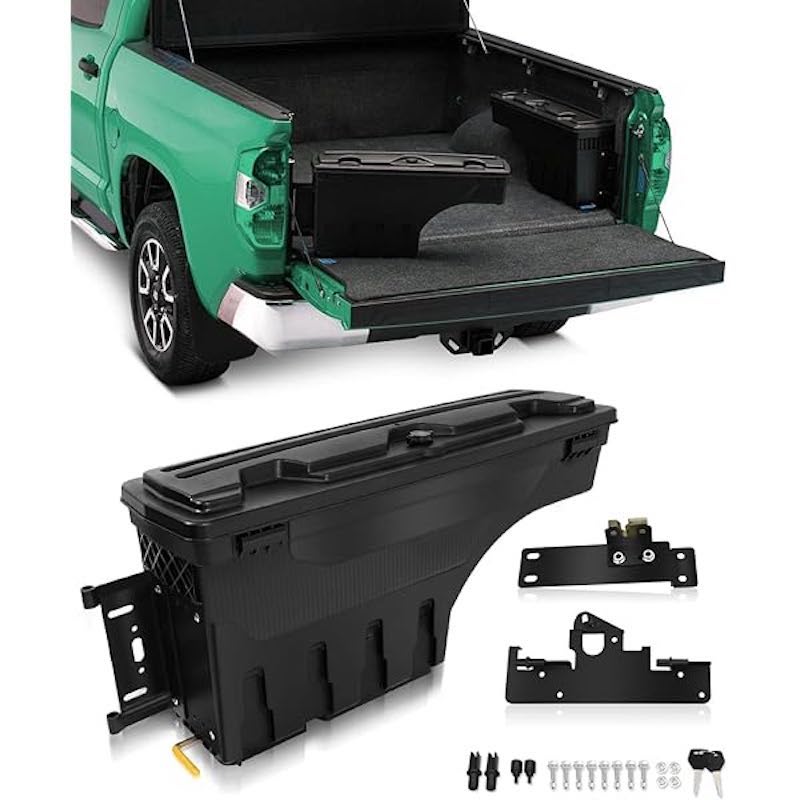
The Ultimate Guide to Tacoma Tool Box
Part 1: Introduction to Tacoma Tool Boxes
If you are a truck owner, you understand the importance of having a reliable and durable tool box to keep your equipment safe and organized. One of the most popular choices for truck owners is the Tacoma tool box. Known for its high-quality construction and innovative design, Tacoma tool boxes are a must-have for anyone who needs to transport and store tools and equipment.
One of the key benefits of a Tacoma tool box is its organization capabilities. These tool boxes often come with drawers, shelves, and compartments to keep tools of different sizes and shapes organized and easily accessible. This can be particularly beneficial for professionals who need quick access to specific tools while on a job site.
Level 1 Content: In this article, we will explore the various features and benefits of Tacoma tool boxes, as well as provide recommendations for the best models available on the market.
Level 2 Content: We will also discuss the different types of Tacoma tool boxes, including crossover, chest, and side mount options, and how to choose the right one for your specific needs.
Part 2: Benefits of Tacoma Tool Boxes
Tacoma tool boxes offer a wide range of benefits for truck owners. From increased storage capacity to enhanced security, these tool boxes are essential for anyone who relies on their truck for work or recreation. In addition to organization, Tacoma tool boxes also provide security for valuable tools. The lockable lids and durable construction of these boxes help prevent theft and protect tools from damage during transport. This added security can give peace of mind to truck owners who need to leave their tools unattended.
Another advantage of a Tacoma tool box is its ability to maximize the space in a truck bed. By using a tool box, the area underneath and around the box can still be used to transport larger items, such as building materials or equipment. This makes the tool box a versatile and practical addition to a Tacoma truck.
Level 1 Content: In this section, we will discuss the primary benefits of Tacoma tool boxes, including their durability, weather-resistant construction, and secure locking mechanisms.
Level 2 Content: Additionally, we will explore how Tacoma tool boxes can help organize and protect your tools and equipment, as well as how they can improve the overall efficiency of your truck.
Part 3: Types of Tacoma Tool Boxes
There are several different types of Tacoma tool boxes to choose from, each with its own unique features and advantages. Understanding the differences between these options will help you make an informed decision when selecting the right tool box for your truck.
Level 1 Content: In this section, we will provide an overview of the various types of Tacoma tool boxes, including crossover, chest, and side mount models, and their key characteristics.
Level 2 Content: Additionally, we will discuss the specific use cases for each type of tool box and offer recommendations for the best models within each category.
Part 4: Choosing the Right Tacoma Tool Box
Selecting the right Tacoma tool box for your truck involves considering a variety of factors, including size, construction materials, and additional features. By understanding your specific needs and preferences, you can make a well-informed decision when purchasing a tool box for your truck.
Level 1 Content: In this section, we will outline the key considerations for choosing the right Tacoma tool box, such as size, compatibility with your truck bed, and preferred mounting style.
Level 2 Content: We will also provide tips for evaluating the quality and durability of Tacoma tool boxes, as well as how to assess additional features such as built-in tool trays, integrated lighting, and advanced security options.
Part 5: Best Tacoma Tool Boxes on the Market
With numerous options available, it can be challenging to determine which Tacoma tool boxes are the best for your specific needs. To help you narrow down your choices, we have compiled a list of the top-rated and highly recommended Tacoma tool boxes currently available on the market.
Level 1 Content: In this section, we will showcase the best Tacoma tool boxes based on customer reviews, expert recommendations, and key features such as durability, security, and overall value.
Level 2 Content: Additionally, we will provide in-depth reviews and comparisons of the top Tacoma tool boxes, including their specifications, pros and cons, and real-world performance in various trucking applications.
Part 6: Weatherproof Design
Many Tacoma tool boxes are weatherproof, keeping your tools and equipment safe from the elements. This is especially important for those who work outdoors or in harsh conditions, as it ensures your tools remain dry and in good working condition.
Part 7: Easy Installation
Tacoma tool boxes are typically designed for easy installation, with many models featuring a no-drill installation process. This means you can easily and securely attach the tool box to your truck bed without the need for any specialized tools or equipment.
Tacoma tool boxes are designed specifically for Toyota Tacoma trucks, offering a convenient and secure way to store and transport tools and other equipment. They are made from high-quality materials such as aluminum or heavy-duty steel, ensuring durability and longevity.
Tacoma tool boxes come in a variety of styles and configurations, including crossover, side-mount, and chest designs, allowing truck owners to choose the best option for their needs. Many Tacoma tool boxes feature locking mechanisms to prevent theft and keep contents secure while on the road.
Part 8: Secure Storage
One of the main benefits of a Tacoma tool box is the secure storage it provides for your tools and equipment. Many tool boxes feature locks to keep your items safe and secure, providing peace of mind when leaving your tools unattended. Additionally, the sturdy construction of these tool boxes ensures your tools and equipment remain protected, even on rough roads or bumpy terrain.
A Tacoma tool box is a valuable investment for anyone who needs to transport and organize tools in their truck. These boxes offer security, organization, and space-saving benefits that can make any job or project more efficient and convenient. With the right tool box, truck owners can ensure that their tools are always on hand and ready for use whenever they are needed.

Conclusion
A Tacoma tool box is an essential piece of equipment for anyone who needs to store and organize their tools. These tool boxes can fit seamlessly into the bed of a Toyota Tacoma pickup truck, providing a secure and convenient way to transport and access tools on the go.
Tacoma tool boxes come in a variety of sizes and styles to accommodate different needs. They are typically made of heavy-duty aluminum or steel to withstand the rigors of transportation and protect the tools inside. The boxes are also weather-resistant, with features such as weather-stripping and automotive-grade locks to keep out moisture and keep tools secure.
A Tacoma tool box is an essential accessory for any truck owner who needs to transport and store tools and equipment. Understanding the various types, benefits, and considerations when choosing a tool box. You can make an informed decision and find the perfect solution for your specific needs. Whether you require additional storage, enhanced security, or improved organization for your truck, a Tacoma tool box offers a reliable and durable solution to meet your requirements.

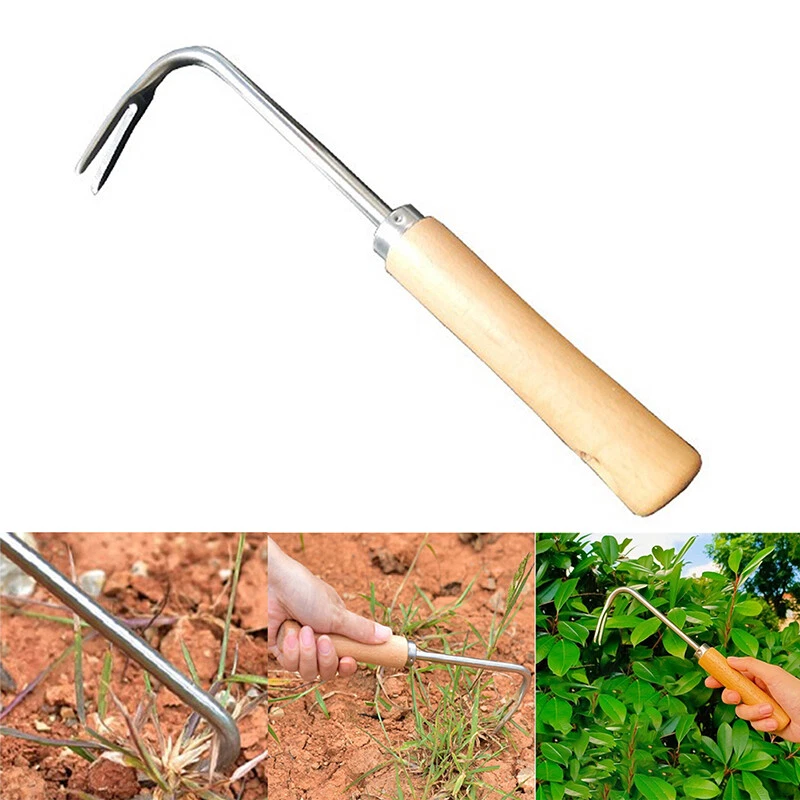
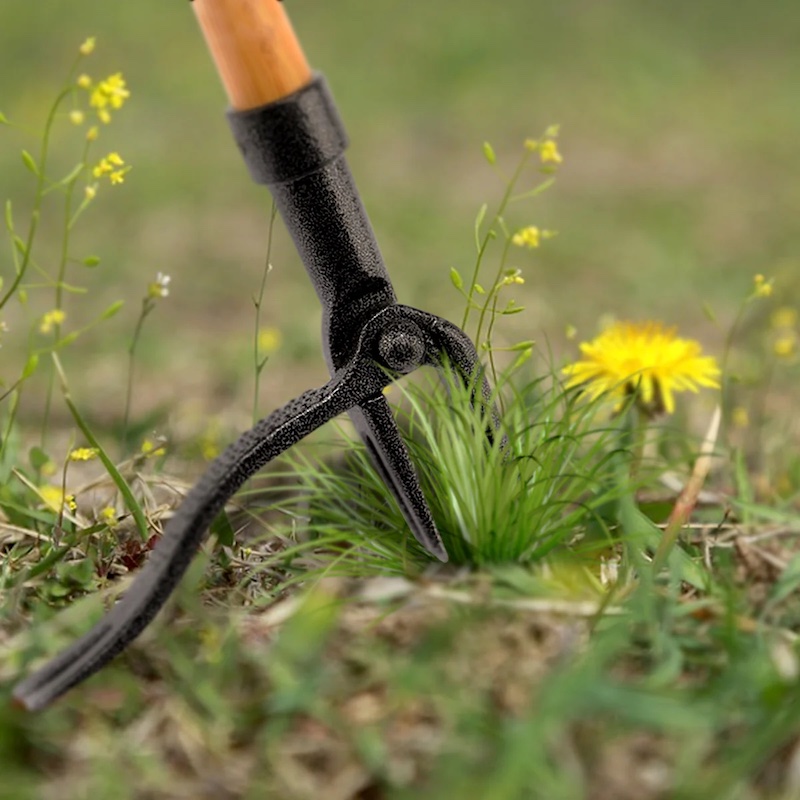
The Ultimate Guide to Weeder: Everything You Need to Know
Introduction
One of the main benefits of using a weeder is that it allows for efficient and targeted removal of unwanted plants. This can help prevent competition for resources and reduce the spread of invasive species, ultimately promoting the health of desired vegetation. Additionally, using a weeder is a more environmentally friendly alternative to using chemical herbicides, which can have negative impacts on surrounding plants and wildlife.
Weeder is a versatile gardening tool that can help you maintain your garden and keep it free from weeds. Whether you have a small backyard garden or a large plot of land, a quality weeder can make the task of removing weeds much easier and more efficient. In this blog post, we will explore the different types of weeders, how to use them effectively, and some tips for maintaining a weed-free garden.
Part 1: Understanding the Different Types of Weeders
Level 1: Handheld Weeders
Handheld weeders are small, handheld tools that are designed to remove individual weeds from the ground. There are several different types of handheld weeders, including fishtail weeders, dandelion weeders, and cobra head weeders. Each type of handheld weeder is designed for a specific type of weed and can be used to target weeds in tight spaces or between plants.
Level 2: Stand-Up Weeders
Stand-up weeders are long-handled tools that allow you to remove weeds from a standing position, reducing strain on your back and knees. These weeders typically have a sharp blade or claw at the end that can be pushed into the ground to grab hold of the weed and pull it out. Some stand-up weeders also feature a foot pedal that allows you to apply extra pressure to the weed for easier removal.
Level 3: Types of Weeders
There are various types of weeders available, including handheld tools with prongs or claws for precision removal of individual weeds, as well as long-handled tools with blades or hooks for larger, more widespread weed removal. Some weeders also come with ergonomic handles or other ergonomic features to reduce strain on the user’s body during prolonged use. Different types of weeders are suitable for different tasks and environments, so it’s important to choose the right tool for the job.

Part 2: Using Weeders Effectively
When using a weeder, it’s important to do so safely to prevent injury to yourself or damage to surrounding plants. This includes wearing appropriate protective gear such as gloves and eye protection, as well as being mindful of your surroundings and any nearby people or animals. It’s also important to use the weeder in accordance with the manufacturer’s instructions and to avoid overexerting yourself, especially when using long-handled tools that require physical exertion.
Level 1: Proper Technique
Using a weeder effectively begins with proper technique. When using a handheld weeder, it’s important to wear gloves to protect your hands and use the tool to dig deep into the soil around the base of the weed. For stand-up weeders, it’s important to position the tool directly over the weed and apply steady pressure to ensure the weed is fully removed from the ground.
Level 2: Timing Is Key
Timing is also an important factor when using a weeder. It’s best to remove weeds when the soil is moist, as this makes it easier to pull them out. Additionally, it’s best to remove weeds when they are small and have not yet gone to seed, as this can prevent them from spreading and proliferating in your garden.
Part 3: The Benefits of Using a Weeder
Level 1: Weed Control
One of the primary benefits of using a weeder is weed control. By regularly removing weeds from your garden, you can prevent them from competing with your plants for water, nutrients, and sunlight. This can help your plants to thrive and produce a better yield.
Level 2: Eco-Friendly
Using a weeder is also an eco-friendly way to control weeds, as it eliminates the need for chemical herbicides that can be harmful to the environment and wildlife. By using a weeder to manually remove weeds, you can maintain a healthy and sustainable garden without relying on harmful chemicals.
Part 4: Maintaining a Weed-Free Garden
Proper maintenance is essential for keeping a weeder in good working condition. This includes regularly cleaning the tool to remove any debris or sap that may accumulate and cause it to become less effective. Additionally, sharpening any cutting elements and lubricating moving parts can help ensure smooth and efficient operation. Storing the weeder in a dry, protected area when not in use can also help extend its lifespan.
Level 1: Regular Inspections
To maintain a weed-free garden, it’s important to regularly inspect your garden for any signs of weeds. By catching weeds early, you can prevent them from spreading and taking over your garden.
Level 2: Mulching
Mulching your garden can also help to prevent the growth of weeds. By adding a layer of mulch around your plants, you can smother any potential weeds and prevent them from sprouting.
Part 5: Tips for Choosing the Right Weeder
Level 1: Consider Your Garden Size
When choosing a weeder, it’s important to consider the size of your garden. For smaller gardens with tight spaces, a handheld weeder may be more practical. For larger gardens, a stand-up weeder with a long handle can make the task of removing weeds much easier.
Level 2: Quality Matters
It’s also important to invest in a high-quality weeder that is durable and built to last. Look for weeders made from sturdy materials, such as stainless steel, and consider the warranty and customer reviews before making a purchase.

Part 6: Weeder’s User-Friendly Design
Level 1: Easy to Use
Weeder is designed with the user in mind, making it easy for anyone to operate. Its intuitive controls and simple interface allow for seamless operation, making it suitable for both experienced and novice gardeners. The user-friendly design ensures that anyone can effectively weed their garden without any special training or expertise.
Level 2: Ergonomic Features
In addition to being easy to use, Weeder also prioritizes user comfort. Its ergonomic design reduces strain on the user’s hands and wrists, allowing for extended periods of use without discomfort. The lightweight construction and balanced weight distribution further ensure that using Weeder is a comfortable and enjoyable experience for all.
Part 7: Versatile Application
Level 1: Compatible with various garden types
Weeder is not limited to a specific type of garden but is versatile enough to be used in various settings. Whether you have a small backyard garden, a large vegetable plot, or a landscaped yard, Weeder is adaptable to different terrains and garden layouts. Its versatility makes it a valuable tool for any gardener looking to maintain a weed-free garden.
Level 2: Multi-functional Design
Weeder is more than just a weeding tool; it also serves multiple functions in the garden. Its sharp edges can be used for precision planting, cutting through tough roots, or cultivating the soil. With its multi-functional design, Weeder offers a range of uses that make it an essential tool for any gardener.

Part 8: Environmental Benefits
Level 1: Chemical-free weeding
Using Weeder in the garden eliminates the need for chemical weed killers, reducing the use of harmful substances in the environment. By opting for a natural and manual weeding method, gardeners can contribute to a healthier ecosystem and reduce their environmental impact. Weeder promotes sustainable gardening practices by providing a safe and eco-friendly alternative to chemical weed control.
Level 2: Weed Prevention
In addition to removing existing weeds, Weeder also helps prevent the spread of new weeds. By regularly using Weeder to uproot young weeds before they mature and scatter seeds, gardeners can effectively control the weed population in their garden. This proactive approach to weed prevention contributes to a healthier and more vibrant garden environment.
Conclusion
Weeders can also be categorized based on their method of weed removal. Some weeders rely on mechanical means, such as blades, disks, or tines, to uproot or cut off weeds from the soil. Others use chemical means, such as herbicides or pesticides, to kill the weeds without harming the main crops. There are also thermal weeders that use heat to kill weeds, and electric weeders that use electricity to kill weeds.
In conclusion, using a weeder is an effective way to maintain a weed-free garden and keep your plants healthy and thriving. By understanding the different types of weeders, using them effectively, and following some maintenance tips, you can enjoy a beautiful and sustainable garden all season long. When choosing a weeder, be sure to consider your garden size and invest in a high-quality tool that will make the task of weed removal much easier. With the right weeder and some regular maintenance, you can enjoy a lush and weed-free garden for years to come.
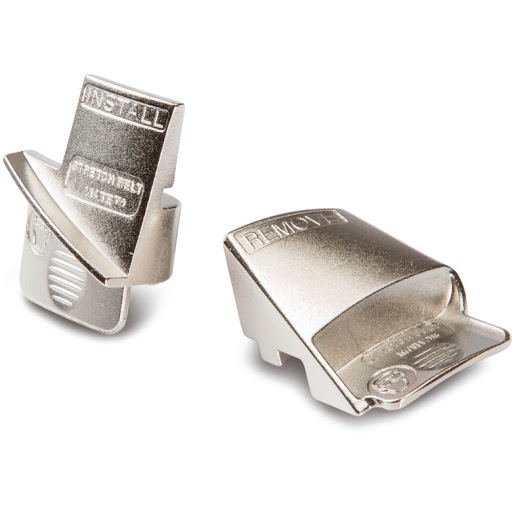
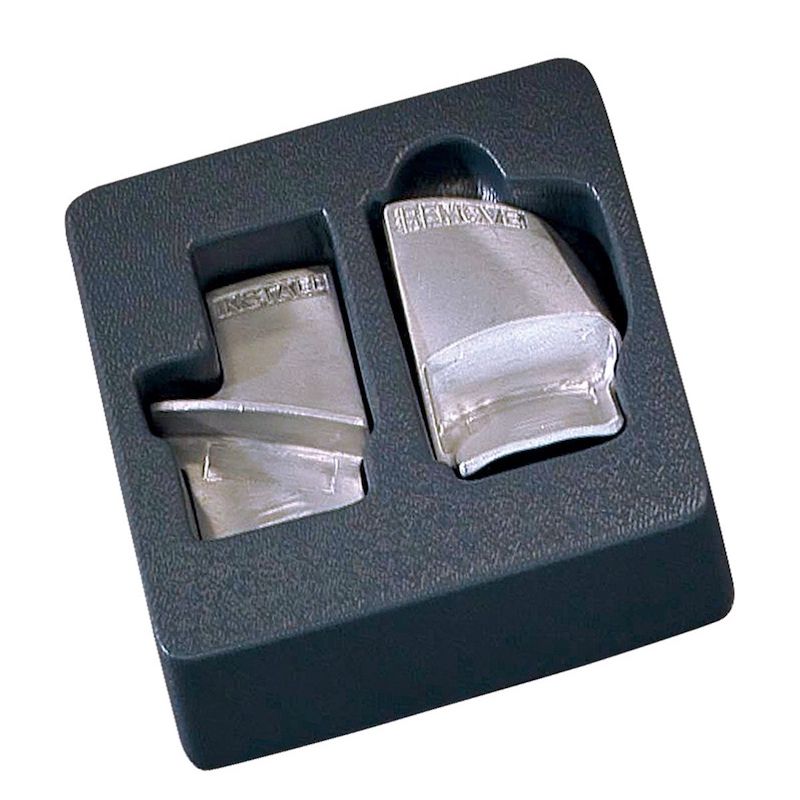
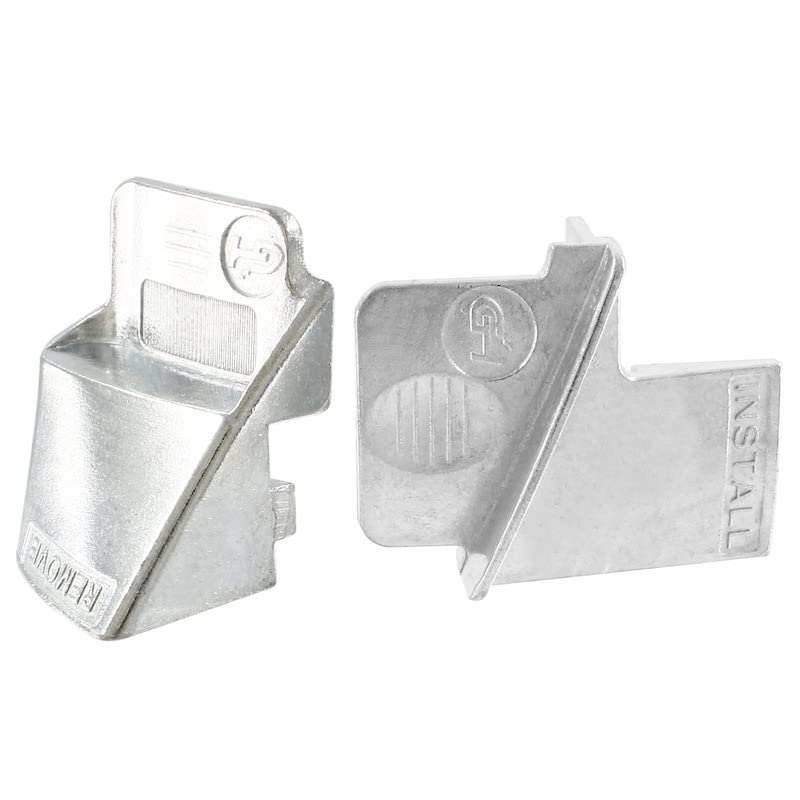
All You Need to Know About the Stretch Belt Tool
Introduction
A stretch belt tool is a handy device used for installing and removing stretch belts on various automotive applications. Stretch belts, also known as elastic belts or serpentine belts, are used in modern engines to drive several components such as the alternator, water pump, power steering pump, and air conditioning compressor. These belts do not have any tensioner or adjustment pulley and rely on their elasticity to maintain proper tension. This unique design requires a different approach when installing or removing them, and this is where a stretch belt tool comes in.
In the world of automotive repairs, having the right tools for the job is essential. One such tool that is commonly used in the repair and maintenance of vehicles is the stretch belt tool. This handy device is designed to assist in the installation and removal of stretch belts, making the process much easier and more efficient. In this article, we will explore the ins and outs of stretch belt tools, including its uses, benefits, and how to choose the right one for your needs.
Part 1: What is a Stretch Belt Tool?
In addition to installation, a stretch belt tool can also be essential for removing a stretch belt without damaging it or the surrounding components. The tool allows for controlled stretching of the belt, making it easier to slip off the pulleys without the risk of sudden release and potential injury.
Stretch belt tools is the valuable addition to any automotive technician’s toolbox. It makes the task of working with stretch belts much more manageable and safer, ensuring proper tension and reducing the risk of damage or injury. Whether in a professional garage or home workshop, a stretch belt tool is a worthwhile investment for anyone working on vehicles equipped with stretch belts.
Level 1: The basics of a stretch belt tool
A stretch belt tool is a specialized tool that is used to install and remove stretch belts on a vehicle’s engine. These belts are commonly found in modern vehicles and are designed to provide a more secure and efficient means of transferring power from the engine to various components, such as the alternator, water pump, and air conditioning compressor.
Level 2: How stretch belt tools work
The stretch belt tool works by allowing the user to easily stretch the belt and slip it over the pulleys. Eliminating the need for excessive force or the risk of damaging the belt. The tool typically consists of a handle and a set of arms that can be adjusted to fit the specific size and shape of the stretch belt being installed or removed.
Part 2: Uses of a Stretch Belt Tool
Level 1: Installing stretch belts
One of the primary uses of stretch belt tools is for installing stretch belts onto a vehicle’s engine. This process can be quite difficult and time-consuming without the proper tool, as the belts need to be stretched over the pulleys in a precise and controlled manner.
Level 2: Removing stretch belts
In addition to installing stretch belts, the stretch belt tool is also used for removing them. This can be equally challenging without the right tool, as the stretch belts can become tightly wedged onto the pulleys. Making them difficult to remove by hand.
Part 3: Benefits of Using a Stretch Belt Tool
Level 1: Time-saving
Using stretch belt tools can save a significant amount of time when installing or removing stretch belts. The tool allows for quick and easy maneuvering of the belt. Eliminating the need for multiple attempts to get it in place.
Level 2: Preventing damage
When installing or removing stretch belts without a proper tool, there is a risk of damaging the belt or the pulleys. The stretch belt tool helps to prevent such damage by providing a controlled and even distribution of force during the process.
Part 4: Choosing the Right Stretch Belt Tool
Level 1: Consider the size and shape of the belt
When choosing stretch belt tools, it is important to consider the size and shape of the stretch belts you will be working with. Different tools can accommodate different belt sizes and configurations, so be sure to choose one that is suitable for your specific needs.
Level 2: Quality and durability
The quality and durability of the stretch belt tools are also important factors to consider. Look for a tool that is made from high-quality materials and is designed to withstand the rigors of frequent use.
Part 5: Tips for Using a Stretch Belt Tool
Level 1: Familiarize yourself with the tool
Before using stretch belt tools, take the time to familiarize yourself with its features and how it operates. This will help to ensure that you use the tool correctly and safely.
Level 2: Follow the manufacturer’s instructions
Always follow the manufacturer’s instructions when using stretch belt tools. This will help to prevent damage to the tool or the belts, and ensure that the process is carried out effectively.
Part 6: Benefits of Using a Stretch Belt Tool
Level 1: Increased Efficiency
Using stretch belt tools can significantly improve the efficiency of belt replacement. The tool can properly tension the belt, ensuring that it is installed correctly. This can reduce the risk of potential damage to the belt and other engine components, saving time and money on future repairs.
Level 2: Versatility
The stretch belt tools is the versatile piece of equipment on a wide range of vehicles. Whether you are working on a car, truck, or SUV, having stretch belt tools in your arsenal can make the belt replacement process much easier and more precise. This versatility makes it a valuable tool for mechanics and DIY enthusiasts alike.
Part 7: Tips for Using a Stretch Belt Tool
Level 1: Read the Instructions
Before using stretch belt tools, it is important to carefully read the instructions that come with the tool. Different tools may have varying methods of use. So it’s crucial to understand the specific guidelines for the tool you are using.
Level 2: Inspect the Belt
Before using stretch belt tools, inspect the belt for any signs of wear or damage. It’s important to replace the belt if there are any issues, as using a damaged belt with the tool can lead to further complications. By ensuring the belt is in good condition, you can maximize the effectiveness of stretch belt tools.
Part 8: Maintenance of a Stretch Belt Tool
Level 1: Regular Cleaning
To maintain the functionality of stretch belt tools, it’s important to keep it clean and free of debris. Regularly wipe down the tool with a clean cloth and, if necessary, use a small brush to remove any build-up in the mechanism.
Level 2: Lubrication
Proper lubrication is essential for the smooth operation of stretch belt tools. Applying a small amount of lubricant to the moving parts of the tool can reduce friction and extend its lifespan. It’s important to use a lubricant that is compatible with the material of the tool to prevent damage. Regularly inspecting and maintaining the tool will ensure it remains in good working condition for future use.
Conclusion
The tool typically consists of a pair of prongs that securely grip the belt and a handle that allows the user to stretch the belt and slip it over the appropriate pulleys easily. The prongs can accommodate the width of the belt and ensure a tight grip without damaging or deforming the belt. Some models may also feature a ratcheting mechanism that allows for a more controlled and precise stretching of the belt.
The stretch belt tools is the valuable asset for anyone working on modern vehicles that utilize stretch belts. It offers a quick, efficient, and safe means of installing and removing these belts. Ultimately saving time and preventing unnecessary damage. Understanding the uses, benefits, and how to choose and use right stretch belt tools. You can make your automotive repair and maintenance tasks much easier and more successful.
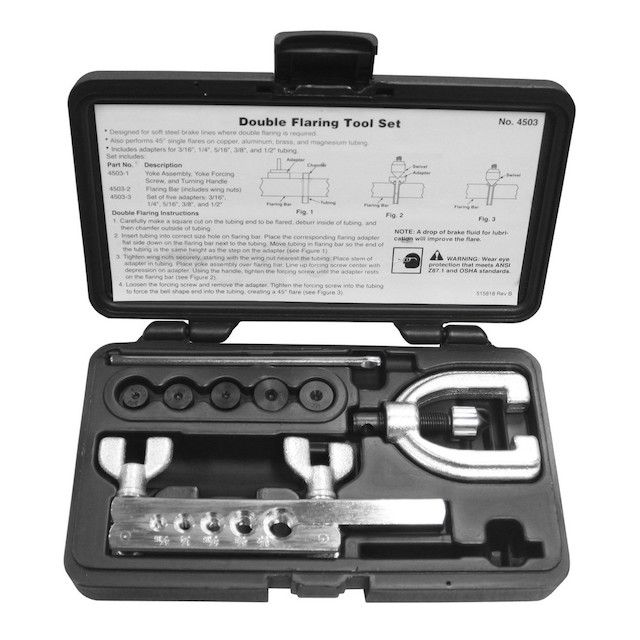
Everything You Need to Know About the Double Flare Tool
Introduction
A double flare tool is a specialized tool used in the automotive and plumbing industries to create double flares on metal tubing. A double flare is a type of flare used to connect metal tubing or pipes in automotive brake and fuel line systems, as well as in hydraulic and pneumatic systems.
The double flare tool works by placing the end of the metal tubing into the clamp of the tool and then turning a handle that presses a flaring cone into the tubing. The cone reshapes the end of the tube to create a 45-degree double flare, which provides a secure and leak-proof connection when joining two pieces of tubing together.
Double flare tools are the essential piece of equipment for anyone working on automotive brake or fuel line systems. This tool allows for the precise formation of double flares, which are necessary for ensuring a secure and leak-proof connection. In this article, we will explore the different types of double flare tools, their uses, and maintenance, as well as provide tips for using them effectively.
Part 1: Understanding the Double Flare Tool
Level 1: What is a double flare tool?
At its core, a double flare tool is a device used to create a double flare on the end of a metal tube. This flare provides a strong and secure connection point for brake or fuel lines. The double flare consists of two folds along the edge of the tube, providing additional strength and resistance to leaks.
Level 2: Types of double flare tools
There are two primary types of double flare tools: handheld and hydraulic. Handheld tools are more common for at-home use and are often compact and affordable. Hydraulic tools, on the other hand, are typically used in professional settings and provide consistent, high-quality flares.

Part 2: Uses of Double Flare Tools
Level 1: Automotive applications
Double flare tools are predominantly used in automotive applications, specifically for creating secure connections in brake and fuel lines. These lines are critical to the safe operation of a vehicle, making the use of a double flare tool essential for anyone working on their own car maintenance or repairs.
Level 2: Industrial applications
In addition to automotive use, double flare tools are also used in industrial settings where metal tubing is commonly utilized. This may include applications in manufacturing, construction, or other mechanical systems where precise and secure connections are necessary.
Part 3: Maintenance of Double Flare Tools
Level 1: Regular inspection
To ensure the continued effectiveness of a double flare tool, it is essential to perform regular inspections. This includes checking for any signs of wear or damage that may affect the quality of the flares produced.
Level 2: Lubrication and cleaning
Keeping the double flare tool clean and well-lubricated is important for smooth operation and to prevent any sticking or binding of the components. Regular cleaning and lubrication will help extend the lifespan of the tool.
Part 4: Tips for Using a Double Flare Tool
Level 1: Proper tube preparation
Before using a double flare tool, it is crucial to properly prepare the end of the tubing. This may include cutting the tube to the correct length and deburring the edges to ensure a clean and consistent flare.
Level 2: Technique and precision
Using double flare tools requires a steady hand and attention to detail. Applying consistent pressure and following the proper technique will result in high-quality double flares that provide a secure and leak-proof connection.
Part 5: Using a Double Flare Tool
Level 1: Setting up the tool
To begin using a double flare tool, you will need to set it up properly. Start by selecting the correct size die for the tubing you are working with. This will ensure that the flare is formed to the appropriate specifications. Then, insert the die into the clamp and securely tighten it in place. Next, adjust the depth stop to control the depth of the flare.
Level 2: Creating the flare
Once the tool is set up, you can begin creating the double flare. Start by placing the tubing into the tool and aligning it with the clamp. Then, use the handle to slowly apply pressure to the tubing, which will begin to form the flare. It’s essential to apply even pressure to ensure that the flare is formed symmetrically. Once the flare is formed, carefully remove the tubing from the tool and inspect the double flare for any imperfections.
Part 6: Tips for Using a Double Flare Tool
Level 1: Proper tube preparation
Before using a double flare tool, it’s crucial to prepare the tubing properly. This includes cutting the tubing to the correct length and deburring the inside and outside edges to prevent any imperfections in the flare. Additionally, it’s essential to ensure that the tubing is clean and free of any debris before inserting it into double flare tools.
Level 2: Practice and patience
Creating a perfect double flare takes practice and patience. It’s essential to start with scrap tubing to get a feel for the process before working on actual brake or fuel lines. Additionally, taking your time and applying consistent pressure when using the double flare tool will help to produce a clean and symmetrical flare. It’s better to take the time to do it right than rush and end up with a flawed flare.
Part 7: Maintenance and Care for Double Flare Tools
Level 1: Cleaning and lubrication
After each use, it’s important to clean and lubricate your double flare tools to ensure its longevity and performance. Use a rag to wipe away any debris or metal shavings from the tool’s components and apply a light coating of oil to any moving parts to prevent rust and corrosion.
Level 2: Storage
Properly storing your double flare tool is essential to keep it in good working condition. It’s best to keep it in a dry and clean environment to prevent rust and corrosion. Additionally, consider investing in a protective case or box to keep the tool safe from any potential damage or accidents. Regularly inspect the tool for any signs of wear or damage, and address any issues promptly to keep it functioning properly.

Conclusion
Double flare tools come in various sizes to accommodate different diameter tubing, and some models also include additional features such as a tubing cutter and deburring tool to ensure a clean and precise flare. It is important to use the correct size of the double flare for the specific type and size of tubing being used in order to create a proper and secure double flare.
When using a double flare tool, it is important to follow the manufacturer’s instructions carefully to ensure the proper technique and achieve the best results. Using the tool incorrectly can result in a weak or improperly formed flare. It can lead to leaks and compromises the safety and integrity of the system.
The double flare tool is an indispensable piece of equipment for anyone working with metal tubing, particularly in automotive and industrial applications. By understanding its uses, maintenance, and proper techniques for use, individuals can ensure the safety and reliability of their connections. Incorporating double flare tools into regular maintenance and repair work will result in strong and durable tubing connections. Providing peace of mind and confidence in the integrity of the system.